Playing Classic Traveller in the Detroit area

May 3rd, 2019

We finally got a campaign of “Classic” Traveller rolling in the metropolitan Detroit, Michigan, area. What, you may ask, is Classic Traveller? You may have heard of Dungeons & Dragons? Well, Traveller was the role-playing science-fiction game equivalent of D&D, except that Traveller was set in outer space, in the far future. The Traveller game was originally the brainchild of Marc W. Miller (with help from a number of other folks) and was originally published by Game Designers’ Workshop (GDW) in 1977 AD (earth years, not to be confused with dates of the Imperium in the Traveller game). Traveller was originally published as “Little Black Books” (LBBs) as they were all pamphlet sized and the covers were basically black with some different color trim, depending on the book. Traveller also went through a number of different publishers and versions over the years, but since I already had a lot of the original (i.e., “classic”) Traveller books, that’s the version I decided to run.

While speaking with some of the other boardgamers in our Championship Formula Racing group, I found out that Jack Beckman used to play Traveller in the past (as I did). I was trying to get him to start up a campaign of Traveller, but he still has to work for a living (unlike us retired folks) and so didn’t have time to set anything up. So, I reckoned it was time I got a campaign together.

Traveller Books 1, 2, and 3

Traveller Books 1, 2, and 3

While I owned a goodly number of the LBBs, I didn’t own them all. Not that you need to own them all — you just really need Books 1 (Characters & Combat), 2 (Starships), and 3 (Worlds & Adventures). But I decided to order the entire set of LBBs from Far Future Enterprises, just so I would have all of the books. FFE has made all of the original material available on CD-ROMs, for a reasonable price ($35 for a CD of all of the original GDW books). After buying the Classic Traveller CD, I bought two more, one with a number of third-party products for Traveller by Judges Guild (and others), and one CD with all of the original “Journals of the Travellers’ Aid Society” which had great articles that expanded the Traveller game. Marc Miller, through Far Future Enterprises, is the official home for Traveller, now that GDW is no longer in business.

Of course, one of the things that will make running a game of Traveller difficult, is that the players also have those same resources available. That means that that if I run any published adventures that I will have to make a number of changes to keep the players guessing!

Edit (August 8, 2019): I have since purchased the other “Classic” Traveller CDs from Far Future Enterprises, so now have the entire treasure trove of stuff that was published for Traveller in the late 1970s and early 1980s (and some later stuff, too).

CFR-Detroit 2019 Race #1 – Australian Grand Prix

March 19th, 2019

Bill Worrel, the 2018 champion of the Championship Formula Racing-Detroit racing series, picked up right where he left off at the end of the 2018 season. After winning the season’s final race in 2018, he won the opening race of 2019, the Australian Grand Prix, beating 10 other drivers to the finish line. Garry Kaluzny and Richard White were the other podium finishers in 2nd and 3rd place, respectively. The race was on the Adelaide track, and the game-store venue this time was Pandemonium Games in Garden City, Michigan. The race date was February 9, 2019.

While the Adelaide track diagram was published by the old Avalon Hill game company in the late 1980s, I had designed that same track (for board-game use) around 1985, shortly after the first real Formula 1 race took place at the real Adelaide track. And, since my track design is more accurate than the AH version, we used my track design (not to mention that my track design had already been transferred to a bedsheet way back in 1985!).

Adelaide track diagram

Adelaide track diagram, a design by Garry Kaluzny from 1985.

This season, the CFR-Detroit racing series instituted a “team” championship to go along with the individual points championship. The new teams going into the 2019 season: Benetton: #5 Brian Robinson (and #20 Jim Landis, not racing in this race); Camel Lotus: #12 Gary Sturgeon (and #11 Mike Cook, absent from this race); Ferrari: #1 Bill Worrel and #2 Jack Beckman; Marlboro McLaren: #7 Richard White and #8 Garry Kaluzny; McLaren: #9 Mike St. Peter and #10 Aric Parr; Tyrrell: #3 Joel Lauder and #4 Mark Moellering; Williams: #0 Greg Lim (and #6 Jim Robinson, not present).

There were two other changes in store for the 2019 CFR-Detroit season. Points would now be awarded to the top eight finishers in each race on a 15-12-10-8-6-4-2-1 basis, instead of the first six finishers getting points on a 10-6-4-3-2-1 basis that was used for the first two seasons of CFR-Detroit racing. And, the Chance Table was changed to what it was in the old Advanced Speed Circuit days, with a 2d6 dice roll of 2 through 7 being success, instead of the CFR 2 through 6 being success.

After the teams were settled, it was time to bid for starting positions on the grid, with each driver secretly bidding a number of his wear and/or skill chits, with each wear chit counted as 1.0, and each skill chit counted as 0.5. Naturally, higher bids start in front of lower bids, with any ties resolved by rolling percentage dice (high rolls are better than low rolls).

Qualifying

Joel Lauder (3 wear + 8 skill) and Greg Lim (1 wear + 12 skill) each bid 7.0. Lauder won the percentage dice roll by “33” to “11” and so Lauder was on the pole position and Lim started next to him in the front row, in 2nd position. Bill Worrel (4 wear + 5 skill) bid 6.5 and started 3rd. Garry Kaluzny (4 wear + 4 skill) started 4th with a bid of 6.0. Richard White (4 wear + 3 skill) started 5th with a bid of 5.5.

Starting 6th was Gary Sturgeon (1 wear + 6 skill) with a bid of 4.0. Mark Moellering (2 wear + 2 skill) bid 3.0 to start 7th. McLaren teammates Aric Parr (0 wear + 4 skill) and Mike St. Peter (2 wear + 0 skill) each bid 2.0. Parr started 8th with a percentage dice roll of “84” and so St. Peter started 9th after rolling “43”. Brian Robinson (0 wear + 3 skill) bid 1.5 to start 10th, and Jack Beckman (0 wear + 1 skill) started 11th after only bidding 0.5.

The starting grid for the 2019 Australian Grand Prix with their car specs:

 # Driver (Car)                    Start/Accel/Decel/Top/Wear/Skill/Tires
 3 Joel Lauder (Tyrrell)             60   40    40   140  5x   4x   hard
 0 Greg Lim (Williams)               60   60    40   140  4x   4x   hard
 1 Bill Worrel (Ferrari)             60   40    40   140  5x   4x   soft
 8 Garry Kaluzny (Marlboro McLaren)  60   40    40   160  5x   3x   soft
 7 Richard White (Marlboro McLaren)  60   40    40   160  5x   3x   soft
12 Gary Sturgeon (Camel Lotus)       60   60    40   160  5x   2x   soft
 4 Mark Moellering (Tyrrell)         60   40    40   160  5x   3x   soft
10 Aric Parr (McLaren)               20   40    60   160  4x   4x   hard
 9 Mike St. Peter (McLaren)          60   40    40   140  5x   4x   soft
 5 Brian Robinson (Benetton)         20   60    60   160  4x   3x   hard
 2 Jack Beckman (Ferrari)            60   60    60   140  4x   3x   hard

Start = Start Speed (in miles/hour); Accel = Acceleration (in mph); Decel = Deceleration (in mph); Top = Top Speed (in mph); Wear = # of Wear markers (per lap); Skill = # of Skill markers (per lap); Tires = hard or soft tires to begin the race.

Starting grid for the 2019 Australian GP

Starting grid at 2019 Adelaide: Front row: Joel Lauder (blue/white Tyrrell) & Greg Lim (white/blue/yellow Williams); 2nd row: Bill Worrel (red Ferrari) & Garry Kaluzny (white/orange McLaren); 3rd row: Richard White (white/orange McLaren) & Gary Sturgeon (yellow Lotus); 4th row: Mark Moellering (blue Tyrrell) & Aric Parr (orange McLaren); 5th row: Mike St. Peter (orange McLaren) & Brian Robinson (blue/green Benetton); 6th row: Jack Beckman (red Ferrari). Note the temporary straight section used only for the start of the race.

1st Lap

The start of the 2019 Austrailan Grand Prix was a rather sane start, what with the track only being 2 lanes wide at the start/finish line. Most cars had a 60 mph start speed, although Aric Parr (starting in 8th place) and Brian Robinson (starting in 10th) had 20 mph start speeds. Most notably, the two cars on the front row, Joel Lauder and Greg Lim, were both shod with hard tires, so most drivers judged it unlikely that the front-row cars would try to boost their start speeds.

In the actual start, however, Joel Lauder did boost his speed to 80 mph with a dice roll, with Greg Lim moving his normal 60 mph and slotting in behind Lauder. From the 2nd row, Worrel increased to 80 mph and pulled alongside Lim. Kaluzny wisely moved just 60 mph, and pulled behind Lim, but White, from row 3, boosted his speed to 80 mph and pulled up next to his teammate Kaluzny. Sturgeon went 60 mph to pull up behind Kaluzny, and Moellering, from the inside of the 4th row, went 80 mph to pull alongside Sturgeon. Parr boosted his start speed to 40 mph, and his teammate St. Peter, from the row behind, went his normal 60 mph to pull alongside Parr. Brian Robinson increased his car to 40 mph, and Beckman moved his normal 60 mph to pull alongside B. Robinson.

Lauder leads away at the start

Lauder leads away at the start, followed by Lim, Worrel, Kaluzny, White, Sturgeon, Moellering, Parr, St. Peter, B. Robinson, and Beckman.

Worrel then passed Lim for 2nd at The Esses, while White managed to take the inside from his teammate Kaluzny, and Beckman got past Parr. Lauder continued to lead through the three slow corners around Wakefield, East Terrace, and Flinders Street. Racing down Hutt Street, the order was Lauder, Worrel, Kaluzny, White, Moellering, Beckman, Lim (having dropped to 7th after starting 2nd), Sturgeon, St. Peter, Parr, and B. Robinson. As the pack raced down Jones Straight and took the gentle right-hand bend onto the long Brabham Straight, the order was Lauder, Worrel, Kaluzny, White, Moellering, Lim, Sturgeon, Beckman, St. Peter, Parr, and B. Robinson.

Lauder leads down Brabham Straight on the 1st lap

Lauder leads down Brabham Straight on the 1st lap. The Ferrari of Worrel is racing three-abreast with the McLarens of Kaluzny and White, then is the other 6-wheeled Tyrrell of Moellering, and Sturgeon and Lim, then the plain-orange McLarens of St. Peter and Parr making a sandwich of Beckman’s red Ferrari, and then B. Robinson.

At the Foster’s Corner at the end of Brabham Straight, Worrel and Kaluzny caught Lauder, with their three cars playing “chicken” to see who would get through the corner first.

Worrel, Lauder, Kaluzny, and White all bunch up at the Foster's Corner

Worrel, Lauder, Kaluzny, and White all bunch up at the Foster’s Corner.

In the event, Kaluzny managed to take the lead after Foster’s Corner, with Worrel also passing Lauder.

Kaluzny and Worrel have passed Lauder

Kaluzny and Worrel have passed Lauder after Foster’s Corner; White and Moellering have joined the leading group. The next bunch of cars of Lim, Sturgeon, Parr, Beckman, St. Peter, and B. Robinson now have their turn to play “chicken” at Foster’s Corner!

Kaluzny led through the next couple of corners, and then Worrel ducked inside of Kaluzny at the Mistral Hairpin just before the start/finish straightaway. The two Tyrrells of Lauder and Moellering also got past White’s McLaren.

Worrel ducks to the inside of Kaluzny at the Mistral Hairpin

Worrel ducks to the inside of Kaluzny at the Mistral Hairpin.

As the five leading cars of Kaluzny, Worrel, Lauder, Moellering, and White traversed through the Mistral Hairpin, they all ducked into the pits for new tires. Lauder would switch from hard tires to soft, while the other four exchanged their soft tires for hard tires. (Note: The CFR-Detroit racing series has a rule that all cars must use both hard and soft tires in a race, which means all cars must make at least one pit stop during a race.) Shortly after, the cars of St. Peter and Sturgeon also headed into the pits for new tires (both exchanging soft for hard tires).

Most cars pitted at the end of the 1st lap

Most cars pitted at the end of the 1st lap, with Kaluzny, Worrel, Lauder, Moellering, St. Peter, White, and Sturgeon in the pits. Eschewing pit stops are Lim, B. Robinson, Parr, and Beckman.

The official order at the end of the 1st lap: Kaluzny (+3); Lim (0); B. Robinson (+7); Parr (+4); Beckman (+6); Worrel (-3); Lauder (-6); Moellering (0); White (-4); St. Peter (-1); and Sturgeon (-5). The numbers in parentheses indicate how many places a driver either gained (+) or lost (-) from their starting position. Kaluzny led the lap by virtue of pitting in the space directly at the start/finish line. After the pit stops were resolved, the running order on the track was: Lim; B. Robinson; Parr; Beckman; Kaluzny; Worrel; Lauder; Moellering; White; St. Peter; and Sturgeon.

The 1st round of pit stops are over

The 1st round of pit stops are over, and Lim and B. Robinson lead the field through The Esses.

2nd Lap

Lim continued to lead through the three slow corners, and managed to stretch out a lead of two spaces over B. Robinson as Lim made the right-hand turn onto Jones Straight. By the time Lim had made the turn onto the long Brabham Straight, he led by four spaces over B. Robinson and Parr.

Lim leads down Brabham Straight

Lim leads down Brabham Straight over B. Robinson and Parr, then came Kaluzny, Lauder, Worrel, Beckman, Moellering, White, St. Peter, and Sturgeon.

Lim led into and through Foster’s Corner, but B. Robinson and Parr had closed the gap, and Kaluzny and Lauder were right on the tailpipes of B. Robinson and Parr. Through Paddock Turn, Lim held his lead, with Parr now in 2nd, and Kaluzny managing to squeeze to the inside of B. Robinson to take 3rd place. As he entered the Mistral Hairpin turn, Lim pulled off the track to make his mandatory pit stop.

Lim pits at the end of Lap 2

Lim pits at the end of Lap 2. The other cars on the track are running in the order: Kaluzny; Parr; B. Robinson; Lauder; Worrel; Beckman; Moellering; White; St. Peter; and Sturgeon.

Shortly after Lim pulled into the pits, he was joined by the cars of Lauder (pitting for the 2nd time), Parr, B. Robinson, and Beckman. The remaining cars, having already pitted once earlier in the race, stayed on the track.

Lauder, Parr, B. Robinson, and Beckman join Lim in the pits

Lauder, Parr, B. Robinson, and Beckman join Lim in the pits. Kaluzny is the new leader on the track, followed closely through the Mistral Hairpin by Worrel, Moellering, and White. St. Peter and Sturgeon trail behind.

The official order at the end of the 2nd lap: Kaluzny (+3); Worrel (+1); Moellering (+4); White (+1); Lim (-3); St. Peter (+3); Sturgeon (-1); Lauder (-7); Parr (-1); B. Robinson (0); and Beckman (0). After the pit stops shook out, the order on the track was Worrel, Kaluzny (both vying fiercely for the lead), Moellering, White, Lim, St. Peter, Sturgeon, Lauder, Parr, B. Robinson, and Beckman.

3rd Lap

Early in the 3rd lap, Kaluzny figured he had no chance to hang onto the lead, as Worrel had several more wear chits remaining than Kaluzny, but Kaluzny resolved to try to make it tough for Worrel to get past. It should be noted that during the 2nd lap, Kaluzny had been racing with the cars that would need to make a 2nd pit stop, with the idea being that if he could have got by them he would have made a 2nd stop. He thus used more wear than Worrel, who was driving more conservatively. But when it became evident to Kaluzny that he would not be able to get by the soon-to-pit cars, he belatedly backed off a bit to attempt to save some wear for the final lap. Kaluzny then did take the inside and the lead from Worrel at the Wakefield corner.

Kaluzny leads down Hutt Street

Kaluzny leads down Hutt Street from Worrel. The rest of the pack is bunched tight in the order: Moellering; White; Lauder; Lim; St. Peter; Beckman; Parr; Sturgeon; and B. Robinson.

Down Hutt Street, White passed Moellering for 3rd place, and Parr passed his teammate St. Peter (and Beckman) for 7th place. Kaluzny continued leading Worrel down the Jones Straight and onto the Brabham Straight, then Worrel pulled alongside Kaluzny half-way down the Brabham Straight, with Worrel trying to pass on the inside just before the Foster’s Corner.

Worrel tries to pass on the inside at Foster's Corner

Worrel tries to pass Kaluzny on the inside at Foster’s Corner. The other cars are running in the order White, Lauder, Moellering, Parr, Lim, Beckman, St. Peter, B. Robinson, and Sturgeon.

But not to be denied, Kaluzny held the lead out of Foster’s Corner. But then Kaluzny had to pull up short at the final Mistral Corner (moving at only 80 mph) due to lack of wear, while Worrel passed Kaluzny at that corner, traveling 120 mph and using a wear and successfully making a -3 chance dice roll around the outside lane.

Worrel takes the lead at Mistral

Worrel takes the lead at Mistral Corner from Kaluzny. White is 3rd, then Lauder, Parr, Moellering, and Lim are battling for 4th, followed by Beckman, B. Robinson, St. Peter, and Sturgeon in a fight for 8th (the last points-paying position).

Worrel then continued moving at 120 mph in his next move, thus reaching the start/finish line and winning the race. Kaluzny could only move at 80 mph, thus being relegated to 2nd place.

Worrel takes the checked flag

Worrel takes the checked flag to win at Adelaide, making it two consecutive race wins (going back to the final race of 2018).

The official finishing order at the 2019 Australian Grand Prix: 1st-Bill Worrel (+2); 2nd-Garry Kaluzny (+2); 3rd-Richard White (+2); 4th-Aric Parr (+4); 5th-Greg Lim (-3); 6th-Joel Lauder (-5); 7th-Mark Moellering (0); 8th-Brian Robinson (+2); 9th-Jack Beckman (+2); 10th-Gary Sturgeon (-4); 11th-Mike St. Peter (-2). Several cars made chance rolls in the Mistral Hairpin corner, using their -3 skill modifier chits. All of the cars made their rolls except for St. Peter, who spun. It didn’t affect St. Peter’s placing, though, as he was running last when he spun.

Aftermath

Points awarded at the 2019 Australian Grand Prix: Worrel 15; Kaluzny 12; White 10; Parr 8; Lim 6; Lauder 4; Moellering 2; and B. Robinson 1.

Team points awarded at the 2019 Australian Grand Prix: Marlboro McLaren 22; Ferrari 15; McLaren 8; Williams 6; Tyrrell 6; Benetton 1.

The Marlboro McLaren team was satisfied with the outcome of the race, finishing in 2nd and 3rd place, and taking the lead in the team championship standings. Aric Parr had a nice drive, finishing 4th after starting 8th.

The points standings of the 2019 CFR-Detroit season (after 1 of 10 races):

Place Driver (Car)                    Points
  1   Bill Worrel (Ferrari)             15
  2   Garry Kaluzny (Marlboro McLaren)  12
  3   Richard White (Marlboro McLaren)  10
  4   Aric Parr (McLaren)                8
  5   Greg Lim (Williams)                6
  6   Joel Lauder (Tyrrell)              4
  7   Mark Moellering (Tyrrell)          2
  8   Brian Robinson (Benetton)          1
  9T  Jack Beckman (Ferrari)             0
  9T  Gary Sturgeon (Camel Lotus)        0
  9T  Mike St. Peter (McLaren)           0

Drivers can only count their 7 best finishes out of the 10 races.

The team championship standings of the 2019 CFR-Detroit season (after 1 of 10 races):

Place Team              Points
  1   Marlboro McLaren    22
  2   Ferrari             15
  3   McLaren              8
  4T  Williams             6
  4T  Tyrrell              6
  6   Benetton             1
  7   Camel Lotus          0

Teams can only count their 2 best finishing cars from each race.

The next race of the 2019 CFR-Detroit racing series was at the Guild of Blades game store in Clawson, Michigan, on Saturday, March 16, 2019. As always, keep up to date with the CFR-Detroit racing series at the home page at http://michigumbo.com/cfr/.

Close Action at Flintcon 2019: scenario CA17 – Santo Domingo

February 18th, 2019

Saturday, February 9, 2019, saw another game of Close Action played in southeastern Michigan, this time at Flintcon 2019 in Flint, Michigan. We played Close Action scenario 17, “Santo Domingo.” In that scenario, five French ships, an 80-gun (Alexandre), a 120-gun (Impérial), and three 74-gun (Diomède, Jupiter, Brave) ships were trying to escape the map, and initially only three British 74-gun ships (Superb, Northumberland, Spencer) were on-board to try to stop the French. The British would also receive reinforcements: Canopus (80-gun) on game-turn 3; Donegal (74) on g-t 4; Atlas (74) on g-t 5; and Agamemnon (64) on g-t 10, although the French could be far away before the reinforcements could even think of catching up.

Starting Positions

British
Superb (74) – A1640:2
Northumberland (74) – A1544:2
Spencer (74) – A1450:2

French
Alexandre (80) – A3435:1
Impérial (120) – A3439:1
Diomède – A3443:1
Jupiter – A3448:1
Brave (74) – A3452:1

Santo Domingo starting positions:

Santo Domingo starting positions: The French line is at the top of the picture, headed right-to-left. The British are at the bottom-right, headed at an angle towards the French. The wind is blowing right-to-left.

Jim Robinson, an experienced Close Action player, commanded the French ships from Impérial. Bill Worrel, who has played CA only once before, commanded the British aboard Superb. On the face of it, this scenario looked to be a tough one for the British to win. The French could escape not only from the far left map edge (there is another map board in that direction that is not pictured, and it’s a long way to that map edge), but could also escape off the long edge at the bottom of the above picture. Any French ship that escaped off the map would give 90% of its Victory Points (VPs) to the French, so the British somehow or another needed to stop three of the five French ships from exiting the map. The British would eventually receive four more ships as reinforcements: Canopus (80-gun) on game-turn 3; Donegal (74-gun) on g-t 4; Atlas (74-gun) on g-t 5; and Agamemnon (64-gun) on g-t 10. Of course, by the time Agamemnon got on the map, the French ships could be far away! So the first item of business for the British was to close the range to the French and to start shooting.

The Wind Speed and Sea State were both “2” at the start of the scenario, so that wouldn’t affect any ships adversely.

Game-Turn 1

The movement for the game-turn 1 was simple. All French ships were at plain sail status, and they all moved ahead 6 spaces, maintaining their line-ahead formation. The British were also at plain sail, and they moved ahead 8 spaces towards the French, due to the fact they were in a better attitude to the wind (the Brits were “broad-reaching,” while the French were “running” with the wind). Only one ship, the British Northumberland, announced “men-in-rigging” as it started changing from plain sail to medium sail status. That sail change would take two game-turns to complete.

Only one ship opened fire at the long range, and that was Brave firing at Spencer. The range was 12 hexes, too far for an initial broadside bonus, and Brave’s Basic Gunnery Number (BGN) was “12” at 12 hexes. Brave had a Crew Quality (CQ) of “D” and so it had a Gunnery Modifier of “0” (zero) for this shot due to being at plain sail. Greg Lim, the skipper of Brave, rolled a d6 and rolled a “2” while firing high (Brave had to fire high at ranges more than 9 hexes from the target). Spencer then received only a single hit on her rigging, due to being at plain sail herself. (It was later determined that the -1 mod for firing when at plain sail was missed, so Brave’s fire should have had a total of -1 in modifiers. C’est la vie!)

End of game-turn 1

At the end of game-turn 1, the British have closed the range towards the French.

Ship positions at the end of game-turn 1:

British
Superb (74) – A2436:2
Northumberland (74) – A2340:2
Spencer (74) – A2246:2

French
Alexandre (80) – A3429:1
Impérial (120) – A3433:1
Diomède – A3437:1
Jupiter – A3442:1
Brave (74) – A3446:1

Although messages were written at the beginning of the game-turn, they were not received until the end of the g-t. The British admiral, Bill Worrel, in Superb, sent the message “STOP REAR THREE SHIPS”. The French commander, Jim Robinson, sent a rather frivolous message: “SET PHASERS DEEP FAT FRY”! Um, we’ll just ignore that message, eh?

Game-Turn 2

On game-turn 2, the French continued sailing in line-ahead formation, all ships moving 6 hexes ahead. The British Superb moved ahead 6, and the Northumberland and Spencer each moved “7P” to turn and head in the same direction as the French ships. All three British ships showed “men-in-rigging.”

Superb (5 hexes) and Northumberland (4 hexes) both fired their initial starboard broadsides at Jupiter, and Spencer (5 hexes) fired her initial starboard broadside at Brave. Diomède (4 hexes) shot at Superb, an initial port broadside and a bow rake; Jupiter (4 hexes) fired her intial port boardside at Northumberland; and Brave (5 hexes) fired at Spencer again.

Superb had a BGN of 22, with +4 for CQ and +1 for initial broadside, but one of the sailor crew sections was busy making changes to the sails, so that gave a -3, for a total Gunnery Modifier of +2. The dr was “3” so the damage inflicted on Jupiter was 2 rigging (one of the rigging lost was due to the target being at plain sail), 1 hull, and 1 sailor. Northumberland then had a BGN of 25 versus Jupiter, with a total of +3 in modifiers. A 1d6 dr of 6 gave a Final Gunnery Number (FGN) of 34, which yielded 3 rigging, 2 hull, and 2 sailors (although it was recorded as only 1 sailor lost). Northumberland also caused a critical (hull) hit on Jupiter, and that caused the “Wheel Shot Away” result. That meant that Jupiter could only make one 60° turn in a game-turn (instead of two turns), and had to roll on the “Poor Maneuvering” table any time she did try to pivot. Spencer then fired at Brave with a BGN of 23 and +2 in mods, with a dr of “5”, to inflict 2 rigging, 1 hull, and 1 sailor in losses.

The French return fire saw Diomède was a BGN of 26, +4 in mods (+2 each for initial broadside and rake), but as she was firing high and using dismantling shot, another +1 would apply (although it should have also had a -1 for shooting while at plain sail). In any event, the damage dished out was recorded as 5 rigging. A hull hit was ignored, as dismantling shot could not affect the hull. Jupiter fired high with dismantling shot at Northumberland, inflicting 3 rigging boxes of damage. Brave then fired at Spencer, firing high with dismantling shot inflicting 5 rigging and 1 marine boxes of damage, plus the “Braces Cut” critical hit. That meant that Spencer would not be able to accelerate or decelerate during game-turn 3.

In all, the British dished out 16 boxes of damage in g-t 2, while receiving 14 boxes of damage in return. Each side inflicted a critical hit on the other side. Both sides also forgot to apply the -1 modifier for firing when at plain sail. It should also be said that it is the GM’s fault for not remembering to apply the plain sail modifier, as most of the players either had zero or very little experience playing Close Action.

Ship positions at the end of game-turn 2:

British
Superb (74) – A3033:2
Northumberland (74) – A3037:1
Spencer (74) – A2942:1

French
Alexandre (80) – A3423:1
Impérial (120) – A3427:1
Diomède – A3431:1
Jupiter – A3436:1
Brave (74) – A3440:1

At the end of g-t 2, the French message from Jim Robinson (aboard Impérial) was revealed to the other French ships as “CHANGE SAIL STATE”. The British sent the message “CONCENTRATE FIREPOWER ON DIOMEDE”.

Game-Turn 3

At the beginning of the game-turn, the Wind Direction Change dice roll revealed that the wind would indeed change 60° counter-clockwise, to blow toward direction 6. But that change wouldn’t take effect until the beginning of g-t 4.

During game-turn 3, the French continued sailing straight-ahead, with all ships showing men-in-rigging. Alexandre moved 7 hexes; the other four ships moved 6 hexes ahead. Superb moved “3P2” which moved her right alongside Jupiter. Northumberland moved ahead 5, and Spencer plotted “2S4”. Spencer had to try to move 8 MPs in this game-turn as she had used 8 MPs in the previous g-t and suffered the “braces cut” critical hit in g-t 2, but as she started g-t 3 as “running” with the wind, her maximum movement was 7. So, Spencer moved as many MPs as she could. Superb and Spencer had men-in-rigging, and Northumberland was now at medium sail. Spencer was 1 hex short of raking the stern of Brave. The Brits got their first reinforcement; Canopus came on the board (in the lower right of the pictures) and moved 6 hexes ahead).

Only two pairs of ships fired at each other in g-t 3. Superb and Jupiter were right next to each other at range 1. Northumberland and Brave were on parallel courses, at range 4. Superb’s shot caused a loss of 3 rigging, 2 hull, 1 sailor, and 1 marine to Jupiter, and Jupiter’s shot caused a loss of 3 rigging, 1 hull, and 1 marine to Superb. Each ship lost its 1st section of rigging and had to make a rigging check 1d6 die roll. Jupiter rolled “Lines Jammed,” and that canceled her attempt at changing sail state from plain sail to medium sail. Jupiter also received a critical hit, but only lost -1 Guns Dismounted to her port side. Superb rolled “Braces Cut” and also would not be able to accelerate or decelerate in game-turn 4.

Northumberland had a very good shoot at Brave, causing a loss of 4 rigging, 3 hull, and 1 sailor, and inflicting a critical hit of “Leadership Casualties on the Quarterdeck” and so Brave also lost a marine box. Brave’s return fire at Northumberland only dinged 2 rigging boxes. Later, during the maintenance phase, Brave rolled a Morale Check (MC), and passed it. And Superb repaired her cut braces.

The ship positions at the end of game-turn 3

The ship positions at the end of game-turn 3. Superb is right next to Jupiter.

Ship positions at the end of game-turn 3:

British
Superb (74) – A3329:1
Northumberland (74) – A3032:1
Spencer (74) – A3338:2
Canopus (80) – A1146:1 (reinforcement that just entered the map)

French
Alexandre (80) – A3416:1
Impérial (120) – A3421:1
Diomède – A3425:1
Jupiter – A3430:1
Brave (74) – A3434:1

French message to all of their ships at the end of game-turn 3: “GOOD SHOOTING KEEP IT UP”. British message to all of their ships: “STOP DIOMEDE FROM ESCAPING”.

It should be stated that in the present position, the leading French ships should be able to escape from the British. That would have won the scenario for the French due to the special victory conditions. However, it would not look good if the French admiral simply abandoned his last two ships to the tender mercies of His Majesty’s Royal Navy!

Game-Turn 4

The wind had now changed; it was now blowing toward “direction 6,” which is to say it was blowing towards the starboard quarter of the French ships, so the French was now all “broad-reaching.” Three of the French ships turned to port and started making way for the nearest map edge where they could escape. The leading Alexandre moved “P6,” Impérial moved “5,” Diomède moved “6,” Jupiter moved “1P1,” and Brave moved “P5.” For the British, Superb moved 5 hexes straight ahead, Northumberland moved 6 hexes ahead, and Spencer moved “P2,” which left her a bit behind the French ship Brave. Donegal came onto the map to join Canopus as a reinforcement; both ships moved 7 hexes forward in direction 1.

All of the French ships were now at medium sail, except for the damaged Jupiter. Jupiter had her sail change canceled due to receiving battle damage in the last game-turn. Superb, Northumberland, and Spencer were all at medium sail, but Spencer had men in the rigging to get back to plain sail to close the distance back to the French ships. Canopus and Donegal were both flying plain sails so they could make all speed towards the enemy.

After movement, only three ships elected to fire at each other: Brave fired a 5-hex range stern rake on Northumberland; Jupiter fired a 3-hex range stern rake on Superb, but could only fire her forward starboard guns; and Northumberland had a 3-hex range bow rake on Jupiter, but could only fire her rear starboard guns. No other ships had a target with the arc of their broadsides.

Jupiter had a BGN of 26 for her shoot at Superb, but had a total of -2 in modifiers, and fired high. Jupiter did roll a 6, and that also caused a critical hit against Superb. Superb lost 3 rigging, and 1 sailor. The critical hit caused leadership casualties on the quarterdeck, which caused Superb to cross out a marine box. Superb then had to take a morale check during the maintenance phase, which she passed with her Morale Rating of “3”. Northumberland’s bow rake versus Jupiter started with a BGN of 25, but had a total of -4 in modifiers. Rolling a “4” caused a loss of 2 rigging and 1 sailor to Jupiter. Brave fired on Northumberland with a BGN of 23, -1 in mods, a dr of “5,” causing a loss of 2 rigging, 1 hull, and 1 sailor. Northumberland then lost her 1st rigging section. The resulting Rigging Check was for a “Mast May Fall” possibility, but fortunately for Northumberland the mast stayed upright.

End of game-turn 4

End of game-turn 4: Three of the French ships have turned to port, but the two rear French ships have been separated from their three other friendly ships.

Ship positions at the end of game-turn 4:

British
Superb (74) – A3324:1
Northumberland (74) – A3026:1
Spencer (74) – A3336:1
Canopus (80) – A1139:1
Donegal (74) – A1145:1 (reinforcement that just entered the map)

French
Alexandre (80) – A2813:6
Impérial (120) – A3416:1
Diomède – A3419:1
Jupiter – A3328:6
Brave (74) – A2931:6

The French message to their fleet that was revealed at the end of g-t 4 said “REAR TWO SHIPS TURN PORT”, although those ships had already executed that turn. The British showed a somewhat spurious message of “DAMN TORPEDOES FULL SPEED AHEAD”. The receiving ships were wondering what the heck was a torpedo?

Game-Turn 5

To begin g-t 5, all of the French ships were now at medium sail, except for Jupiter, which was still at plain sail status, although Jupiter could only move as fast as medium sail status due to having lost her 1st rigging section. Northumberland and Superb were at medium sail, as was Spencer, but Spencer still had men in the rigging to get back to plain sail. The British got a 3rd ship to add to their reinforcements, the Atlas, to join with Canopus and Donegal. All three of the reinforcement ships were at plain sail. Canopus and Donegal moved 7 hexes, and Atlas moved 8 hexes.

Spencer moved 6 hexes directly toward where the French line had been sailing. Superb turned to port to move “P3,” and Northumberland moved “P3P” to sort of head in the wrong direction from where the French were headed, although Northumberland did get a bow rake shot against Jupiter by turning in that direction. For the French, Alexandre moved ahead 5, Brave moved ahead 5, and Jupiter could only manage to move 3 hexes. Those three ships were headed diagonally toward the closest escape edge of the map. Impérial and Diomède both turned to port, both moving “3P”.

Auditing the ship’s logs after the game, there were some move “discrepancies” on this game-turn. Brave moved “5” but only had 4 MPs while running with the wind while at medium sail. So Brave moved one too many hexes forward. Spencer accelerated too much, using only 3 MPs on game-turn 4, and then using 6 MPs on this g-t. Also, while Spencer only used 3 MPs on g-t 4, she should have used at least 5 MPs on g-t 4, since she used 7 MPs on g-t 3! Impérial plotted “2P”, when the photographs were checked after the game, she had actually moved “3P” on the map. And, Canopus, in her first three g-t’s on the map, plotted “6,” “6,” and “7,” but her position on the map at the end of g-t 5 was two hexes to the rear of where she should have been on the map.

The British ships Northumberland and Superb both targeted Jupiter, and Spencer shot at Brave. The French returned fire with Diomède and Jupiter both shooting high at Superb, and Brave fired (low) at Northumberland.

Northumberland inflicted damage to the tune of 5 rigging, 2 hull, and 2 sailor boxes on Jupiter, and Superb dished out another 4 rigging, 2 hull, and 1 sailor to Jupiter, making a total of 9 rigging, 4 hull, and 3 sailor boxes lost. Jupiter lost her 1st hull section, taking a hull check and that directed her to take a rigging critical hit roll, which turned out to be “Shrouds Severed” which caused the loss of another rigging box. The hull check also meant a morale check later in the game-turn. Then, since the Jupiter had also lost her 2nd rigging section, she had to take a rigging check dice roll. Unfortunately for Jupiter, the rigging check was that a mast fell, and that caused the loss of the rest of rigging section 3 and another morale check. Also, Jupiter lost her 1st sailor section, meaning she had a permanent -3 modifier to gunfire, and she would have to take a 3rd morale check during the maintenance phase later in the game-turn.

Spencer’s shot at Brave yielded only 1 rigging and 1 sailor box checked off. Brave lost her 1st rigging section, and got “Braces Cut” for her rigging check, so her acceleration and deceleration would be zero for the next game-turn, and she had “-2 guns dismounted” on her starboard side. Jupiter’s simultaneous return shot at Superb caused the loss of 3 rigging and 1 sailor box, and Diomède’s shot at Superb only added 1 hull to the damage to Superb. Superb did lose her 2nd rigging section, and got “-2 broadside obscured” (from falling rigging) on her port side. Brave’s gunfire at Northumberland caused the loss of 1 rigging and 1 hull box.

Then, during the maintenance phase, Jupiter failed two of the three morale checks she had to make. That dropped her Crew Quality to “F”, which gave her another -5 modifier to all of her gunfire. Add in her -3 for missing sailor section 1, and her gunfire had to apply -8. She also had a “-2 broadside obstructed” to her starboard side due to the mast falling. At this time, Jupiter only had 6 boxes remaining unchecked in rigging section 4, and she could only move at fighting sail MP rate, although she would still take damage at the plain sail rate as she still hadn’t changed her sail state.

End of game-turn 5

End of game-turn 5. Three British ships are rushing to help along the bottom edge of the map.

Ship positions at the end of game-turn 5:

British
Superb (74) – A3023:6
Northumberland (74) – A2724:5
Spencer (74) – A3330:1
Canopus (80) – A1132:1
Donegal (74) – A1138:1
Atlas (74) – A1144:1 (reinforcement that just entered the map)

French
Alexandre (80) – A2310:6
Impérial (120) – A3413:6
Diomède – A3416:6
Jupiter – A3027:6
Brave (74) – A2429:6

The French signaled ” FRONT THREE SHIPS TURN PORT” which they already did, and the British signaled “FREE FOR ALL”.

Game-Turn 6

For game-turn 6, four of the French ships were at medium sail, with only the battered Jupiter still being at plain sail status (although Jupiter could only move at fighting sail MPs, due to having already lost 3 of her 4 rigging sections). For the Brits, Northumberland and Superb were at medium sail; the rest of their ships were at plain sail. Superb had men in the rigging to change sail state.

Northumberland moved “1S3” which put her course on the same heading as Brave, although 5 hexes distant. Spencer moved 6 hexes straight ahead, which put her in position to fire at the stern of Jupiter (although it was not a rake). Superb plotted and moved “1” although she should have spent 2 MPs since she used 4 MPs in g-t 5 and her deceleration was “2”. The British reinforcements Canopus and Donegal moved ahead 7 hexes, and Atlas moved ahead 8 hexes.

Most of the French ships moved straight ahead. Alexandre moved 5, Diomède moved 3, Brave also moved 3 hexes. Jupiter plotted and moved 2, although with only 1 rigging section remaining she only had 1 MP available! Impérial moved “3P”, with her turn to port putting her aiming for a collision with Diomède.

Northumberland shot at Brave, and Spencer and Superb shot at Jupiter. The French Brave fired back at Northumberland, and Diomède and Jupiter both fired at Superb. Brave lost 3 rigging, 1 hull, and 1 marine box. Jupiter lost 4 rigging, 4 hull, 1 sailor, and 1 marine box, although they were not all checked off her ship’s log (in particular, 2 boxes in rigging section 4 were not checked off, nor was the marine box). The French return fire was rather light as to damage. Northumberland lost 2 rigging and 1 marine box, and Superb lost only 1 rigging and 1 sailor box.

End of game-turn 6

End of game-turn 6. Jupiter is being battered to pieces, and Brave is about to be surrounded by the British reinforcement ships at the bottom of the map.

Ship positions at the end of game-turn 6:

British
Superb (74) – A2922:6
Northumberland (74) – A2323:6
Spencer (74) – A3324:1
Canopus (80) – A1125:1
Donegal (74) – A1131:1
Atlas (74) – A1136:1

French
Alexandre (80) – A1808:6
Impérial (120) – A3111:5
Diomède – A3114:6
Jupiter – A2826:6
Brave (74) – A2127:6

Only the French admiral sent a message on g-t 6: “FRONT THREE SLOW TO ENGAGE”, meaning, of course, for Alexandre, Impérial, and Diomède to engage the British with the thought of trying to extricate Jupiter and Brave from the clutches of the enemy.

Three of the French ship commanders

Three of the French ship commanders (left-to-right): Jack Beckman (Alexandre); Jim Robinson (Impérial); and Larry O (Jupiter).

Game-Turn 7

During game-turn 7, the mapboard began to look like giant melee. Spencer raced ahead 8 hexes and could loose a broadside against Diomède. Northumberland moved “S3,” and Superb just plotted “S”, a turn to starboard. Canopus moved “2S4” to try to cut off Brave; Donegal moved 7 and Atlas moved 8 ahead. For the French, Alexandre moved “P2” to start to head towards the British preparatory to doing battle. Impérial moved 3, and Diomède wisely turned to port, moving “P3”. Brave turned to starboard and moved “S2”, and Jupiter merely moved “1”, as fast as she could sail.

Fortunately for the French, only Spencer threw iron at Diomède. Canopus decided to hold her initial starboard broadside instead of firing a mere half-broadside at Brave. Donegal and Atlas decided to also hold their fire against Brave, and Superb and Northumberland didn’t have any enemy ship in their sights. Diomède and Jupiter both fired upon Superb, Jupiter getting a 3-hex stern rake, although she had -9 in modifiers to add to the +3 rake modifier. Brave fired upon Canopus at a 6-hex range, and Impérial fired her 60-gun initial port broadside at Spencer.

Diomède received damage to the tune of 2 rigging, 2 hull, and 1 sailor box. Canopus lost 2 rigging boxes, Superb lost 3 rigging and 1 hull box, and Spencer lost 4 rigging and a sailor box. Spencer lost her 1st rigging section, and the rigging check caused “braces cut” so her acceleration and deceleration for the next game-turn would be zero. Superb suffered a critical hit, also of “braces cut.”

Superb was subject to drifting, but did not drift, during the maintenance phase.

End of game-turn 7

End of game-turn 7. The battle is about to turn into a free-for-all.

Ship positions at the end of game-turn 7:

British
Superb (74) – A2922:1
Northumberland (74) – A2320:1
Spencer (74) – A3316:1
Canopus (80) – A1521:2
Donegal (74) – A1124:1
Atlas (74) – A1128:1

French
Alexandre (80) – A1609:5
Impérial (120) – A2813:5
Diomède – A2816:5
Jupiter – A2725:6
Brave (74) – A2125:1

Once again, only the French admiral signaled to his ships, continuing the same message as before: “FRONT THREE SLOW TO ENGAGE”.

Game-Turn 8

All of the ships continued getting intermingled during game-turn 8. For the Brits, Superb moved “P1”; Northumberland moved “1P”; Spencer moved “2P2”; Canopus moved “4”; Donegal moved “7”; and Atlas moved “4S3”. For the French, Alexandre moved “4”; Impérial moved “2S”; Diomède moved “P3”; Jupiter continued moving “1”; and Brave moved “3”.

There was a lot of gunfire in this game-turn, as every ship on the map fired at some enemy ship. Atlas took a long-shot at Alexandre, inflicting a loss of 1 rigging box. Canopus and Northumberland shot at Brave, causing a loss of 7 rigging, 5 hull, 2 sailors, and 1 marine boxes. Brave also lost her 2nd rigging section, and suffered “sheets cut” during the resultant rigging check, and so she would lose 1 MP from her available MPs for next turn, as well as a -1 to her acceleration (for next turn only). Donegal fired at Impérial, nicking only a single sailor box. And Superb shot at Jupiter, causing losses of 1 rigging, 2 hull, and 1 sailor boxes. That shot reduced Jupiter to only having a single rigging box left in rigging section 4. One more hit to her rigging and she would be dead in the water.

For the French return fire at the British, Alexandre caused the loss of 1 rigging to Atlas. Brave fired away at Canopus, getting Canopus to check off 3 rigging, 1 hull, and 1 sailor. Diomède and Impérial blasted away at Northumberland, causing a loss of 4 rigging, 2 hull, and 2 sailor boxes. Northumberland also lost her 2nd rigging section and suffered “sheets cut.” And Jupiter shot at Superb, but only caused a loss of 1 sailor box.

End of g-t 8

End of g-t 8: Jupiter is one rigging box away from being dismasted, and all ships fired their cannon during this game-turn.

Ship positions at the end of game-turn 8:

British
Superb (74) – A2822:6
Northumberland (74) – A2319:6
Spencer (74) – A3113:6
Canopus (80) – A1919:2
Donegal (74) – A1117:1
Atlas (74) – A1423:2

French
Alexandre (80) – A1211:5
Impérial (120) – A2614:6
Diomède – A2819:4
Jupiter – A2625:6
Brave (74) – A2122:1

No messages were sent during game-turn 8.

Victory Determination

At the end of game-turn 8, the time limit (four hours) for the scenario expired. Victory Points were tallied for each side. The French did not exit three ships off the map (Alexandre was the only ship close enough to escape), which they needed to do to earn enough VPs, so Victory would be determined by who inflicted more damage to the other side.

Damage to the British:

Atlas, Canopus, and Donegal (the reinforcement ships) did not lose any rigging, hull, or crew sections, and so yielded 0 VP.

Northumberland (worth 94 VP) lost 2 rigging sections. Each rigging section is worth 5% of her VP, so 10% x 94 = 9.4 VP.

Spencer (worth 95 VP) lost 1 rigging section, which was worth 5% x 95 = 4.75 VP.

Superb (worth 87 VP) lost 2 rigging sections, worth 10% x 87 = 8.7 VP.

Total VP awarded to the French: 9.4 + 4.75 + 8.7 = 22.85 VP.

Damage to the French:

Alexandre, Diomède, and Impérial did not lose any sections, for 0 VP.

Brave (worth 70 VP) lost 2 rigging sections, worth 70 x 10% = 7.0 VP.

Jupiter (worth 66 VP) lost 3 rigging sections, 1 hull section, and 1 sailor section, worth (3 x 5%) + 10% + 10% = 35% x 66 = 23.1 VP.

Total VP awarded to the British: 7.0 + 23.1 = 30.1 VP.

So the British led in VP, 30.1 to 22.85, making the damage (so far) fairly equal, with the British ahead.

In another game-turn or so, Jupiter would have lost her last rigging section, making her dead in the water. She would then have been pounded until she would have struck, giving all of her 66 VP to the British. But the leading French ships, the Alexandre, Impérial, and Diomède, were coming back to do battle, and they could have dished out some punishment to the British.

Aftermath

Now, the French could have easily sailed their leading three ships away and off the map, but that would have meant abandoning their trailing two ships to capture by the British. Although that could have earned the French enough VP to easily win the scenario, one would think there would have been repercussions to the French admiral when he got back to port, after abandoning 40% of his force!

For this scenario, I made up a form so the GM (myself) could keep track of things such as each ship’s plotted movement, their target, how may gunnery factors and modifiers, how much damage they dished out, and any special results like critical hits. But in spite of that, several times ships were moved a differing number of hexes than what was plotted, and there were other discrepancies, such as ships not keeping within their acceleration or deceleration limits, or sometimes using too many MPs for their sail state and attitude to the wind. Part of that was probably due to new players to the game who didn’t perfectly understand the rules, but I must also take some of the blame for not educating the players better. So, I will work on a handout to give out that will explain how the log sheets should be filled out properly, among other things.

In any event, I will run another Close Action scenario at the Metro Detroit Gamers’ Wintercon 2019 at Oakland University in Rochester, Michigan, on Saturday, March 9, 2019.

Close Action at Spartacon 2019: scenario RS13 — Winter Interception

February 7th, 2019

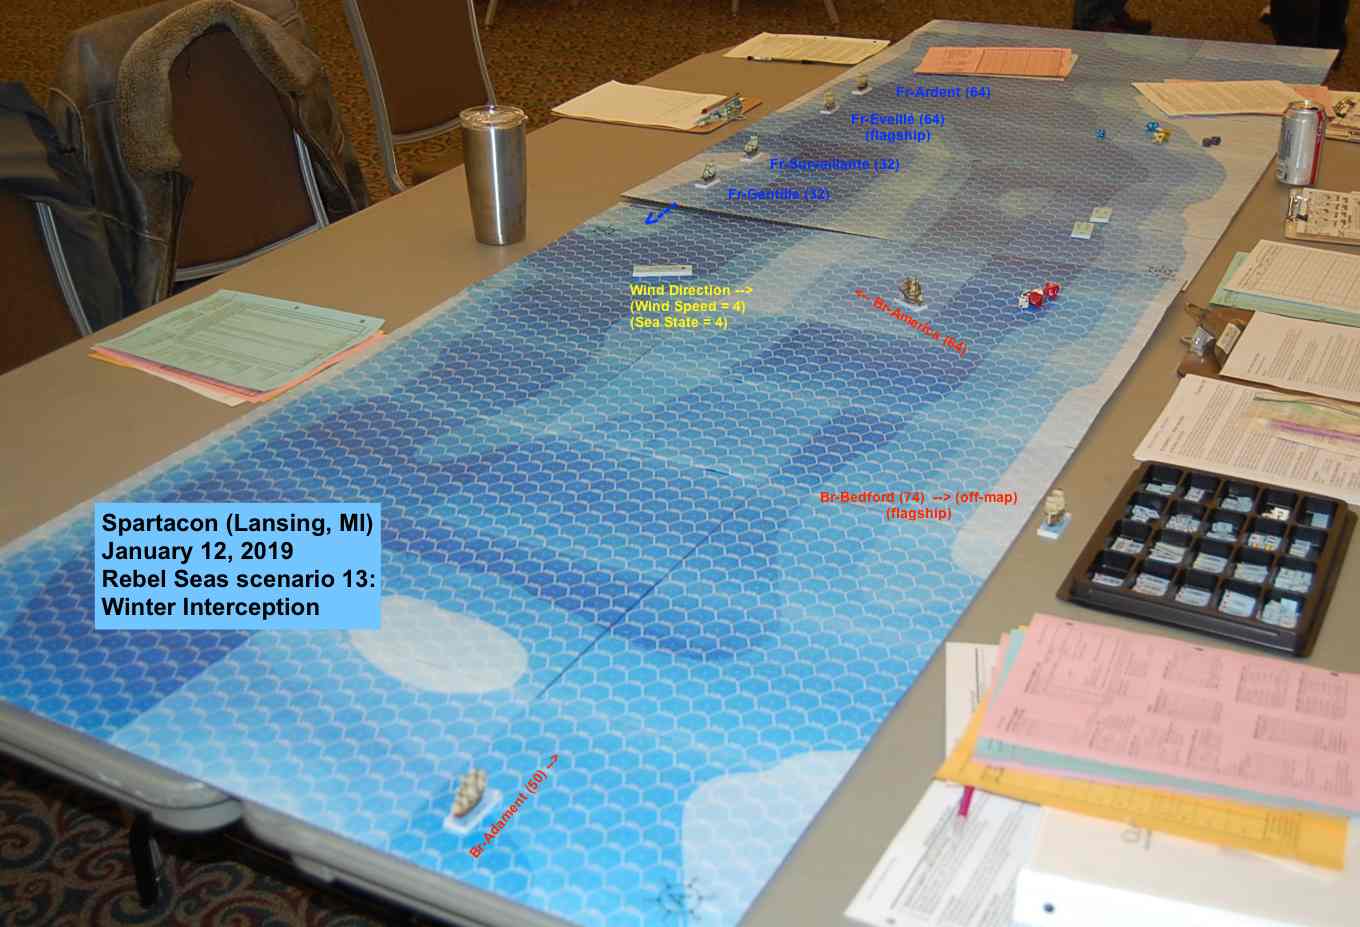
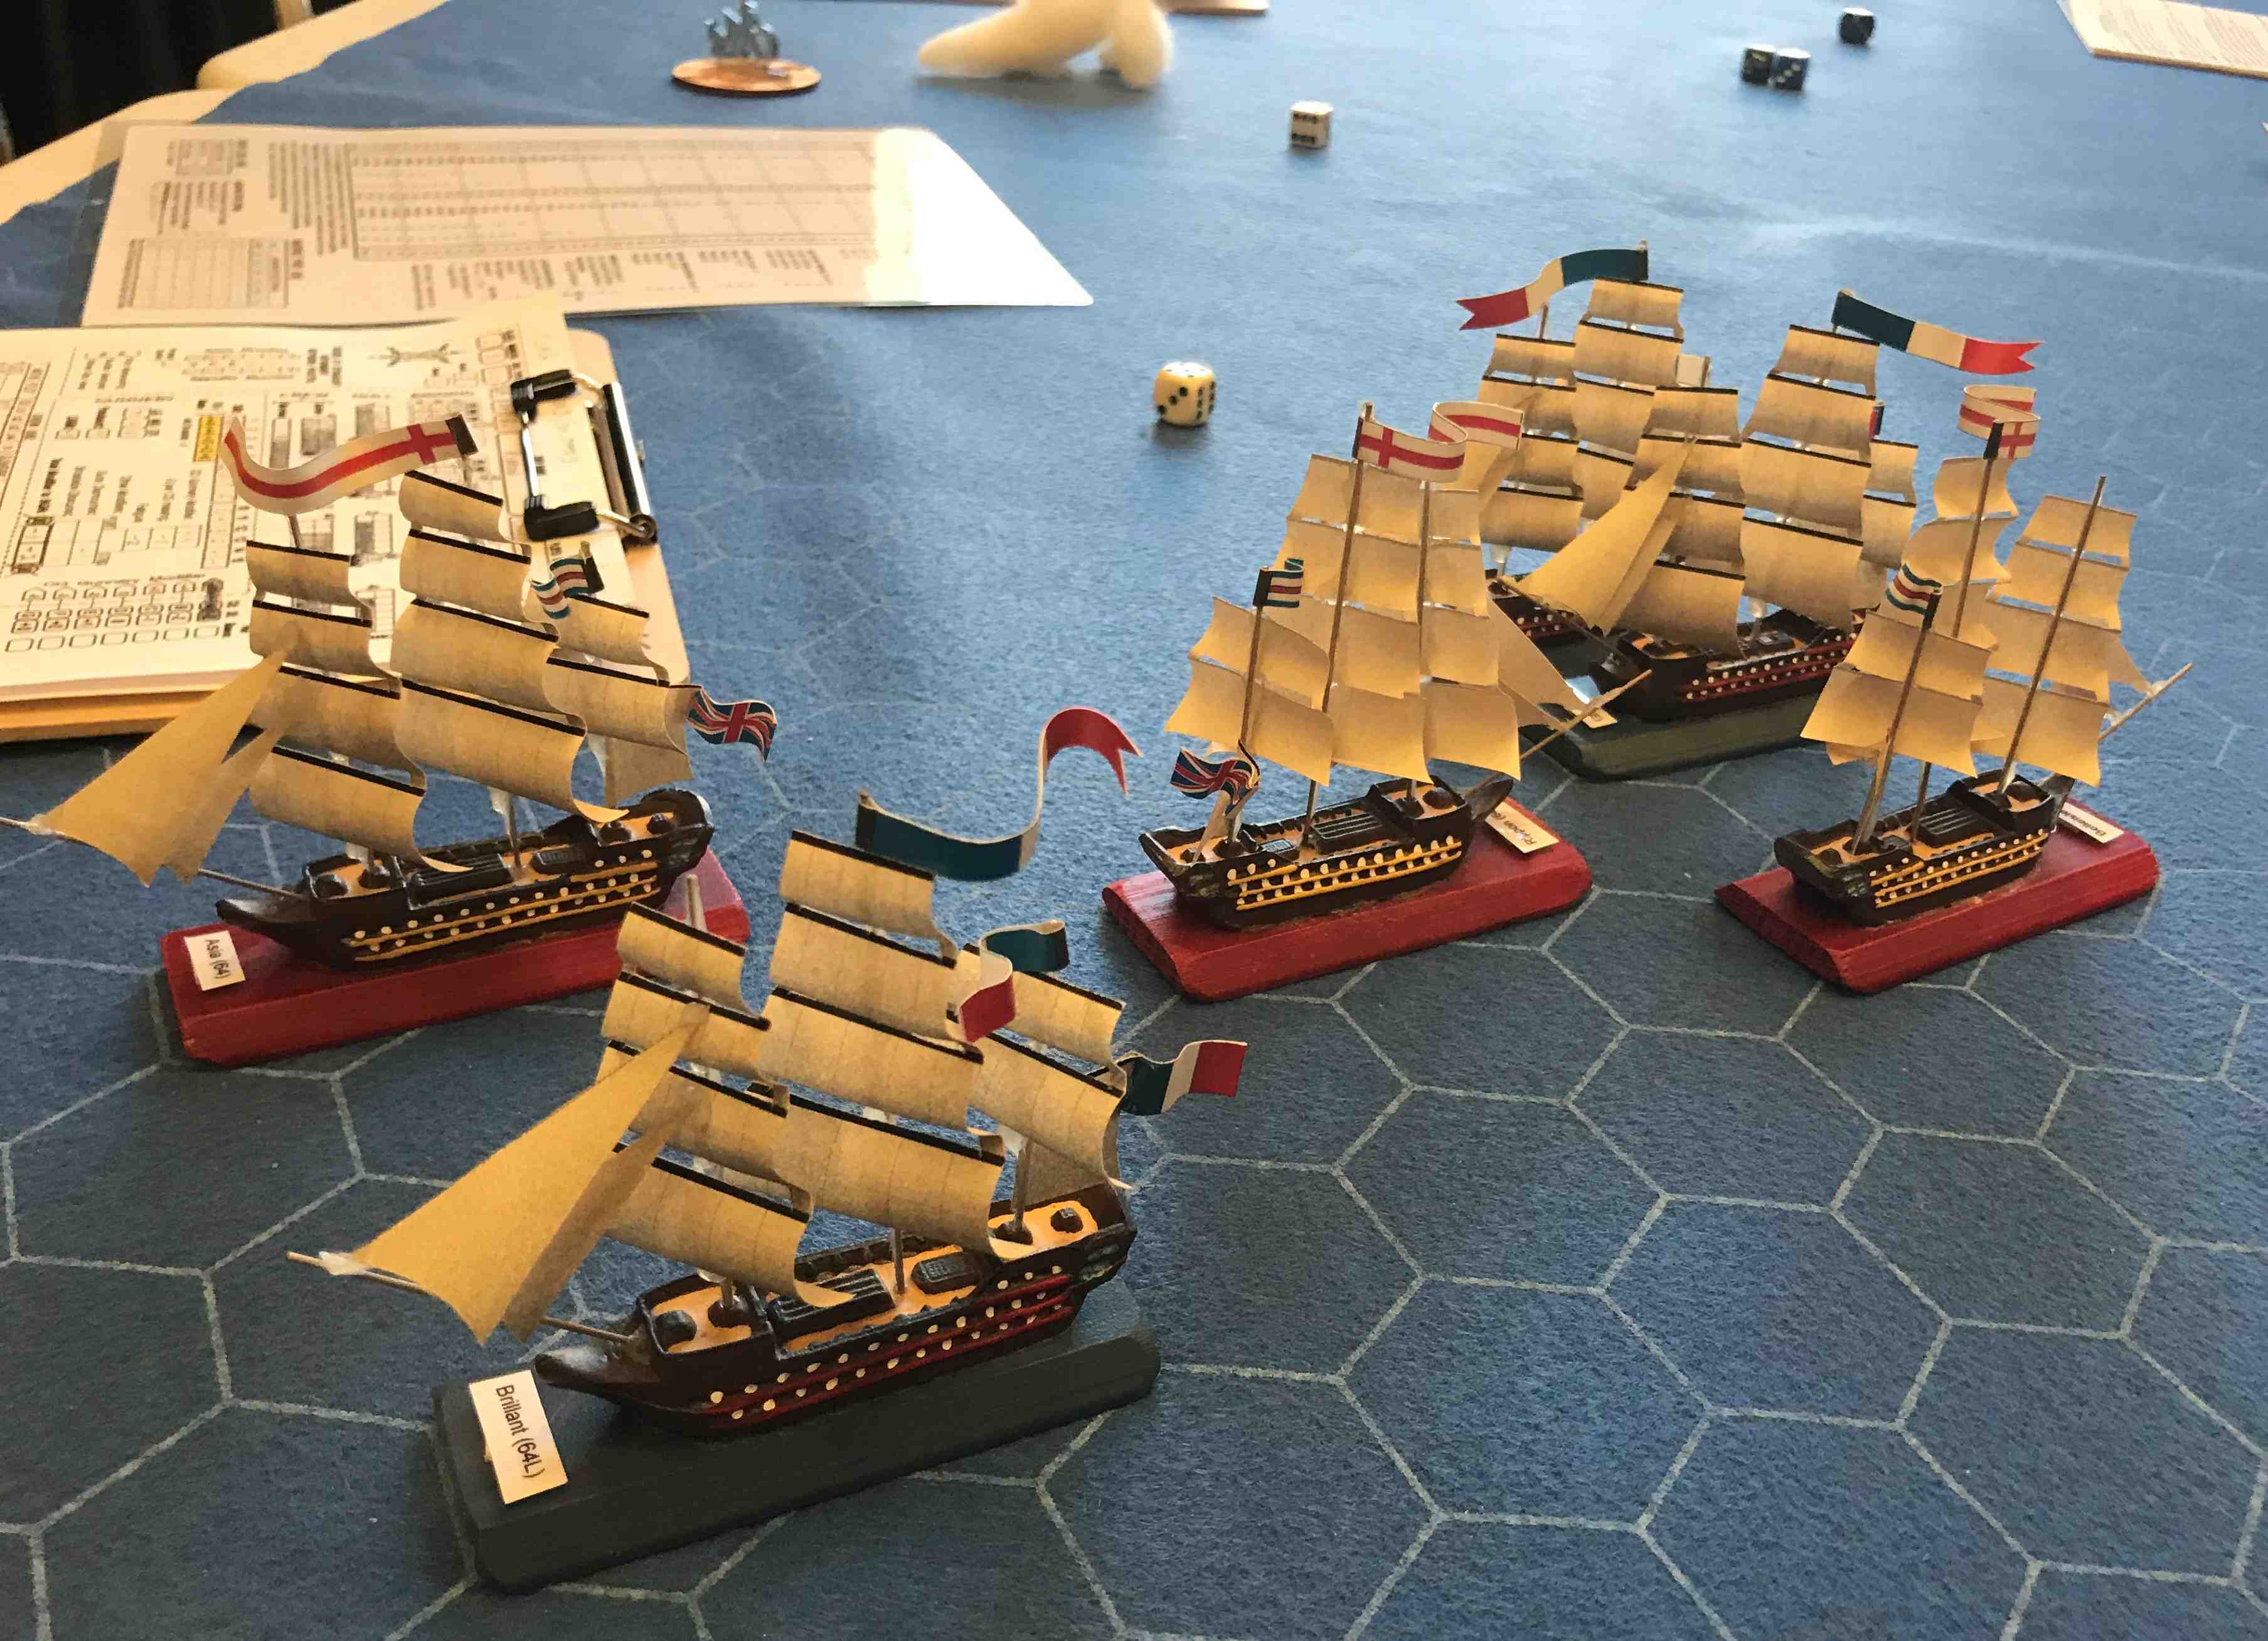
Spartacon 2019 was held in Lansing, Michigan, on Saturday, January 12, 2019. I ran a scenario of Close Action (from Clash of Arms games) there, using the Rebel Seas scenario 13, entitled “Winter Interception.” This scenario was from January 21, 1781, during the American Revolutionary War vs. England, and had a total of seven ships, three British and four French. Basically, the French have two 32-gun frigates, the Gentille and Surveillante, plus two 64-gun ships-of-the-line (SOL), the Eveillé and Ardent (the Ardent being an ex-British ship). The French can win by exiting all four of their ships off the far end of Map A, but a complication is that none of their ships can lose more than one of their rigging sections (each ship has four rigging sections). Else, the scenario would be won by which side caused more damage to the other. In opposition, the British have the 50-gun Adamant, the 64-gun America, and the 74-gun Bedford to try to stop the French. Jim Robinson was the French commander aboard Eveillé, and Joel Lauder commanded the British side from the deck of the Bedford.

The situation at the start:

The At-Start situation for Winter Interception

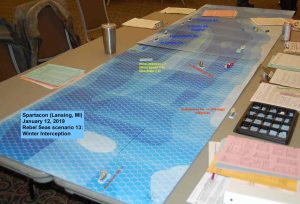
The At-Start situation for Winter Interception. The French ships are in line, with two scattered British ships in opposition. (Click the picture to enlarge it.)

In the above picture, the French ships are in the order Gentille, Surveillante, Eveillé, and Ardent. They are indicated by the blue text, and are heading towards the left narrow side of the map. The British Adamant is near the edge that the French are heading towards, and the America is almost in the exact center of the mapboard, heading towards the French on an angle. The British ship Bedford is off the map, and won’t appear on the map until game-turn 5 (aka g-t 5) of the scenario. All of the ships on the board at start are flying medium sails.

Starting positions

British
America (64) – A2445:3
Adamant (50) – A2004:4
Bedford (74) – (off map, near hex A1126, won’t enter until game-turn 5)

French
Gentille (32) – B4405:1
Surveillante (32) – B4411:1
Eveillé (64) – B4423:1
Ardent (64) – B4429:1

In the above hex locations, “A” or “B” gives the map board the ship started on. In the above picture, Map A is the near map, and Map B is the map that is farther away. Then the hex number is given for that map (example: “2445”) which tells which hex that ship’s bow is placed in. And then, since each ship’s counter covers two hexes, we need to know which way the ship is pointing. The number after the colon (example: “:3”) tells us which way the ship is pointing. The maps have a compass “rose” printed on them. Direction “1” is pointing directly towards the near narrow map edge (off the near side of the table). Direction “2” is one hex clockwise from Direction 1, etc. The wind is blowing toward direction 5, sort of from the near-left corner toward the far-right corner of Map A.

There are a couple of complications with this situation. Although the Wind Speed = 4 (high winds), the America is sailing “close-hauled” into the wind. But the America is flying “medium sails” and so can move four hexes in that wind attitude. But the danger is if that one British ship tries to intercept the French by itself — the four French ships could gang up on the solo Brit and cripple her before the other British ships come up to do battle. Also, with the high winds come high seas (Sea State = 4). This means that all of the ships other than the two frigates will lose some gunnery factors when they are firing their guns downwind, due to having to close the lowest deck’s gun ports to keep the high waves from flooding into the ships. Also, the French are also sailing close-hauled into the wind, and that will slow their progress. Their two 64-gun SOLs can only move 4 hexes per game-turn in that heading, although their two 32-gun frigates can move 5 hexes at medium sail in that heading.

Game-Turn 1

During game-turn 1, Gentille moved ahead 2 hexes, Surveillante moved ahead 3 hexes, Eveillé moved ahead 4 hexes, and Ardent also moved ahead 4 hexes. Adament turned 60-degrees to port (due to the limitations of the hex-grid) and then moved ahead 4 hexes. America moved ahead 4 hexes to close the range towards the enemy. Ardent and Eveillé placed “men in rigging” markers to show they were changing from medium sail to some other sail state. A casual observer would probably think they were going to put up more sails, to go to “plain sail” status, to increase their movement allowance. On the British side, both Adamant and America also placed “men in rigging” counters. No ships fired on g-t 1.

Ship positions at the end of game-turn 1:

British
America (64) – A2847:3
Adamant (50) – A2406:3
Bedford (74) – (off map, near hex A1126, won’t enter until game-turn 5)

French
Gentille (32) – B4403:1
Surveillante (32) – B4408:1
Eveillé (64) – B4419:1
Ardent (64) – B4425:1

The French flagship, Eveillé, signalled to the French fleet: “CLOSE UP THEN COMBINE”.
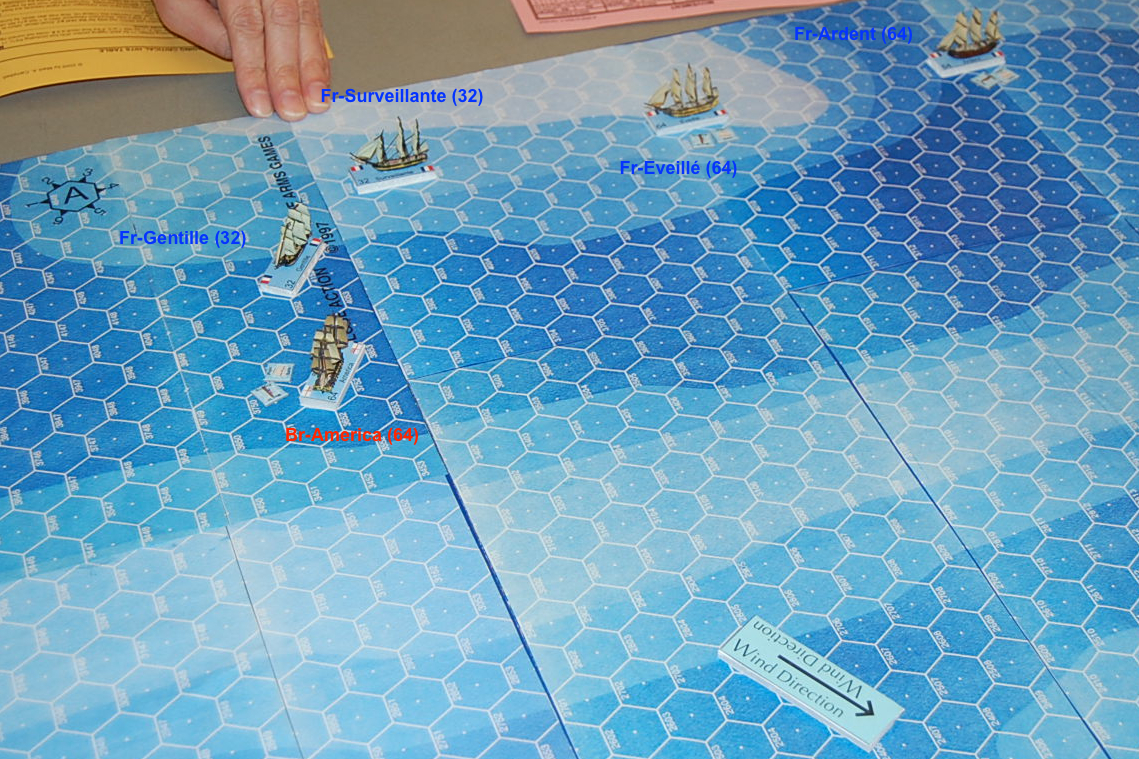
Game-Turn 2

During game-turn 2, Gentille and Surveillante each moved 2 and 3 hexes straight ahead, respectively, the same as in game-turn 1. Eveillé and Ardent each moved 4 hexes ahead, to try to close the gap between them and their leading frigates. The British Adamant moved four hexes ahead. as did America. Eveillé and Ardent still had men in their rigging, as did Adamant and America. On this turn, the two French frigates also showed men-in-rigging. So all of the ships on the map were changing the status of the sails. Once again, there was no gunfire. At the end of the game-turn, during the maintenance phase, the ships announced their new sail status. Gentille and Surveillante had gone to “fighting sail,” meaning they were flying the minimum amount of sails so as to minimize any damage they might receive from enemy fire. Eveillé and Ardent had gone the other way, to “plain sail” and were now flying as many sails as they could get aloft, so to increase their movement allowance. On the British side, both Adamant and America were now flying plain sail.

It should be noted that changing sails requires either one or two crew sections to be plotted to accomplish that task, depending on what sail-state the ship is changing to. Also, the amount of time is slightly variable per ship, depending on the quality of a ship’s crew. Better quality crews can change sails faster than lower quality crews. Quelle surprise, n’est-ce pas?

The map after game-turn 2

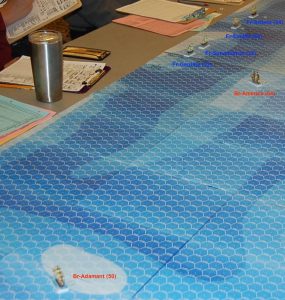
The map after game-turn 2. The America has closed the range towards the French, and the Adamant (in the foreground) has turned to port to try to get in front of the French.

Positions of ships at the end of game-turn 2:

British
America (64) – A3249:3
Adamant (50) – A2808:3
Bedford (74) – (off map, near hex A1126, won’t enter until game-turn 5)

French
Gentille (32) – A4453:1
Surveillante (32) – B4405:1
Eveillé (64) – B4415:1
Ardent (64) – B4421:1

The French flagship, Eveillé, signalled to the French fleet: “FIRE WHEN YOU CAN”.

Game-Turn 3

During g-t 3, both British ships could now move faster while close-hauled toward the wind due to their increased amount of sails, and Adamant and America both moved 6 hexes ahead. Gentille, the leading French frigate, plotted and moved “P3” which means she turned to port, then moved ahead 3 spaces. While the turn to port put Gentille into a more favorable wind attitude of a “broad-reach,” ships are limited by acceleration and deceleration factors from one turn to another. A large sailing warship just can’t accelerate like a race horse! This turn put Gentille on a near-collision course with America. Surveillante was content to just move ahead 3 hexes. Eveillé moved ahead 6 hexes, and Ardent moved ahead 5 hexes. Adamant declared “men in rigging” again, as did Eveillé and Ardent. America also had men in her rigging.

The situation on the map after movement in game-turn 3:

Gentille and America head towards each other

Gentille and America head towards each other. Neither of those ships can bring their guns to bear on each other in this game-turn.

While Gentille and America were near each other, neither ship could fire at the other; however, Surveillante could bring her guns to bear on America, and so Surveillante, commanded by Bill Worrel (playing in his first game of Close Action), opened fire at a range of 6 hexes. At a 6-hex range, Surveillante had a “7” as its Basic Gunnery Number (BGN). It got to add a “+2” for its Crew Quality (CQ) Gunnery Modifier, to give her a Modified Gunnery Number (MGN) of “9”, but was just out of range to get a “rake” or an initial broadside bonus to her gunfire. The result of the gunfire was that America lost 2 rigging boxes (out of 6) in her first rigging section, and also lost a crew box from her marines. So Surveillante had the honor of drawing “first blood” even though the wound was only a “dice wound.” All ships were too far away for any shipboard marines to fire at each other.

Positions of ships at the end of game-turn 3:

British
America (64) – A3852:3
Adamant (50) – A3411:3
Bedford (74) – (off map, near hex A1126, won’t enter until game-turn 5)

French
Gentille (32) – A4151:6
Surveillante (32) – B4402:1
Eveillé (64) – B4409:1
Ardent (64) – B4416:1

The French flagship, Eveillé, signalled to the Surveillante: “GOOD START”.

Game-Turn 4

America (with men still in the rigging) now decided to try to turn to port, to head in the same direction as were the French SOLs. That meant she would have to tack through the facing wind. So America turned to port, and then had to stop, as she was now “luffing” straight into the wind. America had used 6 Movement Points (MPs) in her previous turn, which meant she ordinarily would have had to use at least 4 MPs in this turn due to her deceleration rating of 2. But when a ship turns directly into the wind, it immediately stops. America moved another 6 hexes straight ahead, still angling to get in front of the French ships. The French ship Gentille, commanded by Mike St. Peter, moved “2P1” which meant it moved 2 hexes ahead, then turned 60-degrees to port, then moved 1 more space ahead. This put Gentille’s port bow adjacent to America’s port bow. Surveillante now also peeled out of the French line, plotting and moving “1P2”. Eveillé and Ardent, both still with men in rigging, moved 6 and 5 hexes ahead, respectively. This was opening a bit of a gap between the two 64-gunned vessels.

A note about combat in Close Action (of course, anyone who knows how to play Close Action will know this, but this blog post is mostly written for novices to follow along with play). Like, movement, ships simultaneously plot which ship they will fire at, if any. Then all ships will reveal their targets. Ships also calculate their MGN (Modified Gunnery Factor) and should also write that down. All gunfire (and marine fire) is considered to be simultaneous, and so each ship needs to know what its MGN was at the beginning of combat, as damage received can cause a ship’s gunnery to be lessened.

America could now fire a half-(initial) broadside from its port bow battery at Gentille; Gentille suffered a rigging and a hull hit. Gentille’s initial (half) broadside from its port bow battery returned fire, but did no damage to America. Marine fire between the two ships was ineffective.

During the maintenance phase to end the game turn, America drifted 1 hex to leeward (that’s downwind for you land-lubbers). Although America pivoted (turned), she did not move ahead, so that was considered that she did not move during the turn. Ships that don’t move during a game-turn are subject to drifting, and with high winds in a scenario like this one, they will drift more often than not.

Situation at the end of game-turn 4

Situation at the end of game-turn 4. America was one hex further forward, but has drifted backwards one hex after exchanging gunfire with Gentille.

Positions of ships at the end of game-turn 4:

British
America (64) – A3852:2 (for combat, then drifted to hex A3752:2)
Adamant (50) – A4014:3
Bedford (74) – (off map, near hex A1126, won’t enter until game-turn 5)

French
Gentille (32) – A3851:5
Surveillante (32) – A4252:6
Eveillé (64) – B4403:1
Ardent (64) – B4411:1

Also, at the end of g-t 4, America announced it was now back at medium sail; Eveillé and Ardent also announced they were back at medium sail. HMS Bedford, the British flagship, sent a message to Adamant, saying “COME HERE FASTEST”. This message was sent, even though the flagship was still off the board (but would enter the game map the next turn). The French flagship, Eveillé, signalled to the French fleet: “ROUND SHOT AT SAILS”.

Game-Turn 5

America now rolled to see if she could successfully complete the tack to port this turn. After taking the required two d10 dice rolls on the tacking table, it was found that she did complete the tack, so her move for g-t 5 was plotted as “P”. She did have 3 crew sections plotted to help with the tacking maneuver, so her gunfire for this game-turn would have a -9 modifier applied (-3 per each missing crew section—they’re “missing” from manning the guns because they’re playing with the sails). Adamant plotted “3S2” and was now headed directly at the French, from dead-ahead of their SOLs. And the Bedford, a 74-gun SOL, was finally able to enter the board (in plain sail), moving 5 hexes towards the French.

For the French moves, Gentille moved ahead 2 spaces, Surveillante moved ahead 3 spaces, Eveillé moved ahead 4 hexes, and Ardent moved “P2S,” to sort of side-slip a bit to the left of Eveillé.

America fired at Eveillé, while the Eveillé, Gentille, and Surveillante all fired at America. America did no damage to Eveillé, but America suffered a combined loss of 1 rigging, 1 hull, and 1 sailor boxes. In addition, America suffered a critical hit of waterline damage, and had to send another 3 boxes of sailors to “man the pumps” to keep out the water below. This meant that America lost its first crew section, which gave it a permanent -3 modifier to all gunfire (from the main guns, not from marine fire). America also had to take a morale check (MC) at the end of the game-turn, but with a morale rating of “3”  was able to pass the MC.

Positions of ships at the end of game-turn 5:

British
America (64) – A3752:1 (for combat, then drifted to A3653:1)
Adamant (50) – A4317:4
Bedford (74) – A1629:3

French
Gentille (32) – A3652:5
Surveillante (32) – A3950:6
Eveillé (64) – A4451:1
Ardent (64) – B4210:1

Bedford (the British flag) signaled to Adamant: “MOVE TO JOIN AMERICA”. The French flagship, Eveillé, signalled to the French fleet: “FIRE EVERY TIME”.
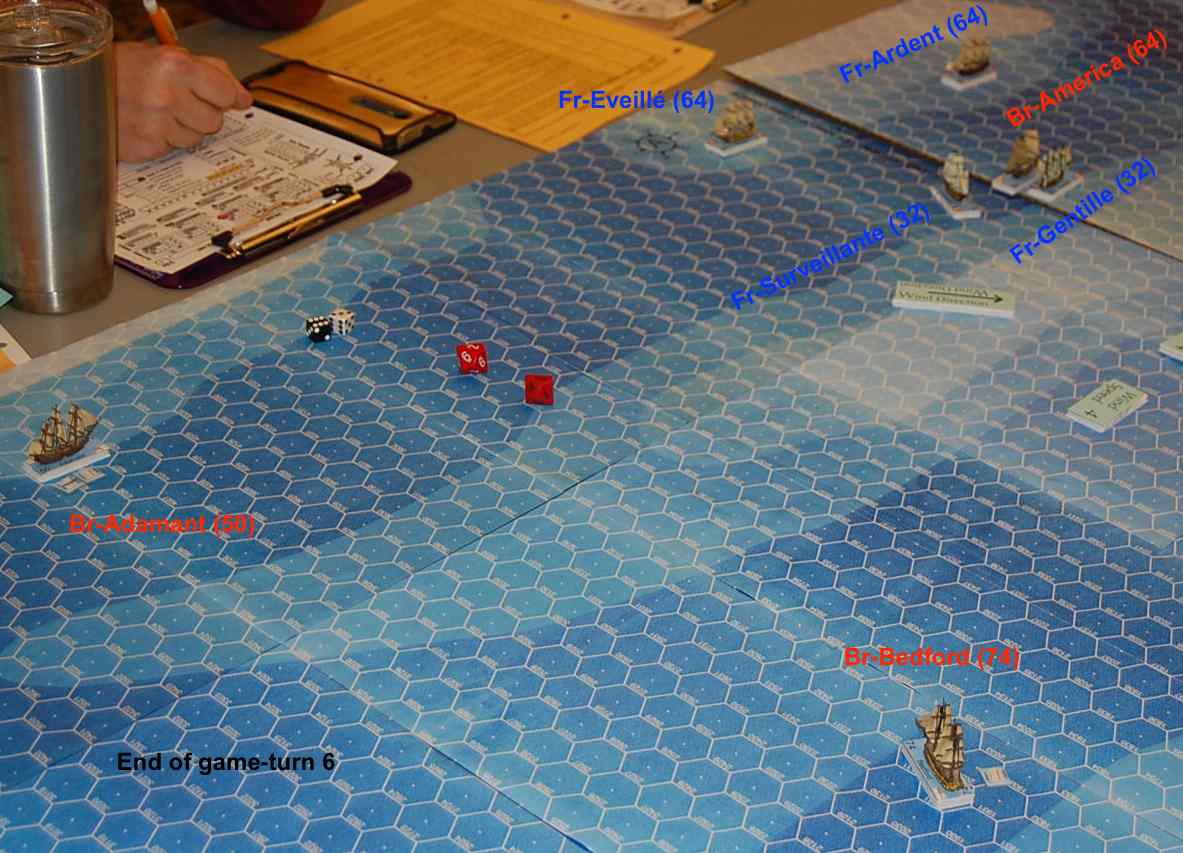
Game-Turn 6

America having completed her tack during game-turn 5, was facing toward board edge “1,” and was facing directly toward Gentille. Not wanting to risk colliding with Gentille, America wisely plotted “0” and so did not move. Adamant, under plain sail, in a broad-reach attitude to the wind, raced along at 9 hexes toward the French. Adamant also had men in the rigging. (Upon examination of the ships’ log for Adamant after the game, Adamant should have only moved 8 hexes, due to its acceleration of “2” and the fact it used only 6 MPs in the previous g-t.) Bedford, being close-hauled, moved 5 hexes towards the French. Gentille moved “1P2” which brought her port side up against the port side of America. Surveillante moved “P2S1” to gain a bow-rake on America. Eveillé moved 2 spaces ahead. Ardent moved 4 spaces ahead.

America plotted to fire at Gentille; the other two British ships were still well out of range of the French. But America was in a sort of vise, drawing the fire of Gentille (1-hex range), Surveillante (2-hex bow rake), and Eveillé (9-hex range). After all gunfire was resolved, amazingly, America had only sustained damage to the amount of 2 rigging boxes and 2 hull boxes and 1 sailor box. Gentille sustained damage of 1 rigging and 1 hull box.

The situation at the end of game-turn 6

The situation at the end of game-turn 6: British ship America is trapped between the ships of the French squadron.

Positions of ships at the end of game-turn 6:

British
America (64) – A3653:1
Adamant (50) – A4326:4
Bedford (74) – A2131:3

French
Gentille (32) – B3502:4
Surveillante (32) – A3651:6
Eveillé (64) – A4449:1
Ardent (64) – B4206:1

The French flagship, Eveillé, signalled to the French fleet: “FIRE AT RIGGING”.
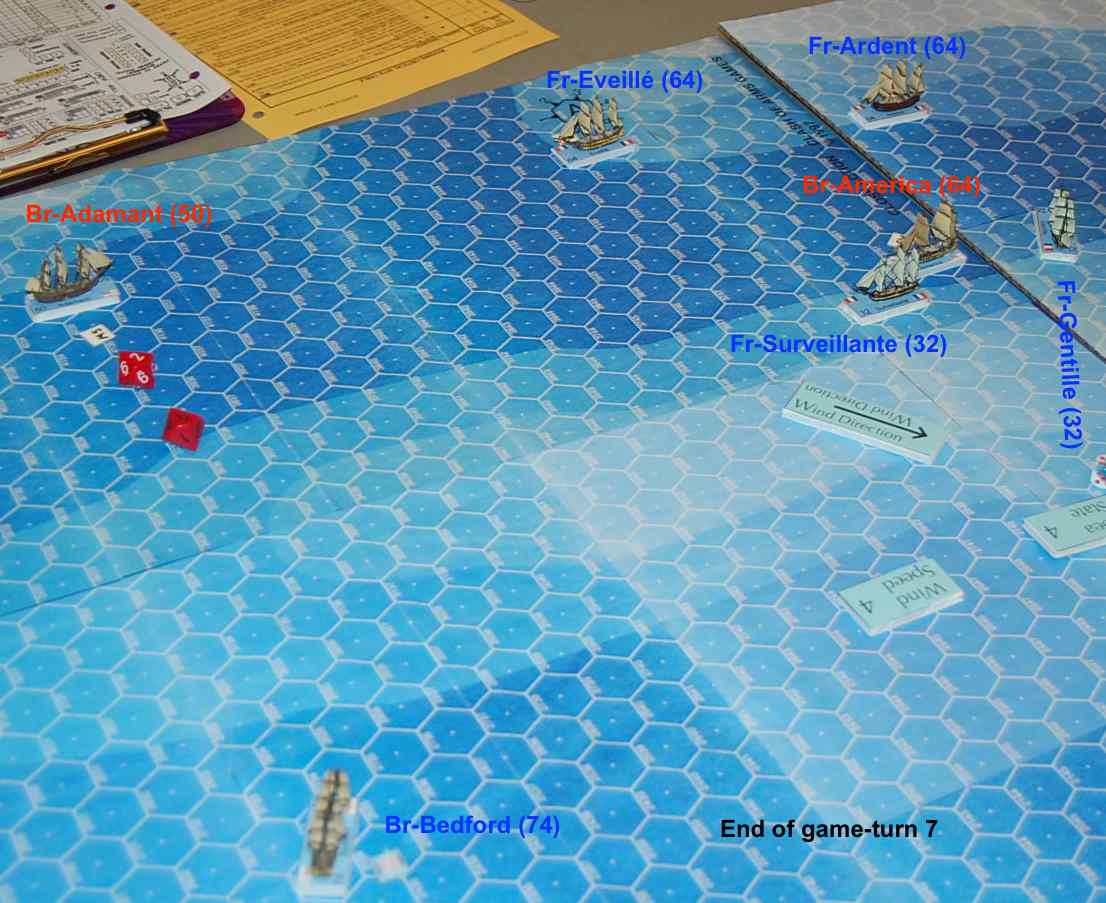
Game-Turn 7

For game-turn 7, Adamant, still with men in the rigging, continued to make haste, moving 9 more hexes closer to the French. Bedford moved 5 hexes closer to the French, coming in from an angle. America, effectively not moving at all last turn while completing her tack, could only accelerate to 2 MPs, so she moved 2 hexes straight ahead. Gentille had been passing by America, so plotted “P1” to turn to port behind America and so gained a stern rake shot. Surveillante plotted “1S1” and so turned to starboard and was now on a parallel course with America, although slightly ahead, so Surveillante could still shoot her starboard stern guns at America. Although, in the end, Surveillante passed on the low-odds shot in order to not fatigue her gun crews for no result. Eveillé continued to move 2 hexes forward, and Ardent moved 4 hexes forward.

Once again, America was the only British ship that could fire at the French, so America fired at Adamant, who was 6 hexes away on her starboard side, rather than take a 1-hex range half-broadside at Surveillante. Gentille, Eveillé, and Ardent all fired at America. America managed to inflict damage on 1 rigging and 1 hull and 1 sailor on Ardent. In return, America suffered damage of 1 rigging (losing her 1st rigging section and having to take a rigging check die roll, which resulted in “sheets cut”), and 1 sailor. So, in spite of having 3 ships firing at her, America dished out 3 boxes of damage while only receiving 2 boxes of damage in return. Perhaps more importantly, America was holding the French in combat, instead of them sailing toward the board edge they needed to exit from.

At the end of the turn, Adamant announced she had changed to medium sail (from plain sail).

Situation at the end of game-turn 7

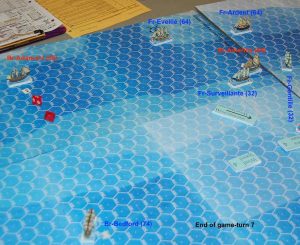
Situation at the end of game-turn 7. Will America be able to escape the French trap?

Positions of ships at the end of game-turn 7:

British
America (64) – A3651:1
Adamant (50) – A4335:4
Bedford (74) – A2634:3

French
Gentille (32) – B3603:3
Surveillante (32) – A3549:1
Eveillé (64) – A4447:1
Ardent (64) – B4202:1

The French flagship, Eveillé, signalled to the Gentille: “TURN AROUND”.

Game-Turn 8

America now appeared to get entirely out of the French trap, as she only plotted “2” to move ahead 2 hexes. Bedford continued to close with the enemy by moving forward 5 hexes, and with men in the rigging. And Adamant, now at medium sail, moved forward 7 hexes.  Gentille moved ahead 4 hexes. Gentille also had men in the rigging (sailor crew section 4), wanting to put up more sails to try to get back into the fight, as her sailing had now taken her a bit in the wrong direction. Gentille also had her marines working at repairing rigging. Surveillante moved ahead 2 hexes, keeping America on her starboard quarter. Eveillé moved ahead 2 hexes, and Ardent moved ahead 4 hexes. America set her marines to work at repairing her rigging.

America once again chose to fire a full broadside at Ardent, rather than a half-broadside at the closer Surveillante. Neither of the other British ships fired. Ardent and Eveillé returned fire at America. America received only a “canvas wound,” i.e., a hit to a single rigging box, while America dished out 2 boxes of damage to Ardent, to a rigging and to a marine box.

During the maintenance phase, Gentille switched from fighting sail to medium sail. America, having fired her guns 5 times, now added a -1 “fatigue” factor to all future gunnery.

Positions of ships at the end of game-turn 8:

British
America (64) – A3649:1
Adamant (50) – A4342:4
Bedford (74) – A3136:3

French
Gentille (32) – B4005:3
Surveillante (32) – A3547:1
Eveillé (64) – A4445:1
Ardent (64) – B4250:1

The French flagship, Eveillé, signalled to the French fleet:”CLOSE UP WHEN POSSIBLE”.
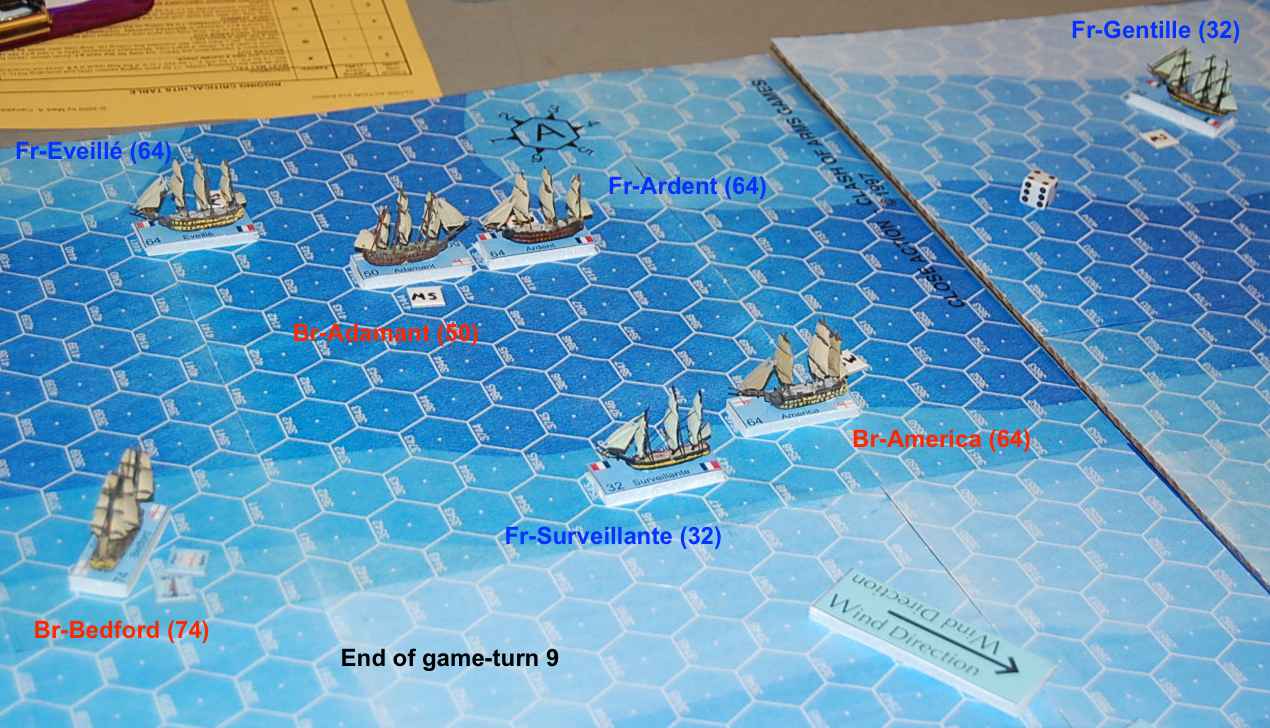
Game-Turn 9

America slowed to only 1 hex forward movement, while her marines were still working at repairing the rigging. (After the game, while perusing the ship’s log from America, she was repairing rigging while at medium sail. That is a big no-no! Ships must be at fighting sail or have their sails furled, or even dismasted, to be able to repair rigging! As a GM, I must check their logs more closely during the game.) Bedford got another 5 hexes closer to the enemy French, still with men in the rigging. And Adamant plotted “1S1P1” to sort of side-saddle move to starboard.

Eveillé moved 4 hexes forward. Surveillante moved 2 hexes forward, which put America behind her starboard quarter so now neither of those ships would be able to fire at each other. Gentille moved ahead 4 hexes, then turned to port, directly into the wind, preparing to tack to a new course. Gentille had effectively sailed completely around America (the ship, not the country!). Ardent continued moving ahead, 4 more hexes worth. This put Ardent on a direct collision course with Adamant! They were facing each other in adjacent hexes.

America again targeted Ardent, and now the HMS Adamant opened fire on Surveillante. Ardent returned fire at America, and Eveillé fired at Bedford. Ardent received a hull hit, while Surveillante was unscathed. America sustained a hull hit, and Bedford dodged any damage.

End of game-turn 9

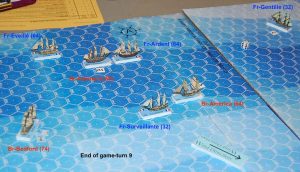
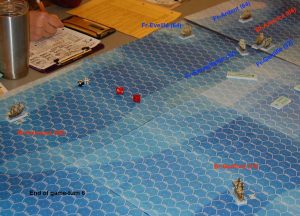
End of game-turn 9: HMS Adamant and the French SOL Ardent are on a collision course!

Positions of ships at the end of game-turn 9:

British
America (64) – A3648:1
Adamant (50) – A4245:4
Bedford (74) – A3639:3

French
Gentille (32) – B4407:2
Surveillante (32) – A3545:1
Eveillé (64) – A4441:1
Ardent (64) – B4246:1

Bedford dropped from plain sail to medium sail during the maintenance phase. The French ship Surveillante signalled to the French fleet:”FIRE AT HULL”.

Game-Turn 10

The first order of business for game-turn 10 was to resolve the possible collision between Adamant and Ardent. Ardent made a turn to port, which was prudent, as if she had turned to starboard she would have turned into the wind and would have lost all headway. So, one would have thought that the captain of Adamant would have realized this and so would have turned to port, but instead the Adamant turned to starboard, and that put the two ships on a collision course, only in a different hex! Besides gnashing of teeth, there was dice-rolling to see which ship got to move first and take possession of hex A4145, and it was the French ship Ardent that got to move first into A4145. Now, sometimes, a ship can attempt to “bear off” by making an emergency turn in a game of Close Action in order to try to avoid a collision. But in this case, since Adamant had just made a turn, and had plotted to move “S1P1S” (which was also an illegal plot, as ships cannot pivot more than twice in a game-turn), she could not turn again immediately. Instead, she rammed into the starboard bow of Ardent. In Close Action, the ramming ship takes damage to its sails, depending on how many sails are flying, when it rams another ship, but the ship that is rammed into does not get any damage. So, in this collision, Adamant lost 5 rigging boxes. That wiped out Adamant’s entire first rigging section (of 5 boxes), necessitating a rigging check, which took out two more rigging boxes in rigging section 2. And, to top things off, the two ships became fouled together, so neither would be able to move away from the other.

For the other ships’ moves, America moved 2 ahead then turned to port. As Surveillante only moved 1 hex ahead, that put Surveillante in position for a bow rake on America. Bedford moved “S2P” and had a bow rake shot on Surveillante from 4 hexes distant. Gentille rolled dice to attempt to continue tacking to port, but the tack’s completion would be delayed for a turn, so Gentille stayed facing into the wind. Eveillé turned to port and then moved 3 hexes ahead, which put her in position for a 9-hex ranged shot versus America, although in the event Eveillé instead fired a half-broadside at range 5 versus Adamant.

During combat, America fired at Ardent, and Bedford fired its initial starboard broadside with a bow rake at Surveillante. The French returned fire with Surveillante firing its half-broadside bow rake at America, and Eveillé and Ardent both shot at Adamant. America suffered only 1 hull hit, but Adamant took a pounding, losing 3 hull and 4 sailor boxes, to go with the 7 rigging boxes Adamant lost during movement. Losing the crew section triggered a morale check for Adamant, which she failed, dropping her crew quality to  “E” which also yielded a “-2” to future gunfire. Surveillante lost only 1 sailor box, and Eveillé lost 2 rigging boxes.

Situation after game-turn 10

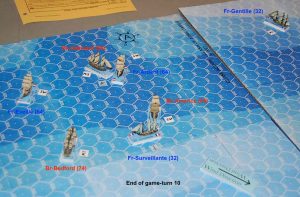
Situation after game-turn 10. Adamant has rammed and fouled with Ardent.

Positions of ships at the end of game-turn 10:

British
America (64) – A3646:6
Adamant (50) – A4245:5 (fouled with Ardent)
Bedford (74) – A3641:3

French
Gentille (32) – B4407:2
Surveillante (32) – A3544:1
Eveillé (64) – A4139:6
Ardent (64) – B4145:6 (fouled with Adamant)

The French ship Surveillante signalled to the French fleet:”GO DOWNWIND ENEMY”.

Game-Turn 11

Gentille completed its tack, and simply pivoted to port. It drifted later (1 hex downwind), during the maintenance phase. Surveillante moved 3 hexes forward. Eveillé moved 6 hexes forward. Ardent was still fouled with Adamant, so neither of those ships moved. America merely moved 1 hex forward, which put her in position for a 3-hex range stern rake of Surveillante. Bedford moved “1S1P” which put her stern in position to be raked by Surveillante. Bedford would return fire at Surveillante, but could only use her starboard stern battery. Eveillé fired at Bedford, but could only use her port stern guns. Ardent delivered another bow rake on Adamant, but this time, Adamant returned fire with her port bow guns.

Adamant lost 2 rigging, 2 hull, a sailor, and a marine box. Bedford lost a hull and a sailor box. Surveillante lost 1 rigging, 1 hull, 1 sailor, and 1 marine. Losing the sailor meant that Surveillante lost her entire first crew section, so future gunfire would have a -3 modifier, and she also had to take a morale check later in the turn (which she passed, having a morale rating of “4”). Ardent lost a rigging, a hull, a sailor, and a marine, although no full sections were lost (yet).

During the maintenance phase, Gentille drifted, as did the fouled duo of Adamant and Ardent.

Positions of ships at the end of game-turn 11:

British
America (64) – A3545:6
Adamant (50) – A4245:5 (fouled with Ardent) (drifted to A4145:5)
Bedford (74) – A3742:3

French
Gentille (32) – B4407:1 (then drifted to B4307:1)
Surveillante (32) – A3541:1
Eveillé (64) – A3536:6
Ardent (64) – B4145:6 (fouled with Adamant) (drifted to A4046:6)

The French ship Surveillante signalled to the French fleet:”RUN OR FIGHT”, evidently wanting to know what the admiral wanted the French to do. At the same time, the French flagship, Eveillé, sent aloft the signal flags that stated “SHOOT AT AMERICA”.

Game-Turn 12

Now the French 64-gun Ardent began to worry. It was still fouled to Adamant, and now Bedford was closing in for a bow rake on Ardent. Bedford moved “1S2” but was only in position to rake the Ardent with her port bow guns. America moved 3 spaces ahead, moving once again in uncrowded water. Gentille accelerated at her maximum rate of “2” and so moved two spaces ahead after finally completing her port tack. Surveillante moved 5 spaces ahead to move away from the nearest British ships, and Eveillé moved 6 spaces ahead.

America fired at the retreating Surveillante at 8-hex range, too far for a rake of the Serveillante’s stern. Adamant, still fouled to Ardent, fired her port bow battery at Ardent. Bedford also fired her port bow guns at Ardent, a half-broadside bow rake. Ardent was the only French ship to return the British fire, firing a 1-hex range bow rake at Adamant.

Surveillante took only 1 hull hit, but Ardent got pummeled to the tune of 3 rigging and 3 hull. Adamant lost 2 rigging (causing the loss of her 2nd rigging section), 1 hull (causing the loss of her 1st hull section), and 1 sailor (losing the 2nd sailor section). So, Adamant had to take another rigging check, a hull check, and two morale checks. In addition, she added a -1 modifier for “guns dismounted” from both the port and starboard broadsides, and all gunnery also got a second -3 modifier for the extra missing crew section (making the “missing crew” gunnery modifier -6 in total). Damage was really beginning to add up against the Adamant.

During the maintenance phase, the Adamant kept trying to grapple the Ardent, to keep her from being able to sail away, especially now that the Bedford was coming up to aid the Adamant. Although the grappling attempts kept failing, the Ardent was also unable to unfoul the ships, and so couldn’t get away.

Positions of ships at the end of game-turn 12:

British
America (64) – A3244:6
Adamant (50) – A4145:5 (fouled with Ardent) (drifted to A4046:5)
Bedford (74) – A3845:4

French
Gentille (32) – B4305:1
Surveillante (32) – A3536:1
Eveillé (64) – A2933:6
Ardent (64) – B4046:6 (fouled with Adamant) (drifted to A3946:6)

The French flagship, Eveillé, signaled “CLOSE UP UNTIL GENTILLE” to her squadron. The British flagship, Bedford, signaled to the ship America “TARGET FRIGATE IF POSSIBLE”, but did she mean the retreating Surveillante or the approaching Gentille?
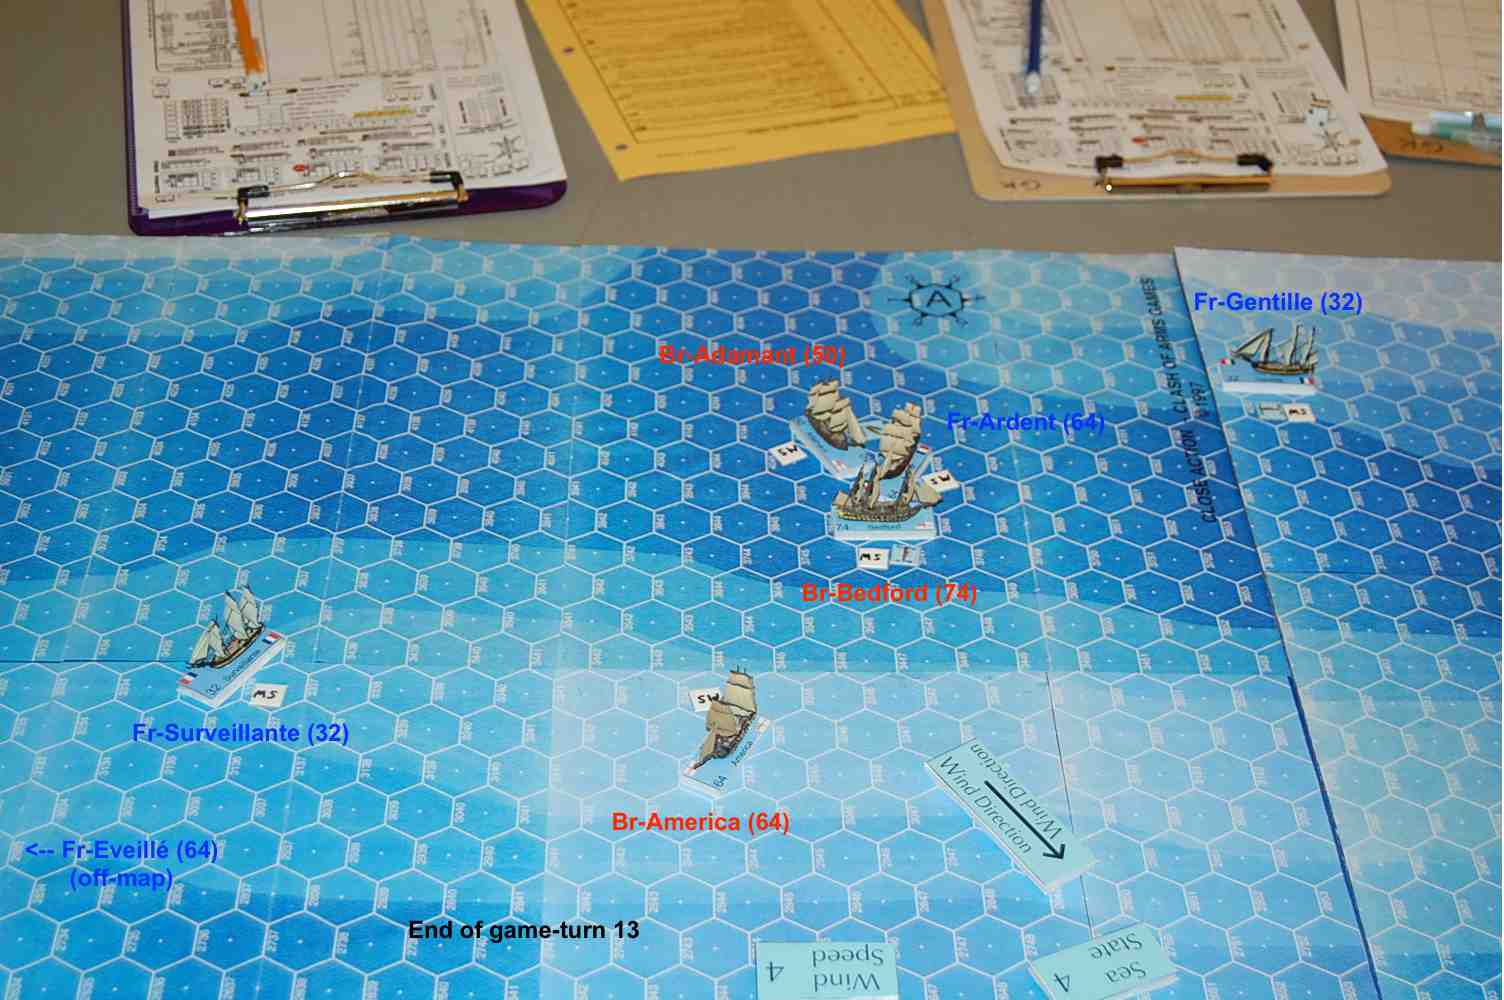
Game-Turn 13

The British Adamant and the French Ardent were still fouled together and so couldn’t move, and now Bedford moved 2 spaces ahead to have a better bow rake on Ardent. America moved 3 spaces ahead, not sure whether to go and help finish off Ardent or to pursue the Surveillante and Eveillé. Eveillé turned to starboard and then moved 3 spaces directly toward the board edge where she could escape from the British. Surveillante turned to port and moved 2 spaces ahead, so she would be able to shoot at America. Gentille accelerated to 4 MPs, and moved straight ahead.

For the combat phase, America and Surveillante traded broadsides, although Surveillante, being only a 32-gun frigate with a missing crew section and whose remaining crew was slightly fatigued, could only manage a MGN of “0” (zero), to  which of course a 1d6 would be added. Ardent continued to bow rake Adamant, and while Adamant returned fire at Ardent as best she could, Bedford now had a full 1-hex range bow rake on Ardent.

America managed to hit a single sailor box on Surveillante; the return broadside did no damage. Ardent’s bow rake at Adamant caused damage to 3 rigging, 1 hull, and 1 sailor. The return fire from Adamant and Bedford to Ardent caused damage to 1 rigging (taking out rigging section 1 and causing a rigging check), 2 hull (wiping out hull section 1 and causing a hull check and a morale check), and 2 sailor boxes.

The end of game-turn 13

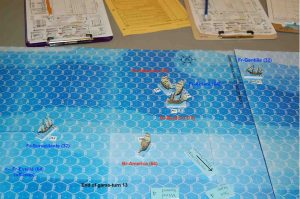
The end of game-turn 13. The French ship Ardent is now caught in a vise between Adamant and Bedford. Eveillé has moved to the left, out of the picture, and Surveillante also has a clear path to escape to the left. Gentille, at the top-right of the picture, should be able to cruise past Adamant and Bedford to escape.

Positions of ships at the end of game-turn 13:

British
America (64) – A3143:6
Adamant (50) – A4046:5 (fouled with Ardent)
Bedford (74) – A3847:4

French
Gentille (32) – B4301:1
Surveillante (32) – A3335:6
Eveillé (64) – A2930:1
Ardent (64) – B3946:6 (fouled with Adamant)

During maintenance, Ardent still was unable to unfoul from Adamant, meaning Ardent was in a very precarious position. The British flag in Bedford sent the message to all British ships, “FOCUS ON ARDENT KILL”. I guess you can’t make it any plainer than that, that you want to wipe out an enemy ship!

Game-Turn 14

During game-turn 14, the French ships Eveillé and Surveillante continued to move toward the escape map edge. Eveillé moved 4 hexes straight toward that map edge, and Surveillante moved 7 hexes while on a broad-reach, in the general direction of that map edge. Gentille accelerated to “5”, the most speed she could go while close-hauled with medium sails. She also had men in the rigging, trying to raise more sails, although that would take two turns to accomplish. For the Brits, America merely moved 2 spaces ahead. Adamant was still fouled with Ardent and so couldn’t move, and Bedford did not move at all, so to keep the perfect bow rake position on Ardent.

Only two ships fired during combat: Ardent had a bow rake on Adamant, and Bedford had a bow rake on Ardent. But, it seems, the game was ended just at this moment, as no damage was recorded for game-turn 14.

Victory Determination

The French did not fulfill their special victory condition of exiting all four of their ships off a particular map edge, so the scenario would be decided by damage inflicted upon the enemy.

Damage to the British:

America (worth 72 Victory Points) lost 7 rigging boxes (1 was then repaired), 5 hull boxes, 6 sailor boxes, and 1 marine box. She only lost one rigging section, though. That rigging section was worth 5% of her total VPs, so the French earned 3.6 VP for America.

Adamant (worth 45 VP) lost 14 rigging boxes, 7 hull boxes, 7 sailor and 1 marine boxes, which was a loss of 2 rigging sections (2 x 5% of VPs), 1 hull section (10% of VPs), and 2 sailor sections (2 x 10%). So Adamant was worth 40% of her 45 VPs, or 18 VP.

Bedford (worth 70 VP) lost only 1 hull and 1 sailor box, and no sections, so she yielded 0 VP to the French.

So the French amassed a total of 18 + 3.6 = 21.6 VP.

Damage to the French:

Gentille (worth 28 VP) lost 2 rigging boxes, 2 hull boxes, and no sections, so she yielded 0 VP to the British.

Surveillante (worth 27 VP) lost 2 rigging boxes, 2 hull boxes, 3 sailor boxes (1 crew section), and 1 marine box. So her 1 crew section was worth 10% of her VP, or 2.7 VP.

Eveillé (worth 62 VP) lost 2 rigging boxes only (no sections were lost), so she yielded 0 VP.

Ardent (worth 62 VP) lost 6 rigging boxes (1 rigging section), 8 hull boxes (1 hull section), 4 sailor boxes, and 2 marine boxes, so her 1 rigging section is worth 5%, and the hull section is worth 10%. So 15% of 62 = 9.3 VP.

So the British earned 12.0 VP from the French.

The French had a VP lead of 21.6 to 12.0, so on the face of it, the French earned a slight victory. However, if the scenario had continued, I believe that Ardent would have eventually surrendered, or would have been battered to pieces, so I would say that the British won this scenario as it seemed the other three French ships were mostly concerned with getting away. The other French ships could have come back to help Ardent, but by the time Eveillé could have turned around and come to Ardent’s aid, Ardent would have not been in very good fighting condition.

British ship Bedford still had all of its gunnery factors; if it continued to pour in bow rakes at Ardent, it would usually have a BGN of close to 30 from 1-hex range. Even at 5-hexes, Bedford’s BGN would be just more than 20. Firing 30 (plus the d6 die roll) gunnery factors should inflict 4 to 7 points of damage per turn. Firing 20 (+ d6) factors should inflict 1 to 3 factors of damage per turn (not counting any critical hits, of course). However, the other British ships were not in great shape. The Adamant would have to apply -10 or -11 to all of her shots, and maybe more negatives. America had a total of -6 or -8 in modifiers, but she still had a Crew Quality of B, so that added +4, making the total gunnery modifier only -2 to -4. So America would have been able to make some effective gun attacks versus Ardent.

But Ardent wasn’t in any immediate danger of being boarded and captured. At the time the scenario was suspended, Ardent still had 17 sailor boxes and 3 marine boxes, more than enough bodies to repel boarders. But she would probably lose those bodies at the rate of 1 or 2 boxes per turn of gunnery fire against her.

Of course, Ardent may have been able to unfoul from Adamant, and if Bedford drifted away, then Ardent could try to make a run for it. But Ardent had lost one rigging section, so she then couldn’t raise sails any more than medium sails, meaning that if was sailing close-hauled toward the exit map edge, she could only move 3 hexes per turn. If Bedford stayed with medium sails, she could move 4 hexes close-hauled, and so could catch Ardent. Although, America had lost one rigging section, and so her fastest speed while close-hauled with medium sails was also only 3 hexes. And Adamant had lost 2 rigging sections, so could only make 1 hex per turn while close-hauled, as she could only fly fighting sails.

So, perhaps Ardent could have escaped? I have all of the logs, maybe some day we can get some folks together and play out the rest of the scenario?

Aftermath

This was a sort of hectic scenario, in that we only got 14 game-turns played (well, we got 13.5 game-turns completed). We would have liked to have played 30 game-turns or so, but we had three players who were new to Close Action. And one of them arrived to play after we had started the scenario, and so Joel and myself (mostly) were trying to explain the game to him. As the GM, I was also trying to take lots of notes and pictures to help with this write-up, although I forgot to take pictures after some of the game-turns. And that record-keeping slightly slowed up play, also.

Some of the logs were not filled in correctly, but that is to be expected, especially with novices playing. One of my goals of running Close Action scenarios is to educate folks how to play the game, so we will have a larger pool of experienced players available so we can try to (eventually) play some of the larger scenarios. There were also two times where captains had crew working at repairing rigging damage, but the ships were at medium sail. I will have to remember to check the status of ships’ sails during rigging repairs in the future.

But there are bound to be mistakes, especially playing at a game-con where you have a limited amount of time. We had four hours available for this scenario, but probably 30 minutes of that was used in explaining things to new players at the beginning, and the “command conferences” where each admiral explained their plan to their subordinate captains of course took some time.

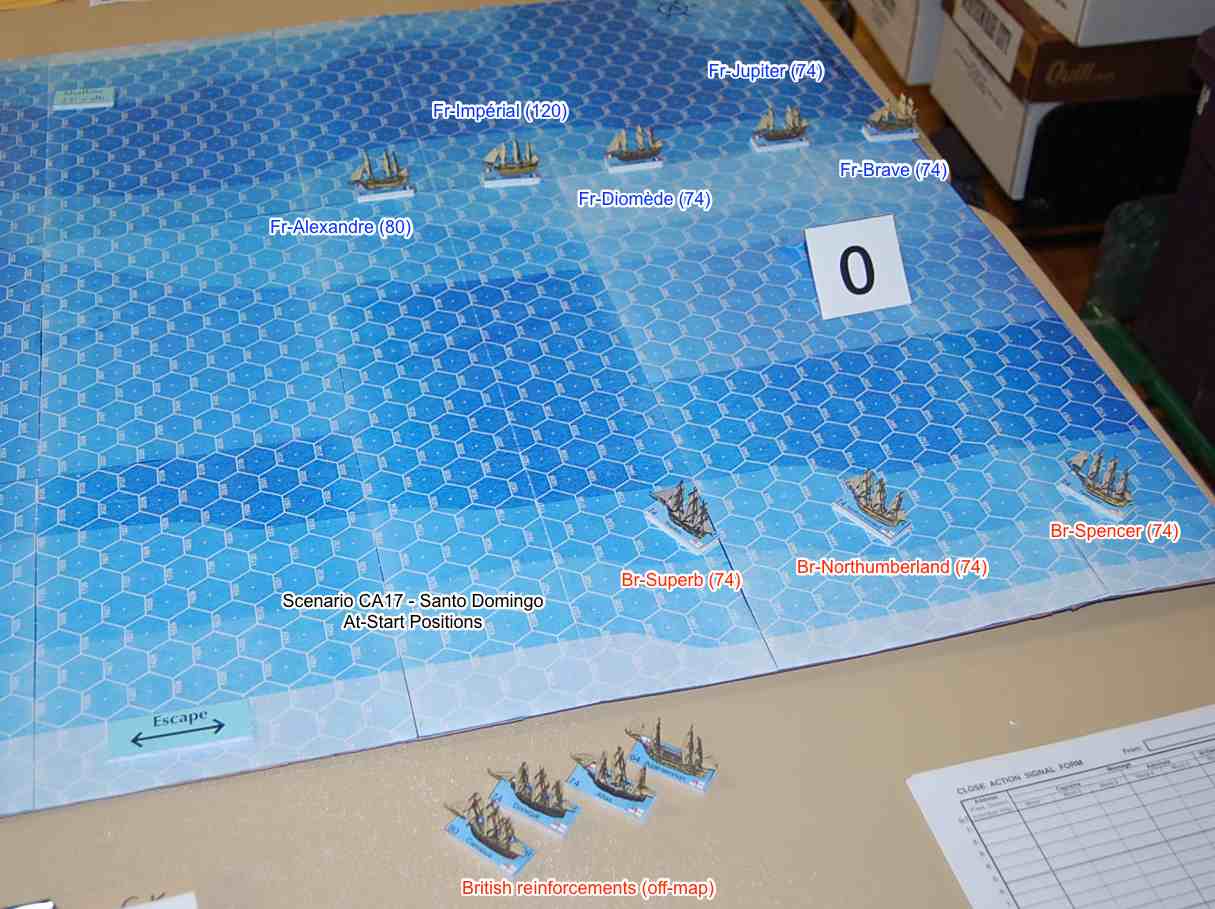
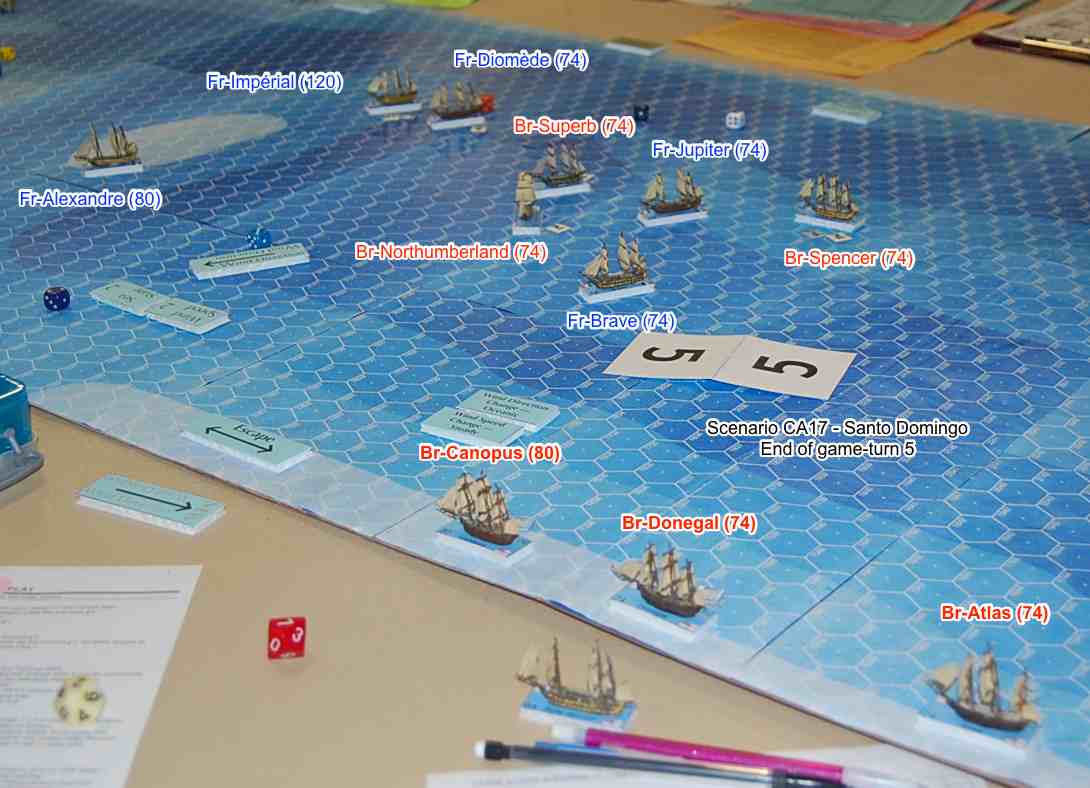
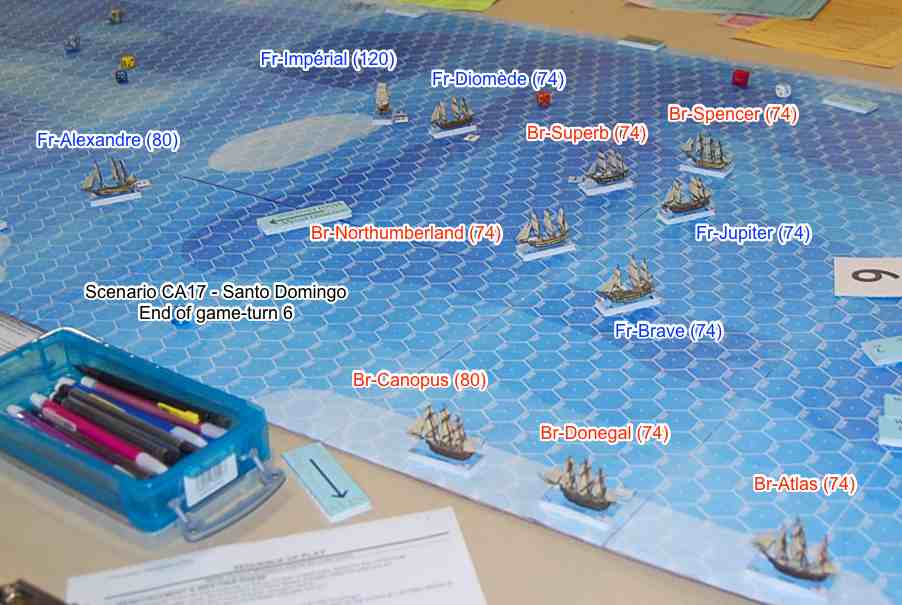
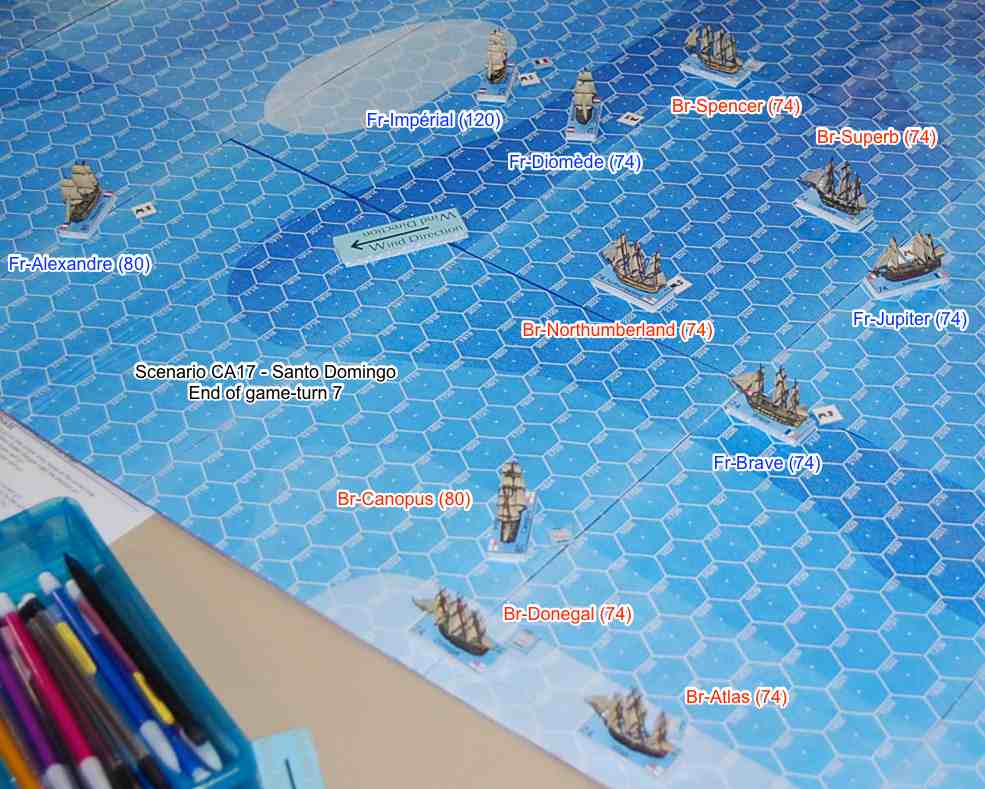
Future Close Action games

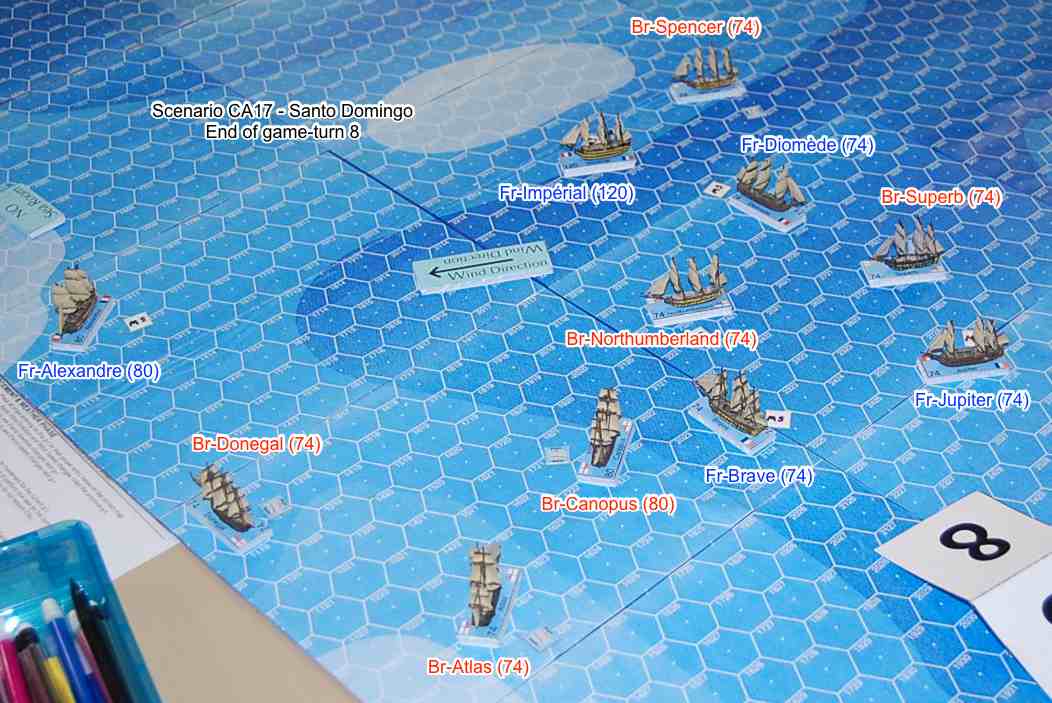
I am running another scenario of Close Action at Flintcon in Flint, Michigan, on Saturday, February 9, 2019. The Close Action game will begin at 0900 (9:00 am for land-lubbers) and will run until 1300 (1:00 pm). The game con is at St. Paul’s Lutheran Church and School, 402 S. Ballenger Highway. The scenario is “Santo Domingo,” Close Action scenario 17. Five French ships are trying to escape from seven British ships, although only three British ships are on the map at the beginning of the scenario (the other five Brits enter later as reinforcements). So up to 12 players can play! Come and check it out!

Close Action in the Detroit, Michigan, area

February 5th, 2019

A number of years ago, I was introduced to the game “Close Action,” which is a board game about naval combat in the “Age of Fighting Sail,” circa the year 1800. It is basically an improvement of the old Avalon Hill game of “Wooden Ships & Iron Men.” Close Action was designed by Mark Campbell, although he has had a lot of folks play various scenarios and offer suggestions for improvements along the way. The game was published by Clash of Arms games in 1997. But then I didn’t get to play the game for more than a decade (probably closer to two decades).

Close Action box cover

Close Action box cover, from Clash of Arms games.

So, probably around the middle of 2017, I was checking out the latest sales flyer from Noble Knight Games, and I saw they had a brand new copy of Close Action for sale. I immediately bought the game, because Close Action has been out of print. Noble Knight also had the two add-on scenario packs of Rebel Seas and Monsoon Seas for sale, so I bought those, too. (Rebel Seas is the only product from the Close Action series available for sale at the Clash of Arms web site, as of February 2019.) So now I owned the basic components of Close Action, but didn’t have any miniature ships to play the game with. Although CA was designed as a board game, it does seem more fun to play when using miniature ships.

I was still in contact with Jim Robinson, as he races in our CFR-Detroit racing games. He’s the guy that introduced me to Close Action in the early 1990s. We were playing then with “pre-publication” rules for the game (version 4.30). Dennis Daughetee was another player, and between Dennis and Jim we had a good sized fleet of miniature ships to use. Anyway, in March 2018, we got several folks together to play a scenario of Close Action at the Canton (Michigan) public library during the first Saturday meetup boardgame day. We used (I believe) 1:900 scale ships on Jim’s large hex mat (with 2-inch hexes). It was pretty cool.

Close Action with 1:900 scale ships

Close Action with 1:900 scale ships at the Canton, Michigan, library.

Now, the large 1:900 scale ships are really neat, but later, while playing another scenario at Imperium Games, with about a dozen ships on each side, it became apparent that it would be very difficult to get all of the ships on the same playing mat at the same time. This made me want to use smaller scale ships. I began to look into the various ships available. It seems that 1:1200 scale is a very popular scale for naval minis from the Age of Sail, and it seems the two main sources for ships are GHQ’s “Micronauts” and Langton Miniatures. GHQ’s ships are about $17 each, though, and the Langton ships are about the same price, once you buy the hulls and sails. Sort of a steep price if you want to purchase enough ships for a 40-ship battle!

So then I discovered the 1:2000 scale ships available from Valiant Enterprises. While Valiant’s ships are not nearly as detailed as the larger 1:1200 scale ships, they are much more affordable, and they are “good enough” for minis gaming. You can buy a 3-pack of 74-gun ships-of-the-line from Valiant for less than $15, or $5 per ship. Now we’re talking affordable! Not to mention that the ships won’t take up as much space, so one can use a smaller hex grid to play on. What made it even better, just about the time I mentioned to some of our Championship Formula Racing group that I was going to start buying the Valiant 1:2000 scale ships, two of the CFR racers, Jim Robinson and Mike St. Peter, gave me a bunch of already built and painted ships! Jim gave me close to 40 ships, mostly 74-gunners but also a few larger and smaller ships. Mike donated around a dozen serviceable ships to me, and some other parts that can be salvaged to repair some other ships.

So, now I had a fleet of ships to use, so the next thing to do was to obtain a playing mat. Now, most folks I have seen online who play naval minis just buy a large hex-grid mat from folks such as Hotz Mats. While the mats from Eric Hotz are beautiful, they are also somewhat expensive, with a 45-inch by 72-inch “Mediterrean Sea Blue” mat costing $67 (with shipping). And you would need more than one mat. But there are two problems with using a plain-colored mat.  For one, the generic blue-hex-grid mats don’t have numbered hexes, making it difficult to correctly place the ships for the scenarios. Also, some of the scenarios in Close Action have land or shallow water. The original maps that come with Close Action have different colored hexes that can be used to depict shallow water or land, while the generic hex-grid mats are all the same color, making it difficult to designate areas as land or shallow water. Not to mention that I don’t want to limit my playing to only deep-water scenarios. So then I decided to use my flat-bed scanner to scan the CA maps, then enlarged them 160% so the hexes were 1-inch across. I then printed them out as tiles, and then glued them to a folding cardboard display board. The final result looks  like this:

Close Action enlarged maps A & B

Close Action enlarged maps A & B.

For basing the ships, I made some 1.75-inch by 0.75-inch rectangles, and added the number of guns, each ship’s name, and the country flag of that ship along both sides of the rectangle. Then I printed out the artwork and glued it to foam-core board, then used an X-Acto knife to cut apart all of the bases. The ships on their bases look like this:

1:2000 scale ships on foam-core bases

1:2000 scale British 50-gun Adamant and French 64-gun Ardent, mounted on foam-core bases.

So, now we’re ready to start playing some semi-regular games of Close Action in the Detroit, Michigan, area!


CFR-Detroit 2018 Championship race – South African Grand Prix

February 5th, 2019

The eighth and final race of the 2018 CFR-Detroit season was held at Pandemonium Games in Garden City, Michigan, on Friday, December 14, 2018. Fifteen drivers contested the race, with five of those drivers having a chance to win the points championship. When all was said and done, Bill Worrel finally drove to his first race win in CFR, and that earned him the championship over Mike Cook, Garry Kaluzny, Richard White, and Jack Beckman. Finishing 2nd at Kyalami was Richard White, and Gary Sturgeon finished on the podium in 3rd place after passing Kaluzny just before the finish line.

The race was held on the Kyalami track, from an old Avalon Hill design from Speed Circuit. This was the first time this track was used in the CFR-Detroit racing series, although it had been used in the old Advanced Speed Circuit races in the Detroit area back in the 1980s/1990s. Of course, we raced on a large-scale track that had been painted on a bedsheet so we could use our 1:64 scale cars.

Kyalami race track of the South African Grand Prix.

Kyalami race track of the South African Grand Prix. This was from the old Speed Circuit game and was available as an extra item from Avalon Hill.

After the drivers set up their car’s specs, the drivers secretly bid for starting positions. Each wear chit counted as 1.0, and each skill chit counted as 0.5. Higher bids started in front of lower bids. Ties were resolved by rolling percentage dice, high rolls favored over low rolls.

The four main contenders for the title, Cook, Worrel, Kaluzny, and White, all wanted to start near the front of the large pack of 15 cars. A “wild card” in this race was Louye Padol. Padol had raced in some old Advanced Speed Circuit races in the Detroit area near the end of that series in the early 1990s. Padol further stated that since he had never won a race in that old ASC series that he wanted to win a CFR race. Of course, he knew his work was cut out for him, what with the hungry drivers who really wanted to win the championship.

Qualifying

There were some high bids for pole position. Mike Cook snatched the pole with a bid of 9.5 (6 wear + 7 skill). It was Cook’s 8th pole in the 15 races he has participated in, the most of any driver. (Jim Robinson and Bill Worrel each have 2 CFR-Detroit career pole positions.) Louye Padol also started in the front row, in 2nd place, with a bid of 9.0 (8 wear + 2 skill). Garry Kaluzny started in 3rd with a bid of 8.5 (6 wear + 5 skill). Bill Worrel started 4th with his bid of 7.0 (5 wear + 4 skill). Greg Lim (3 wear + 6 skill) and Gary Sturgeon (3 wear + 6 skill) each bid 6.0. Lim started 5th after his percentile dice roll of “73” to Sturgeon’s dice roll of “06,” thus relegating Sturgeon to 6th place on the grid.

Richard White bid 5.5 (4 wear + 3 skill), so he started in the 4th row, in 7th place. Beside White, in 8th place, was Mike St. Peter with his bid of 4.5 (4 wear + 1 skill). Brian Robinson (1 wear + 5 skill) and Jack Beckman (2 wear + 3 skill) each bid 3.5 and so they had a “dice-off” for 9th and 10th place on the starting grid. Brian Robinson started 9th after rolling “63,” and Beckman started 10th after rolling “52.”

Jim Robinson was the 11th place starter with a bid of 2.5 (0 wear + 5 skill). Aric Parr (1 wear + 2 skill) and Jim Landis (1 wear + 2 skill) each bid 2.0. Parr won the dice-off by “45” to “26” and so Parr started 12th, and Landis started 13th on the grid. Joel Lauder bid only 1.0 (0 wear + 2 skill) to start 14th, and P.J. Norton (0 wear + 0 skill) bid nothing and was content to start 15th.

The starting grid for the 2018 South African Grand Prix with their car specs:

 # Driver (Car)                    Start/Accel/Decel/Top/Wear/Skill/Tires
11 Mike Cook (Camel Lotus)          100   40    40   140  5x   3x   soft
25 Louye Padol (Ligier)             100   40    40   160  5x   2x   soft
 8 Garry Kaluzny (Marlboro McLaren) 100   40    40   140  5x   3x   soft
 4 Bill Worrel (Tyrrell)             60   40    40   160  5x   3x   soft
13 Greg Lim (GoDaddy)                60   60    40   160  4x   3x   soft
22 Gary Sturgeon (McLaren)          100   40    40   160  5x   2x   soft
 1 Richard White (Brabham)           60   40    40   160  5x   3x   soft
44 Mike St. Peter (Mercedes)         60   40    40   160  5x   3x   hard
 5 Brian Robinson (Walker Racing)    20   60    60   140  5x   3x   soft
12 Jack Beckman (Ferrari)            60   40    40   160  5x   3x   soft
 2 Jim Robinson (Williams)           60   40    40   160  5x   3x   soft
14 Aric Parr (Motul BRM)             60   40    60   160  5x   3x   hard
20 Jim Landis (Benetton)             60   60    60   160  4x   2x   hard
 7 Joel Lauder (HSBC Jaguar)         60   60    60   180  3x   2x   hard
 3 P.J. Norton (Tyrrell)             60   40    40   160  5x   3x   hard

Start = Start Speed (in miles/hour); Accel = Acceleration (in mph); Decel = Deceleration (in mph); Top = Top Speed (in mph); Wear = # of Wear markers (per lap); Skill = # of Skill markers (per lap); Tires = hard or soft tires to begin the race.

The starting grid at Kyalami

The starting grid at Kyalami: 1st row: Cook (yellow car) & Padol (blue car); 2nd row: Kaluzny (orange/white) & Worrel (blue); 3rd row: Lim (green) & Sturgeon (black/silver); 4th row: White (white/blue) & St. Peter (silver); 5th row: B. Robinson (white/blue) & Beckman (red); 6th row: J. Robinson (white/yellow/blue) & Parr (gray); 7th row: Landis (green/red/blue) & Lauder (green); 8th row: Norton (blue/white). (Bill Worrel photo)

1st Lap

At the start, pole-sitter Cook surprised the field by using his -3 skill chit and rolling dice to boost his car’s start speed to 120 mph, giving up the opportunity to use a wear (since he was on soft tires) to get the automatic 20 mph increase to his start speed. Of course, the fact Cook had bid 6 of his available 15 wear to get the pole position might have influenced his choice, since he only started the race with 9 wear. Padol and Kaluzny, both on soft tires, each used a wear to start at 120 mph. Worrel, who was starting the race with 10 wear after bidding 5 wear for qualifying, rolled dice (using two -1 skill chits) to start at 80 mph. Sturgeon was content to just start at his car’s 100 mph start speed; that allowed him to pull alongside Worrel’s blue Tyrrell. Lim used a wear to get to 80 mph; he slotted himself right behind Worrel. White, starting on the inside of the 4th row, also rolled a -2 modified start speed roll, making the roll and thus starting at 80 mph and pulling right behind Lim. St. Peter, starting on hard tires, was content to just start at 60 mph. That allowed Beckman to pull alongside St. Peter after Beckman used a wear to start at 80 mph. J. Robinson used a wear to start at 80 mph, thus leap-frogging B. Robinson who had used a wear to increase his start speed to 40 mph. Parr, starting in 12th, decided to make an unmodified start speed dice roll. Parr rolled an ‘8’ and thus started at only 40 mph, 20 mph below his car’s normal 60 mph start speed. Landis and Lauder started at their normal 60 mph start speed, and they both pulled even with Parr. Norton, making his first official start in the CFR-Detroit races, was content to start at his normal 60 mph speed.

The pack roars away!

The pack roars away at the start! The order is Cook, Padol, Kaluzny, Worrel, Sturgeon, Lim, White, St. Peter, Beckman, J. Robinson, B. Robinson, Parr, Landis, Lauder, and Norton. (Bill Worrel photo)

On the 2nd move of the game, the leading trio of Cook, Padol, and Kaluzny all increased their speed to 140 mph through the Crowthorne Corner. Worrel spent a -1 skill marker and successfully rolled dice to increase his acceleration. J. Robinson rolled a -2 acceleration roll (and made it). Most of the following cars maintained their order, although Beckman got by St. Peter, and J. Robinson pulled to the inside of St. Peter. Landis got by Parr, and Lauder pulled alongside B. Robinson. As the leaders approached the Jukskei Sweep, Worrel and Sturgeon had caught up to the leading trio. Lauder moved to the inside of White.

Going into Clubhouse Bend, Kaluzny passed Padol for 2nd, and the pack was all bunched up again.

Cook still leads at Clubhouse Bend

Cook still leads at Clubhouse Bend, followed by Kaluzny, Padol, Worrel, Sturgeon, Lim, White, Beckman, J. Robinson, Lauder, St. Peter, B. Robinson, Landis, Parr, and Norton. (Bill Worrel photo)

St. Peter spent two wears and two -1 skill markers (making a chance roll) going through The Esses at 120 mph. Parr tried to force a pass by Landis through Clubhouse Bend, but was balked. Parr then had to scrub off 40 mph to reduce his speed to 60 mph.

Going through Leeukop Bend, Cook was able to get clear of the pack, opening a 3-space lead over Kaluzny. Cook was one space shy of The Kink, though, and so he was unable to enter the pits before his following competitors. Then on the next move of the race, Cook did pull into the pits just after crossing the start/finish line. It was the 17th lap Cook has led in his CFR-Detroit driving career, far and away the most of any driver. (Cook has led 38% of the laps he has raced.) Also pitting were Kaluzny, Worrel, Sturgeon, White, and Padol. Lim accelerated to 160 mph out of Leeukop, but then had to roll a -2 deceleration roll to reduce his speed to 140 mph as he didn’t have any wear remaining and so would not have been able to enter The Kink at 160 mph. That left Lim one space shy of getting into the pits on that move.

Cook leads the 1st lap

Cook (just past the start-finish line) leads the 1st lap, pulls into pits. (Bill Worrel photo)

During the immediately succeeding move, the cars of Lim, Beckman, and B. Robinson joined the other cars in the pits; they were eventually joined in the pits by Parr. B. Robinson made a -2 chance roll going through The Kink so he could get into the pits at a higher speed. Not pitting were Lauder, J. Robinson, St. Peter, Norton, and Landis. Lauder was then the leader on the track due to his staying out of the pits.

The official order at the end of the 1st lap: Cook (0); Lim (+3); Lauder (+11); J. Robinson (+7); St. Peter (+3); Norton (+9); Worrel (-3); Kaluzny (-5); Sturgeon (-3); White (-3); Padol (-9); Landis (+1); Beckman (-3); B. Robinson (-5); and Parr (-3). The numbers in parentheses indicate how many places a driver either gained (+) or lost (-) from their starting position. After the pit stops were resolved, the running order on the track was Lauder, J. Robinson, St. Peter, Norton, Cook, Worrel, Kaluzny, Sturgeon, White, Padol, Landis, Lim, Beckman, B. Robinson, and Parr.

2nd Lap

Coming out of the pits, Worrel made a -1 modified dice roll to boost his top speed to 180 mph. Kaluzny also used a -1 modifier to increase his top speed to 160 mph. Since the top four contenders basically needed to win the race to also win the championship, they knew going in to this race that they would need to roll some dice! Going into Sunset Bend, Cook made a -1 deceleration roll, and St. Peter used 2 wear and made a -2 chance roll. Then going through Clubhouse Bend, J. Robinson took the lead from Lauder. White then made a forced pass of Worrel coming out of Clubhouse Bend.

Jim Robinson takes the lead

Jim Robinson takes the lead. Following are Norton, Lauder, St. Peter, Cook, Kaluzny, White, Padol, Worrel, Sturgeon, Landis, Lim, Beckman, B. Robinson, and Parr. (Bill Worrel photo)

Jim Robinson managed to gain a 2-space lead over Norton and Lauder coming out of Leeukop, but J. Robinson had to make a -3 chance roll to gain that advantage. Cook had to make a -1 deceleration roll going into Leeukop (dropping to 80 mph from 100 mph), as the road ahead was blocked by Norton’s Tyrrell. In the process, Cook used his last skill modifier, leaving him with no more skill markers, and there was still a little more than a lap left to race.

Now the dice started really flying. Jim Robinson needed to pit, and he wanted to pit on his current move, so he rolled a -2 chance at The Kink, but he spun. He had to roll as he was out of wear. Then Lauder tried to get into The Kink at 160 mph, so he used a wear and also rolled a -2 chance. Lauder also spun. Although spun, both J. Robinson and Lauder’s cars were placed into the pits, as The Kink corner was the first space where cars could pit. Norton made a -2 acceleration roll coming out of Leeukop so he could go 140 mph. That left him once space short of The Kink, meaning he couldn’t get into the pits on this move.

J. Robinson and Lauder both spin going into the pits

J. Robinson and Lauder both spin going into the pits (so their cars are both facing backwards to indicate they have spun). Other cars on the track are Norton, St. Peter, Cook, Kaluzny, Padol, Sturgeon, White, Worrel, Lim, Beckman, Landis, B. Robinson, and Parr. (Bill Worrel photo)

During the next move, Norton and St. Peter made it through The Kink, then they both pulled into the pits. Cook, Padol, Kaluzny, and Worrel all made it through The Kink, and Sturgeon and White were in The Kink. That meant all six of those cars could accelerate down the long straight. Cook made an unmodified top speed roll to move at 160 mph. Worrel made an unmodified top speed roll to move at 180 mph. Kaluzny wanted to move at 160 mph, and had to roll for his top speed. In spite of using a -1 skill modifier, Kaluzny failed the roll. He moved this turn at 140 mph, and his future top speed was now only 120 mph. So he knew his shot at the championship was doomed. Landis pulled his car into the pits, as he was the last of the cars that had not yet pitted.

Cook, Padol, and Worrel vie for the lead

Cook, Padol, and Worrel vie for the lead to begin the 3rd lap. (Their cars are near the Monty Python-esq hand of Kaluzny.) Kaluzny and White are right behind the leaders, and Sturgeon is also right behind. Lim is just crossing the start/finish line. B. Robinson is just in front of Beckman who is just in front of Parr. The cars of J. Robinson and Lauder have come out of the pits to be placed back in the track in The Kink, but are facing backwards to show they have spun. In the pits are Norton, St. Peter, and Landis. (Bill Worrel photo)

P.J. Norton (+14) was the official leader of the 2nd lap, although he was in the pits when he achieved that honor. The rest of the official order for the 2nd lap: Cook (-1); Padol (-1); Worrel (0); Kaluzny (-2); White (+1); Sturgeon (-1); Lim (-3); B. Robinson (0); Beckman (0); Parr (+1); St. Peter (-4); Lauder (+1); J. Robinson (-3);  and Landis (-2).

3rd Lap

Worrel made a daring move to take the lead going into Crowthorne Corner at the end of the long straight. Since he was on the outside of the track, and would have moved after other cars that plotted the same speed, Worrel plotted 180 mph, made his top speed dice roll, but then slowed to 160 mph before actually entering the corner. That let Worrel move before Cook and Padol. Cook did move alongside Worrel in Crowthorne, with Padol right behind them in 3rd. Kaluzny and White were side-by-side behind Padol, and Sturgeon was behind White.

Worrel and Cook were side-by-side racing through Barbeque Bend and the Jukskei Sweep. Kaluzny, with his damaged top speed, moved to the outside in Barbeque Bend, letting White pass on the inside. Kaluzny did not want to hold up a competitor who had a chance for the championship.

Then came the stunning event of the race. Cook made an unmodified top speed roll to move at 160 mph (so he could move before Worrel) headed into Sunset Bend, and then Cook made an unmodified deceleration roll to get down to 140 mph for the corner. Cook then used 2 wear and rolled an unmodified chance (Cook was on hard tires and so couldn’t use 3 wear, and he was out of skill markers). Unfortunately for Cook, he crashed and was suddenly out of the race, just when he was going for the lead! (Note that if Cook had made the roll successfully, it would have been a piece of “brilliant driving” and might have won the game for him.) Worrel’s car pulled up just short of Sunset, and he took the inside lane, eschewing the cornering arrow that was in the outside lane. Padol then pulled alongside Worrel and took the arrow. White pulled ahead of Kaluzny, and Sturgeon pulled alongside Kaluzny.

Cook has crashed in Senset Bend

Cook has crashed in Sunset Bend (upside down yellow car next to the flat-bed truck). Worrel and Padol are side-by-side just before Sunset Bend, followed by White, Kaluzny, Sturgeon, Lim, Beckman, B. Robinson, Norton, Parr, St. Peter, Lauder, J. Robinson, and Landis. (Bill Worrel photo)

Now Worrel and Padol had a spirited battle on the track. Worrel spent 3 wear through Sunset and Clubhouse, leaving him with only 3 wear remaining for the rest of the race (and with three more corners to go). Worrel then pulled ahead of Padol at The Esses, as Worrel used a wear and made an unmodified chance roll. (It goes without saying that White, Padol, and Kaluzny were hoping for a spin or crash!) As Padol had taken the line behind Worrel, White had to go off-line at The Esses, using 2 wear and making a -2 chance roll so he could be at 100 mph.

Worrel moves in front at The Esses

Worrel moves in front at The Esses. Padol and White are right behind, then are Kaluzny, Sturgeon, Lim, Beckman, B. Robinson, Norton, St. Peter, Lauder, Parr, J. Robinson, and Landis. Cook’s crashed Camel Lotus has been loaded on the flat-bed truck, and the flagman is waving the yellow caution flag just before Sunset Bend. (Bill Worrel photo)

Worrel then pretty much wrapped up the race victory and the championship at Leeukop, as he was the only car that made it to the end of the corner where he would be able to accelerate out of that corner in the next move.

Worrel continues to lead at the exit of Leeukop

Worrel continues to lead at the exit of Leeukop. White is 2nd, Kaluzny has taken the inside and 3rd place from Padol (who is 4th). Sturgeon is 5th, and Beckman (red Ferrari) has just passed Lim for 6th place in The Esses. (Bill Worrel photo)

From that point on, the race to the finish line was an anti-climax, as Worrel crossed the line 3 spaces ahead of White and Kaluzny to win the race and the 2018 CFR-Detroit championship! Kaluzny had used a slip to pull alongside White, especially as Kaluzny didn’t dare roll for his top speed again.

Worrel wins the race and the title!

Worrel takes the checkered flag to win the 2018 South African Grand Prix and also winning the 2018 CFR-Detroit points championship. (Bill Worrel photo)

There was still a race on for other positions. Beckman made a -3 chance roll at Leeukop, and Brian Robinson used 2 wear and made a -3 chance roll, also at Leeukop. At some point late in the 3rd lap, Padol failed a top speed or acceleration roll, although it wasn’t recorded when it happened. Failing that roll cost Padol a couple of positions at the finish, at least. Also, Sturgeon was able to pass Kaluzny as they crossed the finish line, thereby earning a podium finish in 3rd for Sturgeon.

The official finishing order at the 2018 South African Grand Prix: 1st-Bill Worrel (+3); 2nd-Richard White (+5); 3rd-Gary Sturgeon (+3); 4th-Garry Kaluzny (-1); 5th-Louye Padol (-3); 6th-Jack Beckman (+4); 7th-Greg Lim (-2); 8th-P.J. Norton (+7); 9th-Brian Robinson (0); 10th-Mike St. Peter (-2); 11th-Joel Lauder (+3); 12th-Jim Robinson (-1); 13th-Aric Parr (-1); 14th-Jim Landis (-1). Classified in 15th with a DNF was Mike Cook (-14).

Aftermath

Louye Padol had a nice drive for his first race using the CFR rules. He was in contention, but he seemed to not want to interfere with the four-way battle for the lead amongst the main contenders for the title. And P.J. Norton, although he had previously raced in a few demo races, performed well in his first official CFR race, moving up 7 places from his starting position to finish in 8th place.

Points awarded at the 2018 South African Grand Prix: Worrel 10; White 6; Sturgeon 4; Kaluzny 3; Padol 2; Beckman 1.

The final points standings of the 2018 CFR-Detroit season (after eight of eight races):

Place Driver (Car)                    Points
  1   Bill Worrel (Tyrrell)             37*
  2   Richard White (Brabham)           32
  3   Garry Kaluzny (Marlboro McLaren)  30
  4   Mike Cook (Camel Lotus)           29
  5   Jack Beckman (Ferrari)            20
  6   Jim Robinson (Williams)           18
  7   Gary Sturgeon (McLaren)           14
  8   Mike St. Peter (Mercedes)          9
  9T  Brian Robinson (Walker Racing)     4
  9T  Aric Parr (Motul BRM)              4
  9T  Jim Landis (Benetton)              4
 12T  Joel Lauder (HSBC Jaguar)          2
 12T  Greg Lim (GoDaddy)                 2
 12T  Louye Padol (Ligier)               2
 15T  Mark Moellering (McLaren)          0
 15T  Gary Kempen (Williams)             0
 15T  Chuck Modzinski (Arrows)           0
 15T  Jim Lauder (Shadow)                0
 15T  P.J. Norton (Tyrrell)              0

* Drivers could only count their 6 best finishes out of the 8 races. Bill Worrel had to forfeit 1 point (from a 6th place at Monaco) due to his having earned points in 7 races. (Worrel did earn 38 points, but could only count 37 of them.)

After the race, Bill Worrel was awarded the 2018 CFR-Detroit Individual Points Championship trophy from outgoing race steward Garry Kaluzny. Kaluzny was then surprised when the rest of the drivers gave Kaluzny a trophy for the appreciation the drivers had for his organizing and running the race series for 2017 and 2018.

Worrel and Kaluzny receive trophies

Bill Worrel with his 2018 CFR-Detroit championship trophy (left), and Garry Kaluzny with his appreciation trophy (right).

After the championship trophy presentation, the drivers continued to uphold an old tradition dating back to the Advanced Speed Circuit days in Detroit–they voted to award the “Tom Kane Memorial Award” to the most sportsmanlike driver of 2018. Each driver got to vote for one driver, via secret ballot. The voting tallies were:

Jim Landis – 7
Jim Robinson – 3
Jack Beckman – 2
Greg Lim – 2

Thus, Jim Landis was voted the Most Sportsmanlike driver of 2018 and was awarded the Tom Kane Memorial Award trophy.

Jim Landis receives the Sportmanship trophy

Jim Landis (right) receives the Tom Kane Memorial Award trophy as the CFR-Detroit Most Sportsmanlike driver of 2018. Presenting the award is the 2017 Most Sportsmanlike driver, Greg Lim (left). (Bill Worrel photo)

In the 2018 CFR-Detroit racing season, a total of 20 different drivers took part in the eight races. The most drivers at any race was 15, at both the Belgian and South African Grand Prix. The fewest drivers in any race was 11, at both the Italian and German Grand Prix. The average number of drivers for the season was 12.8 drivers per race. This was an increase from the average of 10.3 drivers per race in 2017.

For the 2019 CFR-Detroit racing season, Jack Beckman will be the race steward. There will also be a “team championship” award added, and already the drivers have mostly formed teams for 2019.

As always, keep up to date for the CFR-Detroit schedule at the CFR-Detroit home page at http://michigumbo.com/cfr/.

A demo race will take place at Flintcon (in Flint, Michigan) on Saturday, February 9, 2019, using the Indianapolis road course. The actual 2019 CFR-Detroit schedule begins on Friday, February 15, 2019, at Pandemonium Games in Garden City, Michigan. We will race the Australian Grand Prix using the Adelaide track. Qualifying begins at 6:45pm. No experience is necessary; you are welcome to join us!

CFR-Detroit 2018 Race #7 – German Grand Prix

December 11th, 2018

Saturday, November 17, saw Garry Kaluzny out-drive 10 other drivers to win the German Grand Prix, using the Championship Formula Racing game rules. The event was held at the Guild of Blades game store in Clawson, Michigan. Bill Worrel started on the pole, but finished 2nd for the 3rd time in a row. It was also the fourth 2nd-place finish for Worrel in the 2018 season. Jim Landis made it to the podium in 3rd place, earning his first points of the season. Kaluzny’s win tightened up the points standings, with the top four drivers separated by only 3 points. Mike Cook leads with 29 points, Bill Worrel has 28 pts, Garry Kaluzny has 27 pts, and Richard White has 26 pts. Jack Beckman is 5th in the points standings with 19 points, and still has a mathematical chance to tie for the points championship at the final race of the season in December.

The race was held on the Hockenheimring track, based on the CFR design. This was the first time any of the CFR-Detroit drivers had raced on this track.

The CFR-designed Hockenheimring track

The CFR-designed Hockenheimring track.

After the drivers set up their car’s specs, the drivers secretly bid for starting positions. Each wear chit counted as 1.0, and each skill chit counted as 0.5. Higher bids started in front of lower bids. Ties were resolved by rolling percentage dice, high rolls favored over low rolls.

Bill Worrel (0 wear + 17 skill) got the pole position with a high bid of 8.5. Worrel bid all of his skill chits except for a single -1 skill marker that he retained for the race! He also tied the all-time high bid of 8.5 (by Chad Marlett at the 2017 Abu Dhabi race). Mike Cook (5 wear + 6 skill) had his string of pole positions beaten, as Cook only bid 8.0. Cook started alongside Worrel on the front row, but with Cook in 2nd place. Greg Lim (2 wear + 9 skill) qualified in 3rd place with a bid of 6.5, and Garry Kaluzny (3 wear + 6 skill) started 4th with a bid of 6.0. Richard White (4 wear + 3 skill) nailed down the 5th starting spot with a bid of 5.5, and Mike St. Peter (4 wear + 1 skill) grabbed 5th position with a bid of 4.5. Starting in 7th was Jim Robinson (1 wear + 6 skill) with a bid of 4.0. Then came Jack Beckman (0 wear + 3 skill) in 8th with a bid of 1.5, and Aric Parr (0 wear + 2 skill) in 9th with a bid of 1.0. Two drivers did not bid anything. They were Gary Sturgeon and Jim Landis. Sturgeon started in 10th, and Landis in 11th, on the strength of Sturgeon rolling an ’88’ to Landis rolling a ’57’ on the percentage dice roll.

The starting grid for the 2018 German Grand Prix with their car specs:

 # Driver (Car)                    Start/Accel/Decel/Top/Wear/Skill/Tires
 4 Bill Worrel (Tyrrell)            100   20    20   160  5x   4x   soft
11 Mike Cook (Camel Lotus)           60   60    60   160  4x   2x   soft
13 Greg Lim (GoDaddy)                60   60    40   160  4x   3x   hard
 8 Garry Kaluzny (Marlboro McLaren)  60   40    40   160  5x   3x   soft
 1 Richard White (Brabham)           60   40    40   160  5x   3x   soft
44 Mike St. Peter (Mercedes)         60   40    40   160  5x   3x   soft
 2 Jim Robinson (Williams)           60   60    60   160  3x   3x   soft
12 Jack Beckman (Ferrari)            60   60    60   140  4x   3x   hard
14 Aric Parr (Motul BRM)             60   40    60   160  5x   2x   hard
22 Gary Sturgeon (McLaren)           20   60    60   180  4x   2x   soft
20 Jim Landis (Benetton)             20   60    60   160  5x   2x   hard

Start = Start Speed (in miles/hour); Accel = Acceleration (in mph); Decel = Deceleration (in mph); Top = Top Speed (in mph); Wear = # of Wear markers (per lap); Skill = # of Skill markers (per lap); Tires = hard or soft tires to begin the race.

Pole-sitter Bill Worrel had the only car with a 100 mph start speed; two other cars, those of Gary Sturgeon and Jim Landis, had only 20 mph start speeds. All other cars had the “standard” start speed of 60 mph. Most cars had top speeds of 160 mph, although Gary Sturgeon geared his car for 180 mph, and Jack Beckman had only a top speed of 140 mph. But the most unusual configuration was Worrel’s Tyrrell that only had 20 mph for both its acceleration and deceleration specs.

The starting grid for the German Grand Prix

The starting grid for the German Grand Prix. Bill Worrel’s blue car is on the pole position, and Mike Cook’s yellow car is next to Worrel’s car on the front row.

At the race’s start, Worrel used a wear (as he was on soft tires) to increase his start speed to 120 mph. Cook also used a wear, but could only increase his start speed to 80 mph. In the 2nd row, Kaluzny used a wear to get up to 80 mph, but Lim, on hard tires, elected to only move at his standard 60 mph start speed. Third-row starters White and St. Peter each used a wear to go up to 80 mph, and so they drew up next to Lim. Lim had elected to move to the outside of the track behind Kaluzny’s McLaren in hope of being able to slip behind Kaluzny’s car next turn, and that allowed both White and St. Peter to take the inside from Lim. From the 4th row, J. Robinson used a wear to go 80 mph, while Beckman (on hard tires) only went 60 mph. From the 5th row, Aric Parr, on hard tires, rolled the dice to increase his start speed to 80 mph; however, Gary Sturgeon, on soft tires, only plotted to move at 40 mph, perhaps thinking that the track ahead would be blocked by other cars. Jim Landis, the 11th starter, simply moved at his start speed of 20 mph.

The pack is away

The pack is away, and Worrel leads from Cook, Kaluzny, White, St. Peter, Lim, J. Robinson, Beckman, Parr, Sturgeon, and Landis.

The pack pretty much stayed in the same order as they went through the Nordkurve and then through the sharp right-hand corner that led onto the 20-space long straightaway. St. Peter made a top speed dice roll to go to 180 coming out of that curve to pull up next to Cook, and Kaluzny also pulled alongside the duo of Cook and St. Peter as Kaluzny had been pulled along by the draft from Cook’s yellow Lotus.

Worrel leads; Cook, St. Peter, and Kaluzny are side-by-side

Worrel leads; Cook, St. Peter, and Kaluzny are side-by-side in 2nd through 4th place. White, in 5th place, tucks in behind Cook.

The leading four cars all made in safely through the Hairpin curve at the end of the long straight, in much the same order, although Kaluzny took 3rd from St. Peter in the hairpin. White’s Brabham got stuck in the hairpin, so he fell a little behind the top four cars. Kaluzny then passed Cook for 2nd coming out of the Hairpin and then St. Peter took the inside of the track to pass Cook for 3rd as they were headed into the Mercedes curve. It seemed appropriate, as St. Peter was driving a Mercedes.

Worrel, Kaluzny, St. Peter and Cook are 1st through 4th

Worrel, Kaluzny, St. Peter and Cook are 1st through 4th as they go through the Mercedes corner. The rest of the pack is running in the order White, J. Robinson, Lim, Beckman, Parr, Sturgeon, and Landis.

Finally, the leaders reached the Sudkurve. Worrel and Kaluzny were the first two cars through that curve, and they both ducked into the pits for fresh tires. White and J. Robinson had caught up with St. Peter and Cook just before the Sudkurve. And just behind them, Parr managed to flip and crash his Motul BRM in the Sachs curve. Parr was then a DNF, and was classified in 11th place.

Worrel and Kaluzny pit; Parr crashes in Sachs curve

Worrel and Kaluzny pit; Parr (upside down car) crashes in Sachs curve. Landis lags behind at top right of the picture.

As other cars came through the Sudkurve, they mostly pulled into the pits. Joining Worrel and Kaluzny in the pits were St. Peter, Cook, White, and J. Robinson. And then as Lim and Sturgeon entered the pits, Worrel and Kaluzny were exiting the pits. Eschewing a pit stop were the cars of Beckman and Landis, both of which were on hard tires and so elected to go another lap before having to pit.

The official order at the end of the 1st lap was: Worrel (0); Beckman (+6); Landis (+8); Kaluzny (0); St. Peter (+1); White (-1); Cook (-5); J. Robinson (-1); Sturgeon (+1); and Lim (-7). The numbers in parentheses indicate how many places a driver either gained (+) or lost (-) from their starting position. After the pits stops were concluded, the running order on the track was Worrel, Beckman, Kaluzny, Landis, St. Peter, White, Cook, J. Robinson, Lim, and Sturgeon.

All cars are back on the track after their pit stops

All cars are back on the track after their pit stops.

Coming out of the corner leading onto the long straight, Landis over-revved his engine to 180 mph, thereby passing both Kaluzny and Beckman, putting Landis into 2nd place. Kaluzny then regretted having plotted only 160 mph instead of pushing his engine over its limit. Beckman only moved at his car’s top speed of 140, and that allowed Landis to pass Beckman. Landis then drove 160 mph in his next turn, and Beckman pushed his top speed to 160 mph, and with a slip he got from Landis, he pulled right up next to Landis. Kaluzny went 160 mph again, and pulled in right behind Landis.

Worrel, the race leader, then made it through the Hairpin. Landis was able to make it to the last space of the corner where he would be able to accelerate next turn, but Beckman and Kaluzny were both stuck in the corner. Kaluzny was heard to lament that he now had no chance of winning the race.

Midway through the race, and Worrel still leads

Midway through the race, and Worrel still leads. Landis, Beckman, and Kaluzny are in the Hairpin curve, and are followed by Cook, J. Robinson, White, St. Peter, and then by Lim and Sturgeon.

The cars kept pretty much in order as they followed through the multiple curves on the south side of the track. Finally, Worrel ducked into the pits for the 2nd time, while he had a 7-space lead over Landis.

Worrel pits for the 2nd time

Worrel pits for the 2nd time while in 1st place. Other cars are running in the order Landis, Beckman, Kaluzny, Cook, White, J. Robinson, St. Peter, Lim, and Sturgeon.

As other cars came around the Sudkurve onto the start/finish straight, they also pitted. Landis, Beckman, Cook, and then St. Peter, J. Robinson, and Lim pitted. In a surprise move, Kaluzny and White passed by the pit entrance and remained on the track, Kaluzny had 3 wear remaining at that time, and White only had 2 wear left. Each of those two drivers regained 2 wear as they crossed the start/finish line, giving them 5 and 4 wear remaining, respectively, to finish the race. Worrel came out of the pits with a full complement of 15 wear, and was re-placed on the track only 3 spaces behind Kaluzny and White. Both Kaluzny and White reckoned they were racing for 2nd place at that moment, as they figured there was no way they could stay in front of Worrel as Worrel had at least 10 more wear than die the other two cars. Gary Sturgeon also did not pit.

Kaluzny and White lead to start the final lap

White and Kaluzny lead to start the final lap. Worrel is only 3 spaces behind.

The official order after two laps was: White (+4); Kaluzny (+2); St. Peter (+3), (by virtue of pitting right at the start/finish line); Worrel (-3); Sturgeon (+5); Beckman (+2); Landis (+4); Cook (-6); J. Robinson (-2); and Lim (-7). When all the cars were back on the track, the order was White, Kaluzny, Worrel, Sturgeon, Beckman, Landis, Cook, St. Peter, J. Robinson, and Lim.

White continued to lead through the Nordkurve and around the next curve that led onto the long straightaway. Kaluzny then took the lead from White on the long straight as Kaluzny made a top speed roll. White tucked in behind while going only 160 mph. Worrel had gone only 120 mph through the corner leading onto the straight, and was now 6 spaces behind Kaluzny.

Kaluzny leads White and Worrel down the long straight

Kaluzny leads White and Worrel down the long straight on the last lap. Beckman, Sturgeon, and Landis are battling for 4th.

The drivers of CFR-Detroit

The drivers of CFR-Detroit at Guild of Blades (clockwise, from bottom): Gary Sturgeon (back of his head); Greg Lim (side of his head); Richard White (pointing at track); Bill Worrel (standing); Jim Robinson (green sweatshirt); Jack Beckman (red Ferrari gear); Mike St. Peter (gray sweater).

More of the CFR-Detroit drivers at Guild of Blades

More of the CFR-Detroit drivers at Guild of Blades (clockwise, from upper left): Mike Cook (yellow shirt, standing); Jim Landis (gray shirt); Gary Sturgeon (brown pullover, standing); Greg Lim (blue jockey jersey); Richard White (back of his head).

Kaluzny then over-revved his engine again, and again made a top speed dice roll to move at 180 mph for a 2nd turn in a row. For whatever reason, White did not use the slipstream bonus of 2 spaces, but instead stayed in Kaluzny’s slipstream after moving at 160 mph. Worrel moved at 160 mph, and so he lost another space and was now 7 spaces behind Kaluzny. Kaluzny then made a deceleration roll to slow to 120 mph, also using up two wears at the Hairpin. Richard did not make it through the corner. And Worrel tried to move at 180 mph, but failed the unmodified top speed roll and so only moved at 160 mph. His top speed was then also reduced to 140 mph, which really wouldn’t matter too much on the back part of the course, except for the fact that Worrel’s car only had a 20 mph acceleration rating, and if Worrel had to push his acceleration and failed the roll, then his engine would expire and he would not finish the race. Kaluzny began to feel he had a chance to win at this point.

Kaluzny still leads through the Hairpin

Kaluzny still leads through the Hairpin, White is stuck in the corner, and Worrel has just damaged his engine. The four cars of Beckman, Sturgeon, Landis, and Cook battle for 4th place.

At the Mercedes curve, Kaluzny used his last -1 skill marker to take a deceleration roll, but failed the roll. He then had to use one of his two remaining wear to avoid spinning, but did make it through the Mercedes corner safely. Kaluzny’s deceleration was now only 20 mph, but he shouldn’t have to decelerate more than 20 mph in any move until the end of the race. Worrel had got right up behind White at the Mercedes corner.

Kaluzny corners through Mercedes, but with damaged brakes

Kaluzny corners through Mercedes, but with damaged brakes. White and Worrel are uncomfortably close behind.

Kaluzny continued to lead by 2 spaces over White through the Mobil 1 and Sachs curves. Landis and Beckman were getting right behind Worrel, but there were only two corners left for them to try to improve their positions on the track.

Kaluzny leads through Sachs curve

Kaluzny leads through Sachs curve, followed by White, Worrel, Landis, Beckman, Cook, Sturgeon, St. Peter, J. Robinson, and Lim.

Finally, only 1 corner remaining, and Kaluzny was able to use his last wear to go 120 mph around the outside of the Sudkurve, and thus exit the curve. Worrel drove at 120 mph, taking the inside lane at Sudkurve, but could not make it to the last space of the Sudkurve without having to take two unmodified chance rolls. So, Worrel used two wear at the Sachs curve as he was 40 mph over the speed limit, and then used his last two wear in the Sudkurve as he was also 40 mph over that corner’s speed limit. Worrel figured that a sure 2nd place was better than the possibility of crashing by rolling “normal” chance rolls and thus getting no points at all.

Kaluzny leads through Sudkurve

Kaluzny leads through Sudkurve. Worrel is 2nd, and Landis is catching White for 3rd.

Kaluzny was then able to cross the finish line for the victory, his 2nd of the 2018 season, 3 spaces ahead of Worrel. Worrel managed to get to the line ahead of Landis and so kept hold of 2nd place. And Jim Landis, who had been far behind at one point in the race, came in 3rd in a great last-lap drive. Landis had come out of the pits in 6th place after his pit stop at the end of the 2nd lap.

Kaluzny takes the checkered flag

Kaluzny takes the checkered flag to win. Worrel and Landis are close behind in 2nd and 3rd places.

Then Richard White and Jack Beckman dragged each other down the start/finish line, but White was able to cross the line ahead of Beckman, and so White was 4th and Beckman 5th. Mike Cook beat the other cars to the line to snatch 6th place and the last championship point. Sturgeon was 7th, Lim got 8th, and Jim Robinson was 9th. Mike St. Peter came home in 10th. St. Peter tried to force a pass of Cook back at the Sudkurve, but failed the dice roll and had to scrub off 40 mph. It was a good try to make, because unless he passed Cook, St. Peter would be out of the points.

The official finishing order of the 2018 German Grand Prix was: 1st-Garry Kaluzny (+3); 2nd-Bill Worrel (-1); 3rd-Jim Landis (+8); 4th-Richard White (+1); 5th-Jack Beckman (+3); 6th-Mike Cook (-4); 7th-Gary Sturgeon (+3); 8th-Greg Lim (-5); 9th-Jim Robinson (-2); 10th-Mike St. Peter (-4). Classified 11th with a DNF due to a crash was Aric Parr (-2).

Points awarded at the 2018 German Grand Prix: Kaluzny 10; Worrel 6; Landis 4; White 3; Beckman 2; Cook 1.

The points standings of the 2018 CFR-Detroit season after seven of eight races:

Place Driver (Car)                    Points
  1   Mike Cook (Camel Lotus)           29
  2   Bill Worrel (Tyrrell)             28
  3   Garry Kaluzny (Marlboro McLaren)  27
  4   Richard White (Brabham)           26
  5   Jack Beckman (Ferrari)            19
  6   Jim Robinson (Williams)           18
  7   Gary Sturgeon (McLaren)           10
  8   Mike St. Peter (Mercedes)          9
  9T  Brian Robinson (Walker Racing)     4
  9T  Aric Parr (Motul BRM)              4
  9T  Jim Landis (Benetton)              4
 12T  Joel Lauder (HSBC Jaguar)          2
 12T  Greg Lim (GoDaddy)                 2
 14T  Mark Moellering (McLaren)          0
 14T  Gary Kempen (Williams)             0
 14T  Chuck Modzinski (Arrows)           0
 14T  Jim Lauder (Shadow)                0

The final race of the 2018 CFR-Detroit racing season will be the South African Grand Prix, on the Kyalami circuit from an old Avalon Hill design from the Speed Circuit days. The race will be at Pandemonium Games & Hobbies, at 6033 Middlebelt Road, in Garden City, Michigan, on Friday, December 14. Bidding for qualifying will begin promptly at 6:45 pm. Drivers are urged to arrive 30 to 45 minutes before qualifying begins in order to set up their car’s specifications for the race.

This should be a very entertaining race, as four drivers (Mike Cook, Bill Worrel, Garry Kaluzny, and Richard White) have a great shot at winning the championship. If any of those four drivers wins the race, they will win the championship outright; else, points earned during the final race will determine the outcome. A fifth driver, Jack Beckman, has a mathematical chance to tie for the championship.

Immediately following the race, a small trophy will be awarded to the points champion. There will also be a vote for the Tom Kane Memorial Award to be awarded to the season’s most sportsmanlike driver. That “sportsman of the year” will also receive a small trophy. All drivers who have raced in at least one race during the 2018 season are eligible to vote for the Tom Kane award. If drivers will not be present at the final race, they can contact Garry Kaluzny before the race to have their vote tabulated.

CFR-Detroit 2018 Race #6 – Abu Dhabi Grand Prix

December 11th, 2018

The sixth race of the 2018 CFR-Detroit racing season took place on Saturday, October 13, at Imperium Games in Wixom, Michigan. Jack Beckman skillfully drove his Ferrari to victory over 11 other competitors to join the ranks of winning drivers in 2018. Bill Worrel brought his 6-wheeled Tyrrell home in 2nd place for the 2nd consecutive race; it was also the 3rd time he finished 2nd in 2018’s campaign. Rounding out the podium, in 3rd place, was Mike St. Peter in the #44 Mercedes. It was St. Peter’s 2nd straight race finishing in 3rd place.

The race was on the Yas Marina track, a Doug Schulz design. (Doug Schulz is the designer of Championship Formula Racing.) It is the same track that was raced on in 2017 where Garry Kaluzny came home victorious over Richard White to close out the 2017 season.

Yas Marina CFR track

Yas Marina CFR track

After the drivers set up their car’s specs, the drivers secretly bid for starting positions. Each wear chit counted as 1.0, and each skill chit counted as 0.5. Higher bids started in front of lower bids. Ties were resolved by rolling percentage dice, high rolls favored over low rolls.

Mike Cook (5 wear + 6 skill) got pole position for the 3rd straight time in 2018. Cook bid 8.0, but had to win a “dice-off” with 2nd place qualifier Bill Worrel (3 wear + 10 skill) who also bid 8.0. Cook rolled ’29’ on percentage dice, while Worrel rolled ’00.’ Jim Robinson (3 wear + 8 skill) grabbed the 3rd qualifying spot on the grid with a bid of 7.0. Gary Sturgeon (2 wear + 9 skill) started 4th with a bid of 6.5, and Richard White (3 wear + 5 skill) was 5th with a bid of 5.5. Mike St. Peter (4 wear + 0 skill), Jack Beckman (1 wear + 6 skill), and Garry Kaluzny (2 wear + 4 skill) all bid 4.0. St. Peter rolled ’58’ to start 6th, Beckman rolled ’47’ to start 7th, and Kaluzny rolled ’46’ to start 8th. Aric Parr (0 wear + 6 skill) bid 3.0 to start 9th on the grid. Tenth and 11th places on the grid were contested by Brian Robinson (0 wear + 5 skill) and Greg Lim (0 wear + 5 skill) who had identical bids of 2.5. Brian Robinson got 10th place with a roll of ’68’ while Lim started 11th after rolling ’60.’ Jim Landis (0 wear + 3 skill), with a bid of only 1.5, started in 12th place.

The starting grid for the Abu Dhabi Grand Prix with their car specs:

 # Driver (Car)                    Start/Accel/Decel/Top/Wear/Skill/Tires
11 Mike Cook (Camel Lotus)           60   40    60   160  5x   2x   soft
 4 Bill Worrel (Tyrrell)            100   40    40   140  5x   3x   hard
 2 Jim Robinson (Williams)           60   40    40   160  5x   3x   soft
22 Gary Sturgeon (McLaren)           60   40    40   140  5x   3x   soft
 1 Richard White (Brabham)           60   40    40   160  5x   3x   soft
44 Mike St. Peter (Mercedes)         60   40    40   160  5x   3x   hard
12 Jack Beckman (Ferrari)            60   40    40   160  5x   3x   soft
 8 Garry Kaluzny (Marlboro McLaren)  60   40    40   160  5x   3x   soft 
14 Aric Parr (Motul BRM)             20   60    60   140  4x   4x   hard
 5 Brian Robinson (Walker Racing)    20   60    60   160  4x   3x   soft
13 Greg Lim (GoDaddy)                60   60    40   140  5x   3x   hard
20 Jim Landis (Benetton)             60   40    40   160  5x   3x   hard

Start = Start Speed (in miles/hour); Accel = Acceleration (in mph); Decel = Deceleration (in mph); Top = Top Speed (in mph); Wear = # of Wear markers (per lap); Skill = # of Skill markers (per lap); Tires = hard or soft tires to begin the race.

The starting grid for the Abu Dhabi GP

The starting grid for the Abu Dhabi GP. Mike Cook’s yellow car is on the pole; next to him is Bill Worrel’s blue Tyrrell. Then are Jim Robinson (white/blue/yellow), Gary Sturgeon (black/gold/red), Richard White (blue/white), Mike St. Peter (silver/teal), Jack Beckman (red), Garry Kaluzny (orange/white), Aric Parr (gray), Brian Robinson (white/blue), Greg Lim (green), and Jim Landis (green/red/blue). Thanks to the Grid Girls who once again help the cars line up in proper order.

At the start of the race, Worrel took advantage of the fact that he had the only car with a 100 mph start speed, although he also rolled dice (since his car was on hard tires) to increase his start speed to 120 mph, burning 2 wear to get through the 1st corner before Cook. Cook used a wear to increase his start speed to 80 mph, thereby ending his move in the inside lane of the 1st corner. Both J. Robinson and Sturgeon used wear (both of their cars were on soft tires) to increase their start speed to 80 mph, as did White. Mike St. Peter had to roll dice to increase his start speed as his car was wearing hard tires. Then, immediately following the other cars, Beckman and Kaluzny each used a wear to boost their start speed to 80 mph. Then came a 2-space gap, as both Brian Robinson’s and Aric Parr’s cars only had 20 mph start speeds. Parr rolled dice to increase to 40 mph (as he was on hard tires), while B. Robinson (on soft tires) used a wear to achieve 40 mph. Lim, starting in the row behind them with a 60 mph start speed, only went 60 mph and pulled up alongside Parr and B. Robinson. Landis, starting last, drove at a rate of only 40 mph, fearing that the track ahead would be clogged with slow cars.

Bill Worrel takes the lead at the start

Bill Worrel takes the lead at the start of the Abu Dhabi Grand Prix.

The cars pretty much stayed in order from their starting positions as they came ’round the hairpin that led onto the long straightaway. Worrel continued to lead, but White had taken over 2nd place from Cook. Jim Robinson had fallen to 4th, and St. Peter had moved up to 5th. Sturgeon was now 6th, and Beckman and Kaluzny were still 7th and 8th. And then a little way behind came the group of Parr, B. Robinson, Lim, and Landis.

Worrel leads onto the long straight

Worrel leads onto the long straight.

Down the long straight, Worrel, White, and Cook remained 1-2-3. Kaluzny and Beckman made their way up to 4th and 5th. Jim Robinson had fallen to 6th, after starting 3rd, and Sturgeon had fallen to 8th, after starting 4th.

Worrel still leads through the chicane

Worrel still leads through the chicane, then come White, Cook, Kaluzny, Beckman, J. Robinson, St. Peter, Sturgeon, B. Robinson, Lim, Parr, and Landis.

At the sharp left-hand corner at the end of the 2nd half of the long straight, Cook took the lead from Worrel, and White dove to the inside of the racing line to take over 2nd place. Beckman had got back in front of Kaluzny, and B. Robinson and Lim had caught up with Sturgeon.

Cook takes the lead; White takes 2nd

Cook takes the lead; White takes 2nd place, Worrel is 3rd.

Traveling through the curvy part of the Yas Marina track, Worrel regained the lead from Cook and White. Beckman and Kaluzny were now breathing the exhaust fumes from the leading trio’s tailpipes, and St. Peter, J. Robinson, and Sturgeon were not far behind.

Worrel retakes the lead

Worrel retakes the lead, then are Cook, White, Beckman, Kaluzny, St. Peter, J. Robinson, Sturgeon, then a gap to B. Robinson and Lim, then another gap to Landis and Parr.

As the lead group of cars came around the last right-hand bend that led onto the start/finish straight, the cars of Worrel, Cook, Beckman, Kaluzny, and White pulled into the pits to replace their worn-out tires. White had spun on the 60 mph corner leading onto that straight, so he would be relegated to starting at 40 mph when he left the pits.

The lead cars make their pit stops

The lead cars make their pit stops. Note that White’s Brabham is facing the wrong way (next to the orange and red cars in the pits), as he has just spun coming into the pits.

Joining the leaders in the pits after the next move on the track were the cars of St. Peter, J. Robinson, Sturgeon, Lim, and B. Robinson. The only cars that did not pit on the 1st lap were the cars of Landis and Parr. They stayed on the track as they were on hard tires. Mike St. Peter managed to lead the 1st lap, by virtue of his pitting in the last space that abutted the start/finish line, thus allowing his car’s nose to touch the start/finish line before all others on that lap.

It's getting crowed in the pits!

It’s getting crowed in the pits! Ten of the 12 cars in the race are now in the pits.

The official order at the end of the 1st lap: St. Peter (+5), Worrel (0), Landis (+9), Cook (-3), Kaluzny (+3), Beckman (+1), J. Robinson (-4), Parr (+1), Sturgeon (-5), White (-5), Lim (0), and B. Robinson (-2). The numbers in parentheses indicate how many places a driver either gained (+) or lost (-) from their starting position. But as the cars came up to speed after emerging from the pits, their running order on the track was: Worrel; Cook; Landis; Kaluzny; Beckman; St. Peter; J. Robinson; Parr; Sturgeon; White; Lim; and B. Robinson.

Worrel enjoys a healthy lead after the pit stops

Worrel enjoys a healthy lead after the pit stops.

Worrel continued to increase his lead, while Beckman was making his way through the pack, passing Kaluzny, Landis, and Cook to take over 2nd place. Beckman then went 60 mph over the speed limit in the hairpin curve leading onto the long straightaway. Since he was on hard tires, he couldn’t use 3 wear, but instead had to use 2 wear and take a chance dice roll. Beckman figured it would be a good idea to use his only -3 skill chit. It was a good choice, as Beckman successfully made the chance roll and so kept pace with Worrel. Mike St. Peter moved up into 4th place after returning to the track in 6th place after his pit stop.

Worrel and Beckman lead by a hefty margin

Worrel and Beckman lead by a hefty margin. Richard White (middle of the outside lane in the corner) has just forced pass Parr (gray car) in the hairpin.

Worrel and Beckman continued running 1-2 down the two long straights and the chicane that joined those straights, but by the end of the 2nd long straight, St. Peter was right up with them in 3rd. Through the curvy part of the track, the leading trio was about 4 spaces ahead of the 4-5-6 cars of Cook, J. Robinson, and Kaluzny. Then a few more spaces back came Sturgeon, White, and Lim, and then finally Landis, Parr, and B. Robinson.

Finally, Beckman was able to reach the last corner leading onto the start/finish straightaway before his two closest competitors, and Beckman pulled off the track for his 2nd pit stop.

Beckman takes the lead and pulls into the pits

Beckman takes the lead and pulls into the pits.

A turn after Beckman made his 2nd pit stop, Worrel and St. Peter did likewise. Then, on following turns, the cars of Kaluzny, J. Robinson, Sturgeon, White, and Lim pitted, followed by Landis and Parr. Landis and Parr were making their 1st, mandatory, pit stops, while the others were making their 2nd stops. All cars leaving the pits came out on soft tires, except for Jim Robinson. Mr. Robinson had his pit crew put on a new set of soft tires to replace his original soft tires during his 1st pit stop, so at his 2nd pit stop he had to make the mandatory switch to hard tires as all cars must use both tire compounds in a race. Mike Cook, who had been in 4th place, decided to “ride the rapids” and stay on the track on his hard tires instead of pitting. Brian Robinson also stayed on the track on his car’s hard tires.

Cook did officially lead the 2nd lap, but Beckman, who had just come out of the pits with new tires, was right behind Cook in 2nd place.

Cook leads the 2nd lap; Beckman is 2nd

Cook leads the 2nd lap; Beckman is 2nd after just leaving the pits. Worrel and St. Peter have just returned to the track, while other cars are still in the pits.

The official order after two laps: Cook (0); Beckman (+5); Worrel (-1); St. Peter (+2); Kaluzny (+3); J. Robinson (-3); B. Robinson (+3); Sturgeon (-4); White (-4); Lim (+1); Landis (+1); and Parr (-3). After the cars had all cycled through their pit stops, the running order on the track was: Beckman; Cook; Worrel; St. Peter; Kaluzny; J. Robinson; B. Robinson; Sturgeon; White; Lim; Landis; and Parr.

Beckman has retaken the lead

Beckman has retaken the lead over Cook, and Beckman has a clear path down the long straightaway.

Coming out of the hairpin onto the long straight, Worrel pulled alongside Cook. Although Cook’s car was geared for a superior top speed in the race, 160 mph to Worrel’s 140 mph, Worrel successfully made an unmodified top speed roll to move at 160 mph and stay alongside Cook. But Kaluzny and St. Peter had more momentum while exiting the hairpin, and so caught right up with Cook and Worrel down the long straight. At the chicane, Kaluzny got by Cook to take 3rd place. St. Peter also got by Cook to take over 4th place. Beckman still led by 6 spaces over the others.

Beckman leads with about 1/3 lap to go

Beckman continues leading with about 1/3 lap to go. Worrel and Kaluzny are 2nd & 3rd; St. Peter and Cook are 4th & 5th.

Through the curvy section of the Yas Marina track, the order pretty much held, then Beckman came around the final corner and cruised to his first victory of the season.

Beckman wins the Abu Dhabi Grand Prix

Jack Beckman (the invisible driver) wins the Abu Dhabi Grand Prix! The flagman presents the checkered flag in the old fashioned way, by running onto the track.

After Beckman’s easy victory, there was a 3-way Donnybrook for 2nd place between Worrel, Kaluzny, and St. Peter.

Worrel, Kaluzny, and St. Peter battle for 2nd place

Worrel, Kaluzny, and St. Peter battle for 2nd place!

On the 2nd to last move of the race, Worrel made an unmodified chance roll to get through the last corner and to take the inside position on the track. On the last turn of the race, both Worrel and Kaluzny plotted to move at 140 mph. Worrel moved first, as he was on the inside of the track, and he took the outside lane of the corner, moving through the two 140 mph spaces. Kaluzny had to make an unmodified acceleration roll to get up to 140 mph (he had only moved at 80 mph the previous turn, and his car’s acceleration rating was only 40 mph), and then he made an unmodified deceleration roll to slow to 120 mph and took the space right behind Worrel. St. Peter plotted only 120 mph, so he moved 3rd of the trio, and he took the middle lane of the corner. St. Peter then had to successfully make an unmodified chance roll to avoid spinning or crashing, and he did make the roll to nip Kaluzny for 3rd place. Note: When cars enter a corner after the finish line in CFR races, the cars must pay for the corner, using either wear or taking a chance by rolling the dice. If a car spins in that corner past the finish line, it will finish behind all other cars that crossed the finish line during that same move. If a car crashes in that corner, even though the corner is past the finish line, that car is considered to have never crossed the line, and is a DNF instead. This is to keep cars from becoming kamikazes in that corner!

Worrel is 2nd, St. Peter 3rd, and Kaluzny 4th

Worrel (blue car) is 2nd, St. Peter (silver car) 3rd, and Kaluzny (orange/white car) 4th. Jim Robinson is 5th, Cook is 6th, and Lim is 7th.

There was still action in the back of the pack. White had spun in the 3rd to last corner of the race, and as White got up to speed, he was forced-passed by Lim. It was White’s 2nd spin of the race.

The official finishing order of the 2018 Abu Dhabi Grand Prix: 1st-Jack Beckman (+6); 2nd-Bill Worrel (0); 3rd-Mike St. Peter (+3); 4th-Garry Kaluzny (+4); 5th-Jim Robinson (-2); 6th-Mike Cook (-5); 7th-Greg Lim (+4); 8th-Gary Sturgeon (-4); 9th-Richard White (-4); 10th-Aric Parr (-1); 11th-Brian Robinson (-1); 12th-Jim Landis (0).

Mike Cook’s failure to make his 2nd pit stop cost him a number of positions. The Yas Marina track has now demonstrated in two official races, and in one demo race, the necessity of making two pit stops on this track. Cars need to burn through their full allotment of wear in order to turn fast laps. Cars that have to ration their wear over two laps will get passed on the track.

Points awarded at the 2018 Abu Dhabi Grand Prix: Beckman 10; Worrel 6; St. Peter 4; Kaluzny 3; J. Robinson 2; Cook 1.

The points standings of the 2018 CFR-Detroit season after six of eight races:

Place Driver (Car)                    Points
  1   Mike Cook (Camel Lotus)           28
  2   Richard White (Brabham)           23
  3   Bill Worrel (Tyrrell)             22
  4   Jim Robinson (Williams)           18
  5T  Jack Beckman (Ferrari)            17
  5T  Garry Kaluzny (Marlboro McLaren)  17
  7   Gary Sturgeon (McLaren)           10
  8   Mike St. Peter (Mercedes)          9
  9T  Brian Robinson (Walker Racing)     4
  9T  Aric Parr (Motul BRM)              4
 11T  Joel Lauder (HSBC Jaguar)          2
 11T  Greg Lim (GoDaddy)                 2
 13T  Jim Landis (Benetton)              0
 13T  Mark Moellering (McLaren)          0
 13T  Gary Kempen (Williams)             0
 13T  Chuck Modzinski (Arrows)           0
 13T  Jim Lauder (Shadow)                0

The next race of the 2018 CFR-Detroit racing campaign is the German Grand Prix, racing on the Hockenheimring track (of CFR design). It will be held on Saturday, November 17, at the Guild of Blades game store in Clawson, Michigan.

CFR-Detroit 2018 Race #5 – Detroit Grand Prix

December 9th, 2018

Thirteen drivers gathered at RIW Hobbies & Games in Livonia, Michigan, on Saturday, September 15, to race in the Detroit Grand Prix, using the rules from the Championship Formula Racing board game. The 2018 race was on the Belle Isle track. When the exhaust fumes had settled, it was found that Mike Cook had won his second consecutive race, winning both races from the pole position. Bill Worrel, who started 2nd, finished in 2nd place. And Mike St. Peter made an appearance on the podium, finishing in 3rd place after starting 8th.

Belle Isle CFR track

The Belle Isle track we used to race on (designed by Garry Kaluzny)

The Belle Isle track we used was of our own local design. For information about how to make a large scale track of Belle Isle, see Part 1, Part 2, and Part 3. (Of course, those same techniques can be used to make any track of your choosing.)

After the drivers set up their car’s specs, the drivers secretly bid for starting positions. Each wear chit counted as 1.0, and each skill chit counted as 0.5. Higher bids started in front of lower bids. Ties were resolved by rolling percentage dice, high rolls favored over low rolls.

Mike Cook (5 wear + 6 skill) and Bill Worrel (2 wear + 12 skill) both wanted pole position real bad, as they both bid 8.0. (Note: the all-time high bid for pole position in the two seasons of the CFR-Detroit racing season was 8.5, bid by Chad Marlett at the 2017 Abu Dhabi Grand Prix.) Cook won the subsequent percentage dice roll by ’97’ to ’09’ and so Cook was on the pole and Worrel started 2nd. Garry Kaluzny (2 wear + 8 skill), Jim Robinson (3 wear + 6 skill), and Richard White (4 wear + 4 skill) each bid 6.0, with Kaluzny starting 3rd with a roll of ’79,’ J. Robinson starting 4th with a roll of ’33,’ and White starting 5th after rolling ’23.’ Kaluzny thought for sure he would get the pole position with what he thought was an overly high bid of 6.0, but was amazed with the number of other high bids. Mark Moellering (3 wear + 3 skill), in only his 2nd race of the CFR-Detroit racing series, qualified in 6th position with a bid of 4.5. Gary Sturgeon (1 wear + 6 skill) and Mike St. Peter (3 wear + 2 skill) each bid 4.0, with Sturgeon starting 7th after a dice roll of ’26’ and St. Peter starting 8th with a dice roll of ’21.’ Jim Landis (1 wear + 4 skill) bid 3.0 to start 9th. Jack Beckman (1 wear + 3 skill), Greg Lim (1 wear + 3 skill), and Brian Robinson (0 wear + 5 skill) each bid 2.5. They started 10th, 11th, and 12th, after dice rolls of ’76,’ ’47,’ and ’30,’ respectively. Aric Parr (0 wear + 0 skill) bid nothing, so he started in 13th position.

The starting grid for the Detroit Grand Prix with their car specs:

 # Driver (Car)                    Start/Accel/Decel/Top/Wear/Skill/Tires
11 Mike Cook (Camel Lotus)          120   40    40   140  5x   2x   soft
 4 Bill Worrel (Tyrrell)            100   40    40   140  5x   3x   soft
 8 Garry Kaluzny (Marlboro McLaren)  60   40    40   140  5x   4x   soft
 2 Jim Robinson (Williams)          100   40    40   140  5x   3x   soft
 1 Richard White (Brabham)           60   40    40   140  5x   4x   soft
10 Mark Moellering (McLaren)        100   40    40   160  4x   3x   soft
22 Gary Sturgeon (McLaren)           60   60    40   160  5x   2x   hard 
44 Mike St. Peter (Mercedes)         60   40    40   140  5x   4x   soft
20 Jim Landis (Benetton)             60   40    40   160  5x   3x   hard
12 Jack Beckman (Ferrari)            60   60    60   160  4x   2x   soft
13 Greg Lim (GoDaddy)                60   60    40   160  4x   3x   hard
 5 Brian Robinson (Walker Racing)    20   60    60   140  5x   3x   soft
14 Aric Parr (Motul BRM)             20   60    60   160  4x   3x   hard

Start = Start Speed (in miles/hour); Accel = Acceleration (in mph); Decel = Deceleration (in mph); Top = Top Speed (in mph); Wear = # of Wear markers (per lap); Skill = # of Skill markers (per lap); Tires = hard or soft tires to begin the race.

Starting grid at Belle Isle

Starting grid at Belle Isle: Cook (yellow car); Worrel (blue); Kaluzny (orange/white); J. Robinson (white/blue/yellow); White (blue/white); Moellering (orange); Sturgeon (gold/red/black); St. Peter (silver/teal); Landis (green/red/blue); Beckman (red/white); Lim (green); B. Robinson (white/blue); Parr (gray). Note that the Grid Girls have cheerfully helped the drivers to line up in the proper order.

The drivers all made clean getaways from the start as the green flag waved. Mike Cook, with his 120 mph start speed, used a wear to increase his start speed to 140 mph, making him the only car to make it through the first two corners on the track during the first move of the race. He had to pay 2 wear to traverse the first corner over its 100 mph limit (on the racing line), and another wear to go through the second corner at 20 mph over its limit. So with Cook having spent 5 wear to get the pole, another wear to increase his start speed, and 3 more wear for the first two corners, he only had 6 wear remaining to drive the rest of the first lap.

Bill Worrel did not increase his start speed, and merely moved at 100 mph, taking the arrow for the 2nd corner. Jim Robinson, who started on the outside of the 2nd row, boosted his start speed to 120 mph (using a wear) and pulled alongside Worrel, thereby taking the inside lane and also taking over 2nd place on the track. Garry Kaluzny, the 3rd place starter, used a wear to increase his start speed to 80 mph, leaving him in the middle of the first corner. Mark Moellering, starting from the outside of row 3, used a wear to increase his start speed to 120 mph and moved up next to Kaluzny in turn 1. Richard White increased his start speed to 80 mph, as did Mike St. Peter. Gary Sturgeon, on hard tires, merely started at his car’s 60 mph start speed, and that allowed Jack Beckman’s Ferrari to increase to 80 mph and pull alongside Sturgeon. Jim Landis and Greg Lim both started at their normal 60 mph start speeds, as both were on hard tires and neither wanted to risk throwing dice to increase their start speed. Brian Robinson increased his speed from 20 to 40 mph, as he was on soft tires. And finally, Aric Parr also boosted his starting speed to 40 mph.

Cook races away from the line

Cook races away from the line at the start of the Detroit Grand Prix.

As the pack raced down Central Way, then turned right onto Insulruhe Street, made another right onto Loiter Way, then the left onto Picnic Way, Cook was barely in front of Worrel, and Moellering was right behind them. As they made the sweeping right turn onto The Strand, Worrel pulled alongside Cook, to challenge for the lead.

Worrel challenges Cook for the lead

Worrel challenges Cook for the lead. The rest of the pack is running in the order Moellering, White, J. Robinson, St. Peter, Kaluzny, Beckman, Lim, Sturgeon, B. Robinson, Landis, and Parr.

But Cook won the game of chicken with Worrel into the right-hand corner at the end of The Strand, and so Cook maintained his grip on the lead.

Cook leads through the horseshoe on Belle Isle

Cook leads through the “horseshoe” on Belle Isle, followed by Worrel, Moellering, White, J. Robinson, St. Peter, Kaluzny, Lim, Beckman, Sturgeon, B. Robinson, Parr, and Landis.

As the pack came around the Scott Fountain and onto the start/finish straight, Cook, Worrel, and White quickly ducked into the pits. They were shortly joined in the pits by Moellering, St. Peter, Kaluzny, Beckman, J. Robinson, and B. Robinson. Only the four cars of Sturgeon, Parr, Lim, and Landis stayed on the track instead of pitting as those four cars were all on hard tires and so that quartet all regained some wear as they crossed the start/finish line.

The first pit stops have begun

The first pit stops have begun — Cook, Worrel, and White are in the pits.

The official order at the end of the first lap was: Cook (0); Worrel (0); Moellering (+3); St. Peter (+4); Kaluzny (-2); Beckman (+4); J. Robinson (-3); Sturgeon (-1); Parr (+4); Lim (+1); Landis (-2); White (-7); and B. Robinson (-1). The numbers in parentheses indicate how many places a driver either gained (+) or lost (-) from their starting position. However, due to some cars pitting and some cars staying on the track, Gary Sturgeon became the new leader on the track as he passed the cars that were in the pits.

Gary Sturgeon passes the pits and takes the lead

Gary Sturgeon passes the pits and takes the lead after the 1st lap at the Detroit Grand Prix on Belle Isle.

After all of the cars that pitted rejoined the track, the running order was Sturgeon (leading by 5 spaces) from Parr, Lim, Landis, Cook, White, Worrel, Moellering, St. Peter, Kaluzny, Beckman, J. Robinson, and B. Robinson. But, as was the case during the 1st lap when Cook had a big lead down Central Way, after Sturgeon turned right onto Insulruhe Street he found that the pack was right up with him. As Sturgeon turned onto The Strand, he had Parr right behind him, and Cook was now in 3rd place, having passed Lim and Landis.

As the pack roared down The Strand, Parr pulled alongside Sturgeon, and then took the lead as they turned into the “horseshoe.”

Aric Parr takes the lead at Casino Way

Aric Parr takes the lead from Sturgeon at Casino Way.

Parr continued to lead over Sturgeon under Parr made his pit stop near the end of the 2nd lap. Richard White, who had been running in 7th, spun at the sharp right hand turn from Fountain Drive onto Casino Way as he was leaving the “horseshoe.” The spin dropped White back to 12th place out of 13 cars.

Aric Parr continues to lead while Richard White spins

Aric Parr continues to lead while Richard White spins back by the yellow flagman.

At the end of the 2nd lap, some cars pitted for a 2nd time, other cars stopped for their 1st, mandatory, pit stop. Aric Parr had been leading when he pulled in for his mandatory pit stop. He was then followed into the pits by Sturgeon (1st stop), Landis (1st stop), Kaluzny (2nd stop), J. Robinson (2nd stop), Lim (1st stop), and White (2nd stop). All of the pitted cars returned to the track on soft tires for the last lap. Cars that did not pit were Cook, Worrel, St. Peter, Beckman, Moellering, and B. Robinson. The non-pitting cars were all on hard tires and so picked up 2 or 3 wears apiece.

Mike Cook retakes the lead as cars make pit stops

Mike Cook (yellow car) retakes the lead as other cars make pit stops. Jim Robinson (gray shirt, center) appears dismayed, and Jim Landis (blue shirt, right) appears lost in thought as his car is serviced in the pits.

The official order at the end of the 2nd lap was: Cook (0); Sturgeon (+5); Landis (+6); Kaluzny (-1); Worrel (-3); St. Peter (+2); Beckman (+3); Moellering (-2); J. Robinson (-5); Parr (+3); B. Robinson (+1); White (-7); and Lim (-2). However, after the pit stops were completed, the actual running order on the track was: Cook; Worrel; Beckman; St. Peter; Moellering; Parr; Sturgeon; B. Robinson; Landis; Kaluzny; J. Robinson; Lim; and White.

As the 3rd lap progressed, Cook continued to lead from Worrel by 4 spaces, while Worrel was still in front of Beckman and others. Going into the right-hand corner at the end of The Strand, St. Peter took 3rd place from Beckman. Then the jockeying for positions back in the pack grew intense. Kaluzny was able to force a pass over three other cars, those of Landis, Parr, & Sturgeon, at the first left-hand bend in the horseshoe. Kaluzny did make contact and had to lose a wear, leaving him only 1 wear for the balance of the race. But then Kaluzny lost that position he had just gained when he spun at the sharp right-hander exiting the horseshoe.

Kaluzny spins exiting the horseshoe

Kaluzny spins exiting the horseshoe. He had just moved up from 9th to 5th. The spin dropped him back to 7th.

Then Aric Parr forced a pass past Kaluzny and Moellering as Kaluzny was recovering from his spin. Then Sturgeon tried a forced-pass on Moellering, but was blocked. Sturgeon had to scrub off 40 mph of speed. He spent a wear and rolled an unmodified deceleration dice roll, which he failed. He then had to spend another wear to avoid spinning out, and his deceleration was now only 20 mph, which didn’t matter, because he wouldn’t need to decelerate any more until the end of the race. In Moellering’s blocking of Sturgeon, there was contact between the cars and Moellering also had to lose a wear.

Next, Jim Landis spun at the 2nd of the twin 80 mph corners on Casino Way going around Scott Fountain. At the same time, Gary Sturgeon was spinning at the 1st of those corners. And Richard White managed to bend his Brabham in a failed attempt at cornering at the 40 mph corner exiting the horseshoe. While this carnage was taking place on the track, Mike Cook (0) was taking the checkered flag while crossing the finish line without fanfare, making it two wins in a row for Cook. Both wins came after Cook started in the pole position.

Cook takes the checkered flag to win

Cook takes the checkered flag to win; meantime, Landis has spun (at right of picture), Sturgeon has spun (directly behind the yellow flagman), and White has crashed (upside-down car in front of Lim’s green car at upper-center of picture).

Then Worrel (0), St. Peter (+5), and Beckman (+6) crossed the finish line to take 2nd, 3rd, and 4th positions. Parr (+8) then crossed the line to take 5th place. But wait! There’s more! (Sounds like a commercial for the Amazing Ginsu, does it not!?) Back in the 2nd of the 80 mph corners around Scott Fountain, where Landis had just spun, Jim Robinson crashed out of the race. Brian Robinson used some late-braking to try to avoid being collected in the crash, and Brian did narrowly succeed in avoiding the car parts that were strewn across the track.

Jim Robinson crashes in the 2nd to last corner of the race

Jim Robinson crashes in the 2nd to last corner of the race (directly in front of the yellow flagman at right). In the meantime, Worrel, St. Peter, and Beckman have crossed the finish line (at left).

Finally, Kaluzny (-3) managed to hold off Moellering for 6th place, thus getting the last available point; Moellering (-1) was 7th. Brian Robinson and Sturgeon were both able to pass Landis before the finish line, with B. Robinson (+4) finishing 8th, Sturgeon (-2) 9th, and Landis (-1) 10th. Finally, Greg Lim, although running a ways behind the other cars, managed to achieve the final spinout of the race, in the final 140 mph corner just before the finish line. Lim (0) was 11th. Jim Robinson and Richard White were both DNFs due to crashes; J. Robinson (-8) was classified 12th and White (-8) was 13th.

Points awarded at the Detroit Grand Prix: Cook 10; Worrel 6; St. Peter 4; Beckman 3; Parr 2; Kaluzny 1.

The points standings of the 2018 CFR-Detroit season after five of eight races:

Place Driver (Car)                    Points
  1   Mike Cook (Camel Lotus)           27
  2   Richard White (Brabham)           23
  3T  Jim Robinson (Williams)           16
  3T  Bill Worrel (Tyrrell)             16
  5   Garry Kaluzny (Marlboro McLaren)  14
  6   Gary Sturgeon (McLaren)           10
  7   Jack Beckman (Ferrari)             7
  8   Mike St. Peter (Mercedes)          5
  9T  Brian Robinson (Walker Racing)     4
  9T  Aric Parr (Motul BRM)              4
 11T  Joel Lauder (HSBC Jaguar)          2
 11T  Greg Lim (GoDaddy)                 2
 13T  Jim Landis (Benetton)              0
 13T  Mark Moellering (McLaren)          0
 13T  Gary Kempen (Williams)             0
 13T  Chuck Modzinski (Arrows)           0
 13T  Jim Lauder (Shadow)                0

The next race of the 2018 CFR-Detroit racing campaign is the Abu Dhabi Grand Prix, using the Yas Marina track. It will be raced on October 13 at Imperium Games in Wixom, Michigan.

CFR-Detroit 2018 Race #4 – Monaco Grand Prix

December 8th, 2018

The fourth race of the CFR-Detroit 2018 racing season was held at Imperium Games in Wixom, Michigan, on Saturday, August 11, and Mike Cook, the pole-sitter, won handily over 11 other competitors. Second and third places went to Gary Sturgeon and Jim Robinson, respectively. Although the CFR-Detroit races have been held on Friday evenings, it was decided to move most of the races to Saturday afternoons because with the 15 racers who competed in last month’s race, the race would not have been able to be completed before most gaming stores would have closed for the evening. We were fortunate that the previous race was at Pandemonium Games and Hobbies in Garden City, and that store stayed open until midnight (most other game stores close at 11:00 pm) and so we were able to complete the race at “Pando” before being evicted for the evening!

The Monte Carlo track we used to race on.

The Monte Carlo track we used to race on.

We used the old Monte Carlo track from one of the Avalon Hill Accessory Pack tracks, except we updated it with the “Nouvelle Chicane.” This is the same track we raced at last year’s Monaco Grand Prix.

After the drivers set up their car’s specs, the drivers secretly bid for starting positions. Each wear chit counted as 1.0, and each skill chit counted as 0.5. Higher bids started in front of lower bids. Ties were resolved by rolling percentage dice, high rolls favored over low rolls.

Mike Cook (1 wear + 12 skill) bid 7.0, and so started in the pole position. Jim Robinson (2 wear + 8 skill) bid 6.0 and started 2nd on the grid. Gary Sturgeon (1 wear + 9 skill) and Richard White (5 wear + 1 skill) tied with bids of 5.5. Sturgeon won the percentage dice-off by ’63’ to ’22,’ so Sturgeon started 3rd and White 4th. Jack Beckman (1 wear + 8 skill) started 5th with a bid of 5.0. Garry Kaluzny (3 wear + 3 skill) started 6th with a bid of 4.5. Bill Worrel (3 wear + 2 skill) started 7th with a bid of 4.0. Brian Robinson (0 wear + 5 skill) started 8th with a bid of 2.5. Mike St. Peter (1 wear + 2 skill) and Greg Lim (0 wear + 4 skill) each bid 2.0, with St. Peter winning the resulting dice-off by ’77’ to ’50’ and so St. Peter was 9th and Lim 10th on the grid. Jim Landis (0 wear + 1 skill) started 11th with a bid of 0.5, and Aric Parr (0 wear + 0 skill) bid nothing and so started in 12th position.

The starting grid for the Monaco Grand Prix with their car specs:

 # Driver (Car)                    Start/Accel/Decel/Top/Wear/Skill/Tires
11 Mike Cook (Camel Lotus)          100   40    40   140  5x   3x   hard
 2 Jim Robinson (Williams)           60   40    40   140  5x   4x   soft
22 Gary Sturgeon (McLaren)          100   40    40   140  5x   3x   soft
 1 Richard White (Brabham)           60   40    60   140  5x   3x   soft
12 Jack Beckman (Ferrari)            60   40    40   140  5x   4x   soft
 8 Garry Kaluzny (Marlboro McLaren)  60   60    40   140  5x   3x   soft
 4 Bill Worrel (Tyrrell)             60   40    40   140  5x   4x   hard 
 5 Brian Robinson (Walker Racing)    20   60    60   140  5x   3x   soft
44 Mike St. Peter (Mercedes)         60   40    40   140  5x   4x   soft
13 Greg Lim (GoDaddy)                60   60    40   140  5x   3x   hard
20 Jim Landis (Benetton)             20   60    60   160  5x   2x   hard
14 Aric Parr (Motul BRM)             20   60    60   140  5x   3x   hard

Start = Start Speed (in miles/hour); Accel = Acceleration (in mph); Decel = Deceleration (in mph); Top = Top Speed (in mph); Wear = # of Wear markers (per lap); Skill = # of Skill markers (per lap); Tires = hard or soft tires to begin the race.

Starting grid for the Monaco G.P.

Starting grid for the Monaco G.P. Mike Cook (yellow car) is on the pole (the inside of the track), while Jim Robinson (white/yellow/blue) is next to Cook on the front row. (Greg Lim photo)

As the green flag dropped, Mike Cook roared off with his 100 mph start speed, ending his move in the Ste. Devote corner. Cook started on hard tires, and did not want to risk increasing his start speed by rolling dice — and besides, ending up in the middle of Ste. Devote was a great place to end his first turn. Gary Sturgeon, the only other car with a 100 mph start speed, used a wear (since he was on soft tires) to increase his start speed to 120 mph. That allowed Sturgeon to pass Jim Robinson (who had used a wear to increase his start speed to 80 mph), leaving Sturgeon in 2nd place on the outside of Ste. Devote. Richard White used a wear to boost his starting speed to 80 mph. He eschewed the cornering arrow, instead taking the inside lane of the track. Jack Beckman, although on soft tires, elected to roll dice and try to boost his start speed “the hard way.” Although Beckman used two -1 skill chits, he rolled a ’12’ and so moved off at only 40 mph, instead of the 80 mph he had hoped for. Both Garry Kaluzny and Bill Worrel passed Beckman at the start. Kaluzny only plotted 60 mph, figuring there wouldn’t be any spaces to move into at 80 mph, while Worrel plotted 80 mph and so moved up next to Kaluzny. The rest of the field started somewhat cautiously.

Cook and Sturgeon roar into the lead

Cook and Sturgeon roar into the lead over J. Robinson and White (note White is driving a different model of Brabham for this race). Then came Kaluzny, Worrel, Beckman, B. Robinson, St. Peter, Lim, Landis, and Parr. (Greg Lim photo)

Mike St. Peter completed a forced-pass through Brian Robinson & Beckman at Ste. Devote, vaulting St. Peter into 7th (after St. Peter started 9th).

Cook continued to lead during the 1st lap, and Sturgeon mostly stayed in 2nd. Jim Robinson briefly challenged Sturgeon for 2nd at Mirabeau Haute, but then Sturgeon ducked to the inside at the Hairpin and re-took the position, only to have Robinson re-take 2nd at Mirabeau Bas after the Hairpin. Then Sturgeon got back into 2nd going through the Nouvelle Chicane. Richard White made a -3 chance roll at Portier, having also spent a wear at Portier and 2 wear on the previous corner (Mirabeau Bas).

Cook leads into Tabac on the 1st lap

Cook leads by 5 spaces at Tabac on the 1st lap. The other cars in order: Sturgeon; J. Robinson; Kaluzny; White; Worrel; St. Peter; Lim; Landis; Beckman; Parr; and B. Robinson.

After passing through La Rascasse, Cook was the first car to pull into the pits. Although his car had started on hard tires, Cook had burned through all of his wear and so stopped for fresh tires. A move later, Sturgeon joined Cook in the pits. Lim attempted a forced pass of Worrel at La Rascasse, but failed and spun short of the corner. Lim was able to recover nicely, though, as with his 60 mph start speed and acceleration, he continued on at 60 mph through Rascasse, and pulled even with Richard White on the far side of that corner.

Cook and Sturgeon in the pits; Lim spins at La Rascasse

Cook and Sturgeon in the pits; Lim spins at La Rascasse.

Just as Cook was leaving the pits and re-entering the track, Jim Robinson and Kaluzny pulled into the pits. By the time Sturgeon got back on the track, Cook had a 7-space lead.

Frantic action in the pits as Cook leads Sturgeon by 7 spaces

Frantic action in the pits as Cook leads Sturgeon by 7 spaces. In the pits are B. Robinson, Worrel, Lim, White, Beckman, and St. Peter. Jim Robinson and Kaluzny have just been placed back on the track, just to the outside of Parr, who did not pit. Just in front of those three cars is the Benetton of Landis, who also did not pit.

The official order at the end of the 1st lap: Cook (0); Sturgeon (+1); Landis (+8); Kaluzny (+2); Parr (+7); J. Robinson (-4); Worrel (0); Lim (+2); Beckman (-4); St. Peter (-1); White (-7); and B. Robinson (-4). The numbers in parentheses indicate how many places a driver either gained (+) or lost (-) from their starting position.

Mike Cook indicates "thumbs up"

Mike Cook indicates “thumbs up” to show he has his next move plotted. It could also mean that everything is going great as he still leads by 6 spaces through Mirabeau Haute.

During the 2nd lap, Cook cruised with a huge lead. As Cook went into the Nouvelle Chicane for the 2nd time, his lead over Sturgeon was 9 spaces. Sturgeon then led by 6 spaces over Jim Robinson. The rest of the pack were all fighting tooth and nail (or would that be wing and wheel-rim?) through every corner.

Cook leads by a huge margin into the Nouvelle Chicane

Cook leads by a huge margin into the Nouvelle Chicane.

Among the pursuing cars, J. Robinson and Kaluzny were having a fierce battle for 3rd place. Parr and Landis were right behind, battling for 5th place. Beckman, Worrel, and White were duking it out over 8th place.

Then, when the leader Cook pulled into the pits for the 2nd time, Parr crashed his gray Motul BRM at the first of the “swimming pool” corners, now known as the “Louis Chiron” corner.

Aric Parr crashed at Louis Chiron

Aric Parr crashed at Louis Chiron, by the swimming pool. The race leader, Mike Cook, is already in the pits, and 2nd-place Sturgeon is approaching La Rascasse. The rest of the order on the track is J. Robinson, Kaluzny, Landis, Lim, Worrel, Beckman, White, B. Robinson, and St. Peter.

Cars making pit stops at the end of the 2nd lap were Cook, Sturgeon, J. Robinson, Kaluzny, Lim, Landis, Worrel, and Beckman. All of those drivers were making their 2nd pit stop of the race except for Landis, who was making his 1st stop. All of the pitting drivers came returned to the track shod with soft tires. Not stopping were White, B. Robinson, and St. Peter. The non-pitting trio were all on hard tires, and so each regained two wear chits.

The official order after two laps: Cook (0); Sturgeon (+1); White (+1); J. Robinson (-2); B. Robinson (+3); Kaluzny (0); Lim (+3); Landis (+3); St. Peter (0); Worrel (-3); and Beckman (-6). Parr (0) did not complete the lap, and was classified 12th with a DNF.

At last, the final lap! Cook was just about coasting to an easy win, and Sturgeon was a fairly safe 2nd place. Through Ste. Devote and up the hill to the Massenet corner, White and J. Robinson were dueling for 3rd place. Brian Robinson, Kaluzny, Lim, and Landis were in a tight knot of cars fighting for 5th place. St. Peter and Worrel were battling for 9th place, and Beckman had fallen to last, 5 spaces behind the nearest cars. But, by the Mirabeau Haute corner, Worrel, St. Peter, and Beckman had all closed the gap to the four cars in front of them.

Going up the hill to Massenet, and cars are all strung out

Going up the hill to Massenet, and cars are all strung out. Cook’s yellow car leads at the far right of the picture, and Beckman’s car is at the back of the pack at the far left.

The pack has closed up

The pack has closed up. Sturgeon, in 2nd, is at the right, followed by J. Robinson and White. Then 5th through 11th places (Kaluzny, Lim, B. Robinson, Worrel, Landis, Beckman, and St. Peter) are all bunched up in front of the Hairpin.

Then as the pack slithered through the Hairpin, Mirabeau Bas, and Portier, Kaluzny got just a little in front of his competitors. This was turning into the most exciting part of the Monaco Grand Prix, as a number of cars were battling for a few points-paying positions. Beckman, in an attempt to slow for the Hairpin, rolled a ’10’ on an unmodified deceleration roll, and that reduced his deceleration spec to 20 mph until the end of the race. Then, coming out of Portier shortly afterwards, Beckman failed an unmodified overacceleration roll, and that reduced his car’s acceleration to only 20 mph.

The race is heating up near the Nouvelle Chicane

The race is heating up near the Nouvelle Chicane!

As expected, Mike Cook (o) won as easily as a race can be won while playing Championship Formula Racing, winning by 10 spaces over Gary Sturgeon (+1) in 2nd place. Those two finished one-two in 2017, in similar fashion. The battle, now, was for 3rd. J. Robinson had managed to get ahead of White at the Nouvelle Chicane, and Robinson was now trying to stay ahead of a hard-charging Kaluzny, as Kaluzny had finally been able to pass White in the swimming pool corners.

Cook wins easily; the battle for 3rd continues

Cook wins easily (yellow car at upper right of picture). Sturgeon (car at upper left) is approaching the checkered flag). The battle for 3rd continues as J. Robinson holds 3rd at Rascasse from Kaluzny, White, Lim, Worrel, B. Robinson, Landis, St. Peter, and Beckman.

Jim Robinson now saw his way clear for 3rd place coming out of La Rascasse, as he held a 2-space lead over Kaluzny, and only the Anthony Noghes corner remained before the finish line. Kaluzny was feeling assured of finishing no lower than 4th, as Richard White had just crashed in La Rascasse, and Greg Lim was stuck in that corner with the rest of the pack behind.

Richard White crashes at La Rascasse

Richard White crashes at La Rascasse while Jim Robinson and Garry Kaluzny head towards 3rd and 4th place.

As it was, Garry Kaluzny managed to pull alongside Jim Robinson as they crossed the finish line, but Robinson (-1) managed to hang on to 3rd place over Kaluzny (+2). It was a sort of reverse of the finish at Monza, where Kaluzny had just stayed ahead of Robinson, except that at Monza the duo were battling for 1st place. Greg Lim (+5) then took an uncontested 5th place. And then finally Bill Worrel (+1) was able to hold off Brian Robinson for 6th place and the final point. Brian Robinson (+1) finished 7th. Eighth through 10th places went to: 8th-Jim Landis (+3); 9th-Mike St. Peter (0); 10th-Jack Beckman (-5). Beckman nursed his car home about 10 spaces behind the 9th place car of St. Peter, but Beckman was determined to bring his car home at Monaco in 2018 after crashing his car on the final corner of the same track in 2017. Classified 11th was Richard White (-7) with a DNF due to a crash, and Aric Parr was classified 12th, for the same reason.

Points awarded at the Monaco Grand Prix: Cook 10; Sturgeon 6; Jim Robinson 4; Kaluzny 3; Lim 2; and Worrel 1.

The points standings of the 2018 CFR-Detroit season after four of eight races:

Place Driver (Car)                    Points
  1   Richard White (Brabham)           23
  2   Mike Cook (Camel Lotus)           17
  3   Jim Robinson (Williams)           16
  4   Garry Kaluzny (Marlboro McLaren)  13
  5T  Gary Sturgeon (McLaren)           10
  5T  Bill Worrel (Tyrrell)             10
  7T  Jack Beckman (Ferrari)             4
  7T  Brian Robinson (Walker Racing)     4
  9T  Aric Parr (Motul BRM)              2
  9T  Joel Lauder (HSBC Jaguar)          2
  9T  Greg Lim (GoDaddy)                 2
 12   Mike St. Peter (Mercedes)          1
 13T  Jim Landis (Benetton)              0
 13T  Mark Moellering (McLaren)          0
 13T  Gary Kempen (Williams)             0
 13T  Chuck Modzinski (Arrows)           0
 13T  Jim Lauder (Shadow)                0

The next race of the 2018 CFR-Detroit racing campaign is the Detroit Grand Prix, raced on the Belle Isle track this year. It will be at RIW Hobbies & Games in Livonia, Michigan, on September 15.